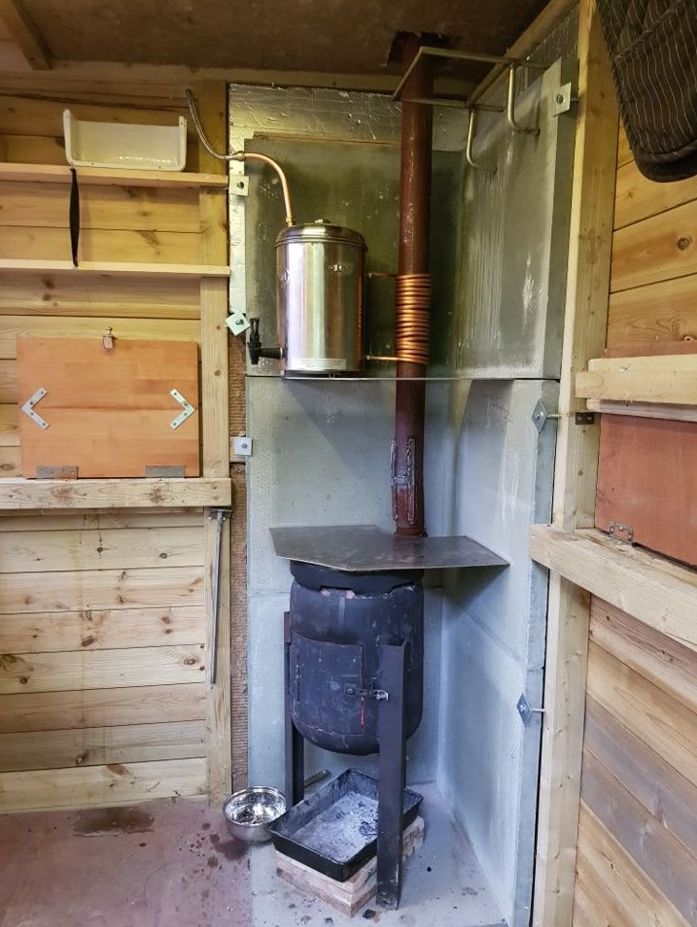
There’s something incredibly comforting about the warmth of a wood stove on a cold day. But what if that single heat source could do more than just heat your space? The ingenious setup in this photo is a multi-purpose marvel, combining a wood stove with a hot plate and a self-circulating water heater. It’s the perfect solution for a cabin, tiny home, or workshop, offering a level of off-grid self-sufficiency that’s both practical and impressive.
This system is a masterclass in efficiency, using one fire to accomplish three tasks: heating the room, warming food on the hot plate, and providing a continuous supply of hot water. The most brilliant part is the self-circulating water heater, which works on a principle called thermosiphon. As water in the copper coil heats up, it naturally becomes less dense and rises into the elevated storage tank. Cooler, denser water from the bottom of the tank then flows down to take its place, creating a natural, pumpless circulation.
How to Build Your Own Off-Grid System
Ready to create your own all-in-one wood stove? This project requires careful planning and a solid understanding of safety.
⚠️ WARNING: THIS PROJECT INVOLVES SERIOUS RISKS INCLUDING CARBON MONOXIDE POISONING, FIRE, AND SCALDING. THE LACK OF A PRESSURE RELIEF VALVE CAN LEAD TO EXPLOSION. THIS GUIDE IS FOR INFORMATIONAL PURPOSES ONLY AND SHOULD ONLY BE ATTEMPTED BY THOSE WITH PROFESSIONAL EXPERIENCE. ⚠️
What You’ll Need:
- Wood Stove: A small, compact stove as your heat source.
- Stovepipe: The vertical pipe for venting the smoke.
- Copper Tubing: Flexible copper tubing for the heat exchanger coil.
- Water Tank: A durable, stainless steel tank with a secure lid for water storage.
- Fittings and Pipes: To connect the tank and the coil.
- Hot Plate/Shelf: A solid metal plate for a warming surface.
- A Spigot: For drawing hot water.
- Safety Equipment: Carbon monoxide detector, fire extinguisher.
Step-by-Step Instructions:
- Install the Stove Safely: Place your wood stove on a non-flammable surface, such as a concrete pad or fire-resistant hearth. Ensure there are proper clearances from walls and ceilings to prevent fire. The stovepipe must be installed according to fire codes and vented outdoors.
- Create the Heat Exchanger: Wrap the copper tubing tightly around a section of your stovepipe. Ensure the coils are closely spaced to maximize contact with the hot pipe. This coil will be your primary heat exchanger.
- Mount the Tank and Plumbing: Mount your water tank on a secure shelf so that the bottom of the tank is positioned higher than the top of the copper coil. Connect a copper tube from the bottom of the tank to the bottom of the coil. Then, connect a second tube from the top of the coil to a port near the top of the tank. This setup enables the thermosiphon effect to circulate the water. Add a spigot to the bottom of the tank to draw out hot water.
- Add the Hot Plate: Secure a sturdy metal plate on top of the stove to serve as a warming shelf for food or to boil a kettle.
- Test and Monitor: After all connections are made and checked for leaks, fill the tank with water and start a small fire. Monitor the system closely to ensure it works correctly and that the water temperature does not rise to a dangerous level.
This project is a testament to the power of low-tech solutions. It’s an efficient, reliable, and deeply satisfying system that provides warmth and hot water without a single kilowatt of electricity.