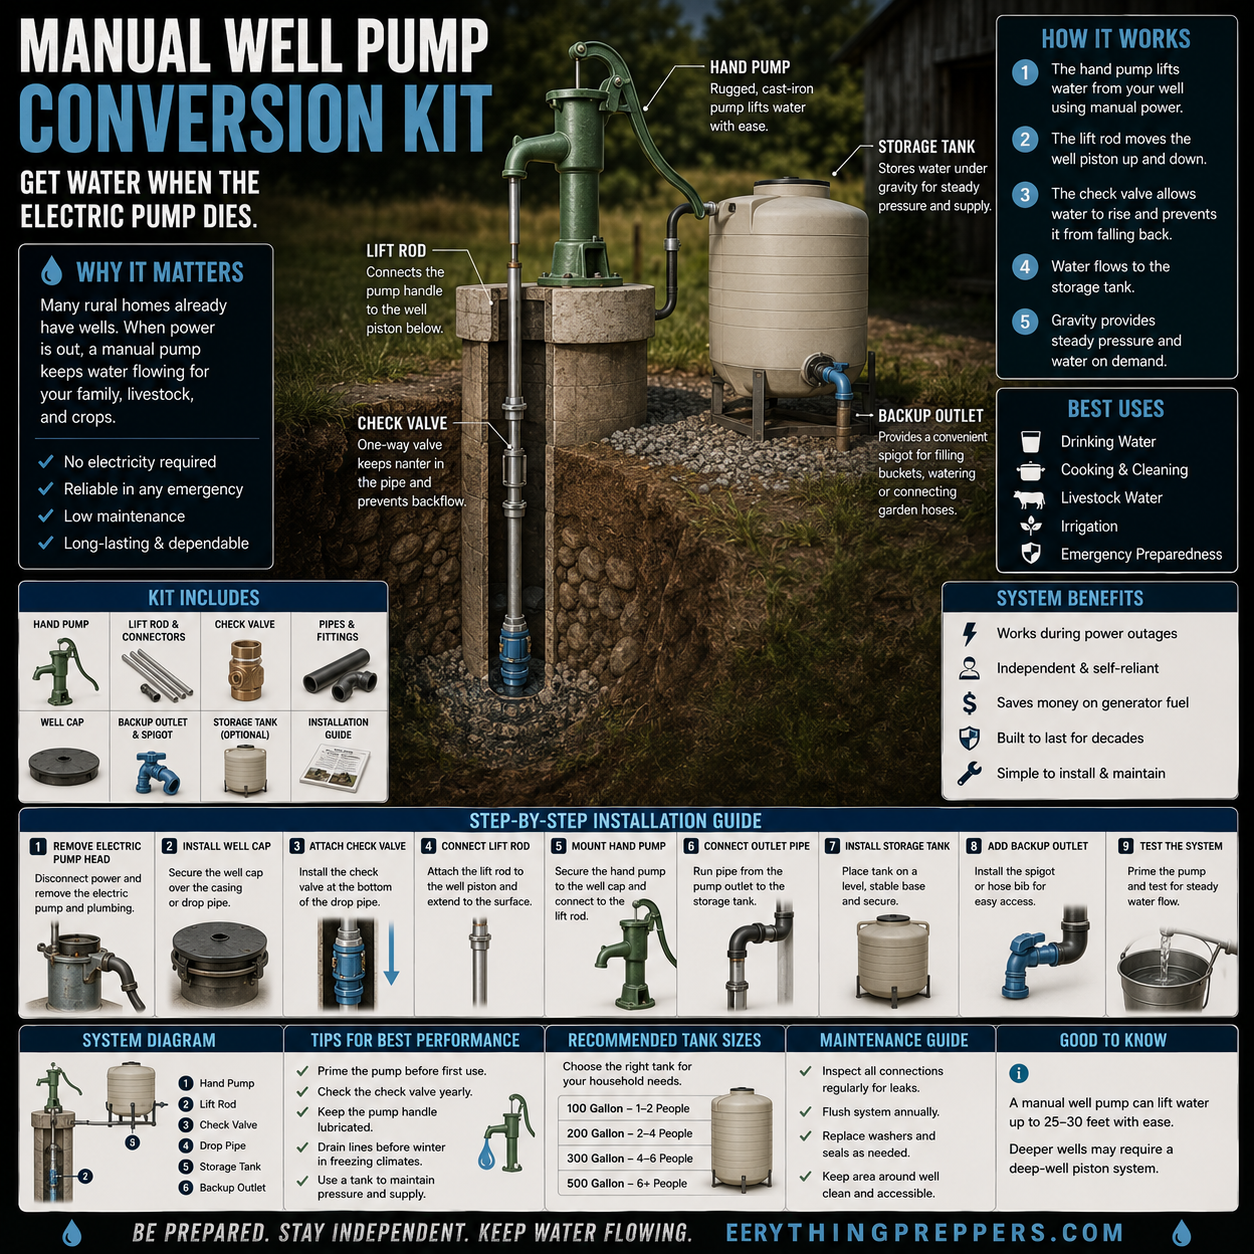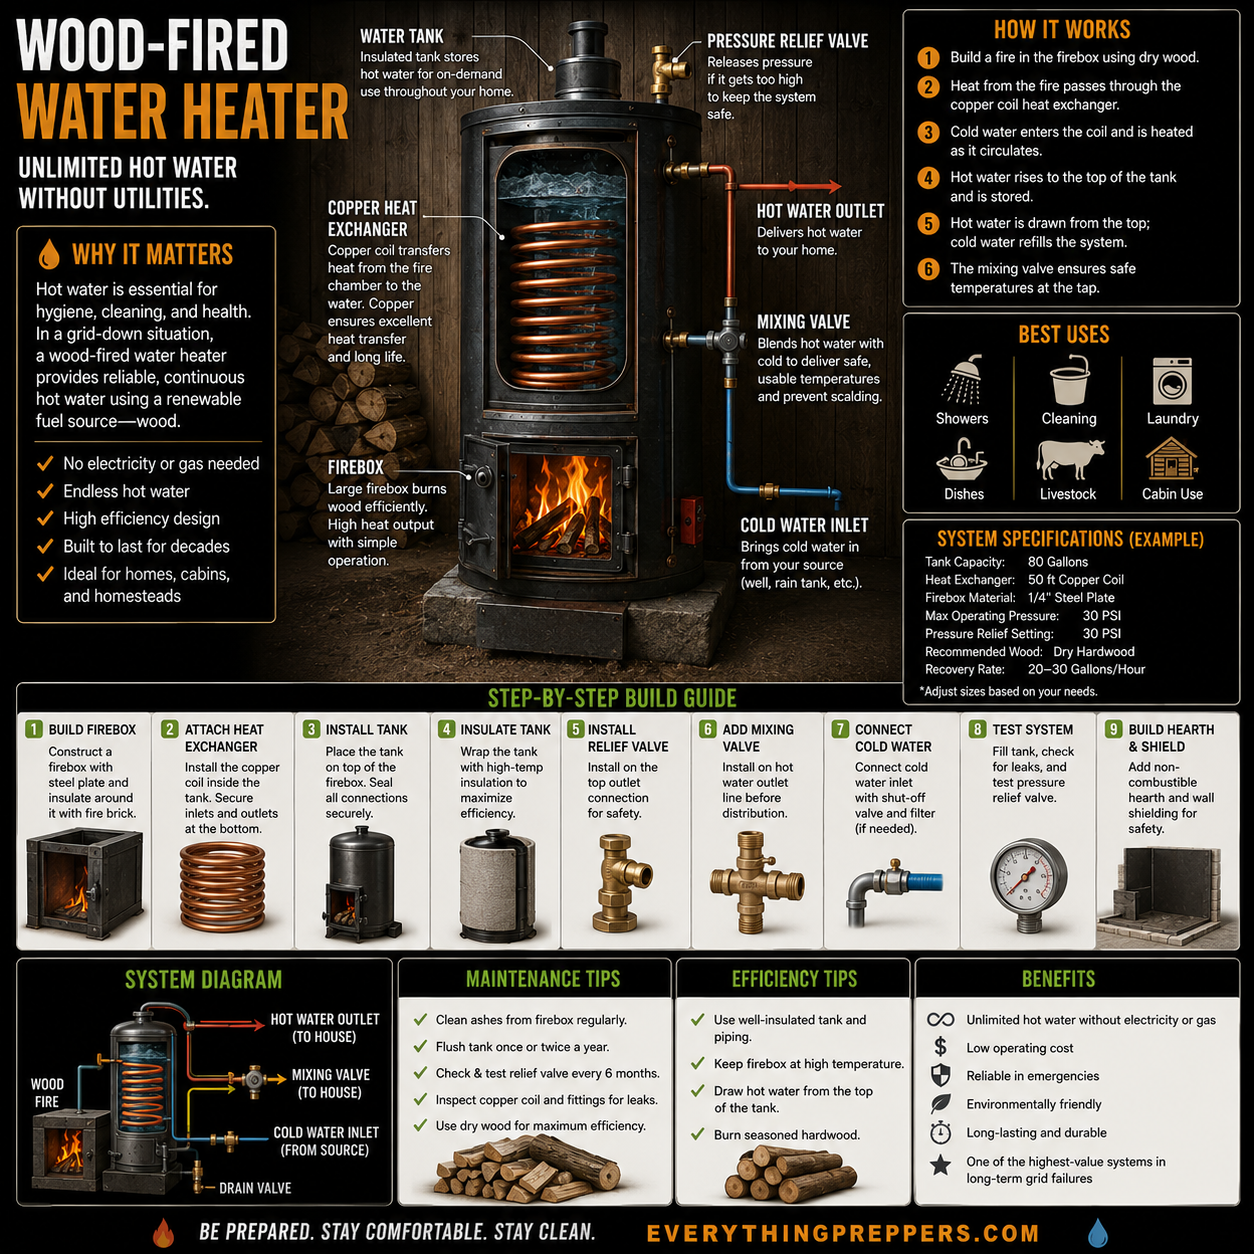
In the world of bikepacking and ultralight camping, every ounce matters. Gear lists are meticulously curated, and the search for the perfect, feather-light equipment is a constant pursuit. While many enthusiasts turn to high-tech, expensive solutions, there’s a growing movement of do-it-yourselfers who are proving that the most efficient gear can be made from the simplest materials.
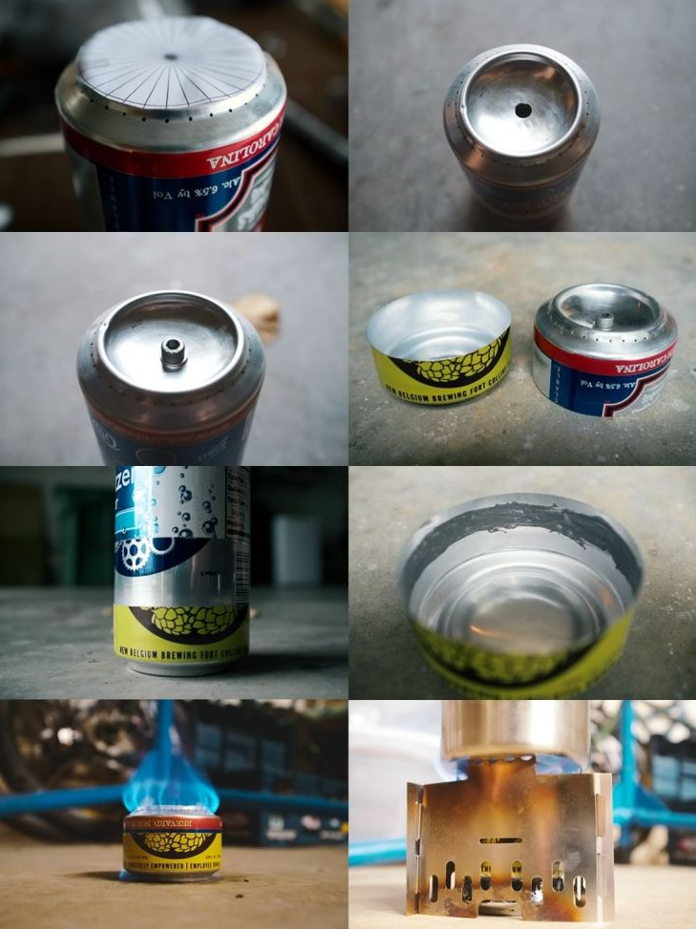
Introducing the “Hop-Can” stove: a DIY alcohol stove made from a humble aluminum beer can. It’s a project that combines ingenuity, sustainability, and a love for the open road. These stoves are not only incredibly lightweight and effective but also offer a satisfying sense of accomplishment.
The beauty of the “Hop-Can” stove lies in its simplicity. With a few basic tools and a bit of patience, you can transform a discarded aluminum can into a powerful little burner. The design allows for a clean, efficient burn, making it perfect for boiling water for coffee, rehydrating a meal, or a quick hot lunch on the trail.
What’s even better is the variety of designs you can create. The images in our gallery showcase a range of “Hop-Can” stoves, from a simple, single-chamber design to more complex models with multiple jets. Each variation offers a different burn time and efficiency, allowing you to customize your stove to your specific needs. The different can sizes and shapes also lend themselves to unique creations, turning a mass-produced item into a one-of-a-kind piece of gear.
DIY: Crafting Your Own Ultralight ‘Hop-Can’ Stove
Ready to get started? Here’s a basic guide to making a simple, yet effective, two-piece ‘Hop-Can’ stove. Remember to always exercise caution when working with sharp edges and fire.
What You’ll Need:
- Two empty aluminum beverage cans (standard 12 oz or similar works well). Ensure they are clean and dry.
- Sharp utility knife or strong scissors
- Ruler and a marker
- Sandpaper or a file (to smooth sharp edges)
- Pushpin, thumbtack, or small drill bit (for making jet holes)
- Denatured alcohol (for fuel – DO NOT use gasoline or other flammable liquids!)
- A pot stand (this can also be DIY from a tin can or wire)
Step-by-Step Instructions:
- Prepare the Cans:
- Carefully cut the top section off of both cans. Aim for a clean, even cut just below the rim. You’ll want to remove enough so that the straight sides of the can are accessible.
- From the bottom of one can (this will be your bottom piece), measure up about 1 inch (2.5 cm) and draw a straight line around the circumference. Cut along this line. Smooth any sharp edges with sandpaper.
- From the bottom of the second can (this will be your top piece), measure up about 1.25 to 1.5 inches (3.2 to 3.8 cm) and draw a straight line. Cut along this line. This piece should be slightly taller than the first. Smooth edges.
- Create the Inner Wall (Optional but Recommended for Stability):
- Take the remaining middle section of one of your cans. Cut a strip that is about 1 inch (2.5 cm) wide and long enough to fit snugly inside the bottom piece of your stove. This will act as an inner support.
- Carefully bend this strip into a circle and insert it into the bottom piece, creating a small, raised inner platform. This helps create the fuel chamber and provides structural integrity.
- Make the Jet Holes:
- On the side wall of your taller (top) can piece, use your pushpin or small drill bit to create 8-12 small holes evenly spaced around the top edge, just below the cut. These are your “jet” holes where the fuel vapor will escape and burn.
- (Optional: You can also create 3-4 slightly larger “primer” holes around the center of the bottom piece’s inner platform for easier ignition).
- Assemble the Stove:
- Carefully slide the smaller (bottom) piece into the taller (top) piece. This can be tricky. You might need to gently “roll” or twist them together, applying even pressure. The goal is to create a snug, airtight fit.
- The top edge of the shorter piece should meet the inner wall of the taller piece, forming a sealed chamber for the fuel.
- Test and Use:
- Place your assembled stove on a heat-resistant surface.
- Pour a small amount (around 1-2 oz) of denatured alcohol into the central chamber.
- Carefully light the alcohol. Initially, the flames will burn from the central pool. As the stove heats up, the alcohol will vaporize and ignite from the small jet holes you created, creating a more efficient ring of flames.
- Place your pot stand over the stove, then your pot. Always use in a well-ventilated area and keep flammable materials away.
Beyond their practical use, these stoves are a nod to the bikepacking ethos of self-reliance and resourcefulness. They are a tangible reminder that you don’t need the latest and greatest to have a successful adventure. They encourage you to get your hands dirty, to build something with your own two hands, and to find a new purpose for an old object.
So, the next time you finish a refreshing hop-forward beverage, don’t just toss the can. Set it aside for your next project. With a little effort, you’ll have an ultralight, highly efficient stove that’s ready for your next bikepacking trip. It’s a small change that makes a big difference, not just for your pack weight, but for your wallet and the planet, too. Happy crafting, and happy trails!