DIY Cargo Trailer for Your Bicycle
A bicycle cargo trailer is a fantastic way to haul groceries, camping gear, or other heavy items without a car. The images show a versatile and sturdy cargo trailer with some great features. Building your own can be a rewarding project, and you can customize it to fit your specific needs.
Understanding the Design
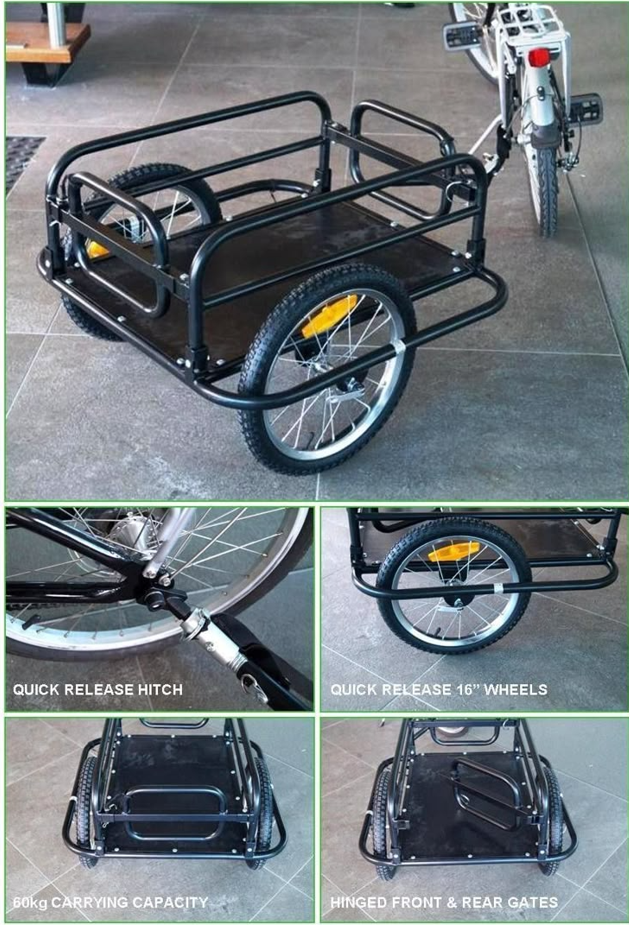
The trailer in the photos is a two-wheel design, which is stable and can handle a heavier load than single-wheel trailers. Key features include:
- Quick-release hitch: This makes it easy to attach and detach the trailer from your bike’s rear axle.
- Quick-release wheels: The 16-inch wheels can be easily removed, making the trailer more compact for storage or transport.
- Hinged front & rear gates: These allow you to haul longer items and keep your cargo secure.
- Sturdy frame: The black metal frame and solid base provide a 60kg (about 132 lbs) carrying capacity.
How to Build Your Own DIY Bicycle Cargo Trailer
Building a trailer like this requires some basic welding and fabrication skills. Here’s a general guide on how you could approach the project, inspired by the design shown in the photos.
Materials and Tools
- Steel Tubing: Square or round steel tubing for the frame. You’ll need a welder to join the pieces.
- Wheels: Two 16-inch bicycle wheels. Look for quick-release hubs to mimic the design.
- Axle: A solid steel rod for the axle.
- Hitch: A quick-release hitch for the bike’s rear axle. You can buy these or fabricate your own.
- Wood or Metal Sheet: A piece of plywood or a metal sheet for the base of the trailer.
- Hinges: Small, durable hinges for the front and rear gates.
- Tools: Welder, metal cutting saw, drill, measuring tape, clamps.
Step-by-Step Guide
- Plan the Frame: Start by sketching out your design. Decide on the dimensions of your trailer based on what you plan to carry. The photos show a good size for general use. The key is to create a rigid rectangle for the main base.
- Cut and Weld the Frame: Cut the steel tubing to your desired lengths. Weld the pieces together to form the main rectangular frame. Add crossbars for extra support.
- Create the Axle Mounts: Weld small sections of tubing or brackets to the underside of the main frame. These will hold the axle in place. Make sure the mounts are strong and the axle can spin freely.
- Install the Axle and Wheels: Slide the axle through the mounts and attach the 16-inch wheels. If you’re using quick-release wheels, you’ll need to create a secure, compatible mount on your frame.
- Build the Hitch: The hitch is a critical component. You can buy a universal quick-release hitch designed for bicycle trailers. Weld the trailer side of the hitch to the front of your trailer frame.
- Add the Base: Cut a piece of plywood or a metal sheet to fit the bottom of your trailer frame. Secure it with bolts or welds. This will be the floor for your cargo.
- Fabricate the Gates: Cut and weld smaller pieces of steel tubing to create the front and rear gates. Attach them to the frame using hinges, so they can pivot up and down.
- Finish the Trailer: Once the welding is complete, clean the metal and apply a coat of rust-proof primer and paint. Black is a classic choice and looks great. Add reflectors to the wheels and front/rear for safety.
Building a custom trailer can be a fun and practical project. While the photos show a professionally-made product, a DIY version can be just as functional and a source of pride every time you use it.