Your everyday knife is a great tool, but for survival, it needs to be more. The image you’ve seen shows the ultimate example of a Mora Companion HD knife modified into a complete survival system. This isn’t just a knife; it’s a lightweight, rugged, and ready-to-go kit that fits in your hand.
The beauty of this setup is that it takes a reliable, affordable knife and adds essential survival items right where you need them most. It proves that with a little ingenuity, you can turn a basic tool into a true lifesaver.
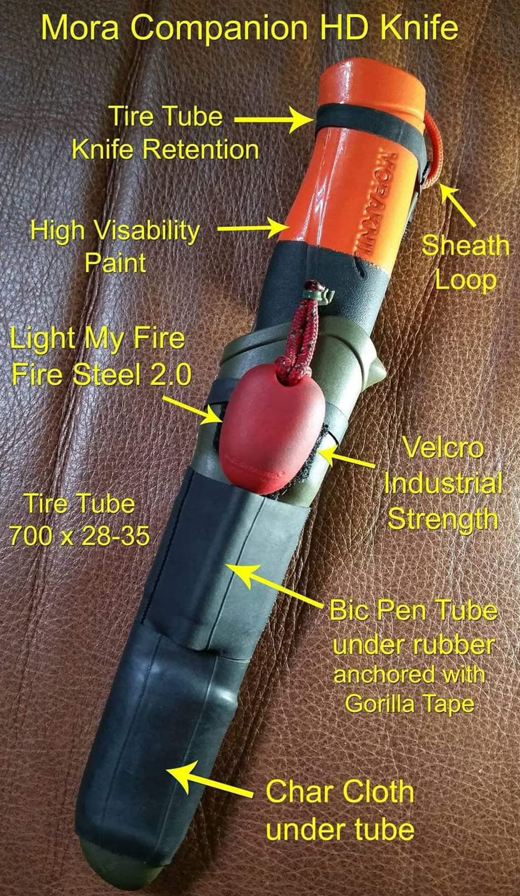
Anatomy of a Survival Knife System
Before you start, let’s break down the different parts of this amazing survival hack. The core of the system is a Mora Companion HD knife, known for its durable high-carbon steel blade. The owner then added several key components to the sheath, turning it into a compact survival kit.
- Tire Tube: Used as a durable, all-weather way to hold gear in place. A bicycle tire tube is a perfect, grippy material.
- High-Visibility Paint: The top of the sheath is painted bright orange, making it easy to find if you drop it in the woods.
- Fire Steel: A “Light My Fire Fire Steel 2.0” is attached to the sheath for a reliable fire-starting method.
- Char Cloth and Bic Pen Tube: This is a clever one. A small, waterproof container (a pen tube) holds char cloth, which is a key part of starting a fire with a fire steel.
- Industrial Strength Velcro: Used to secure the sheath to a belt or pack.
How to Make Your Own Survival Knife System
This project is highly customizable and can be adapted to any fixed-blade knife with a sheath.
Step 1: Prep the Knife and Sheath 🛠️
First, get a knife you can trust. The Mora Companion HD is a great choice because it’s tough and inexpensive. Clean the sheath and knife thoroughly to remove any dirt or oil. If you want to add high-visibility paint, now is the time to do it. A coat of bright orange spray paint on the top of the handle or sheath can make a huge difference in a search and rescue situation.
Step 2: Add Your Fire Starter 🔥
The most important part of any survival kit is the ability to make fire. You have a few options:
- Attach a Ferro Rod: Use a small piece of cordage or strong rubber to lash a ferro rod or fire steel to the sheath. Place it in a spot that is easy to reach but won’t get in the way.
- Prepare Your Tinder: The clever trick with the Bic pen tube is a great idea. You can cut a pen tube to size, remove the ink, and use it as a waterproof container for your char cloth. To make char cloth, you can simply put small pieces of cotton in a closed metal tin and heat it in a fire. Once it’s black, it will catch a spark easily. You can also use dryer lint or cotton balls with petroleum jelly.
Step 3: Secure Everything ⚙️
This is where the tire tube comes in. Cut a tire tube from an old bicycle tire into a long sleeve. Slide it over the sheath. This will provide a secure, non-slip way to hold your gear. You can slide your pen tube and other items under the tire tube, and the natural grip of the rubber will hold them in place. This method is incredibly reliable, waterproof, and doesn’t require any drilling or special tools.
This simple but effective upgrade turns a knife into a complete survival kit. It’s a reminder that prepping isn’t about expensive gadgets; it’s about being resourceful and making the most of the tools you have.