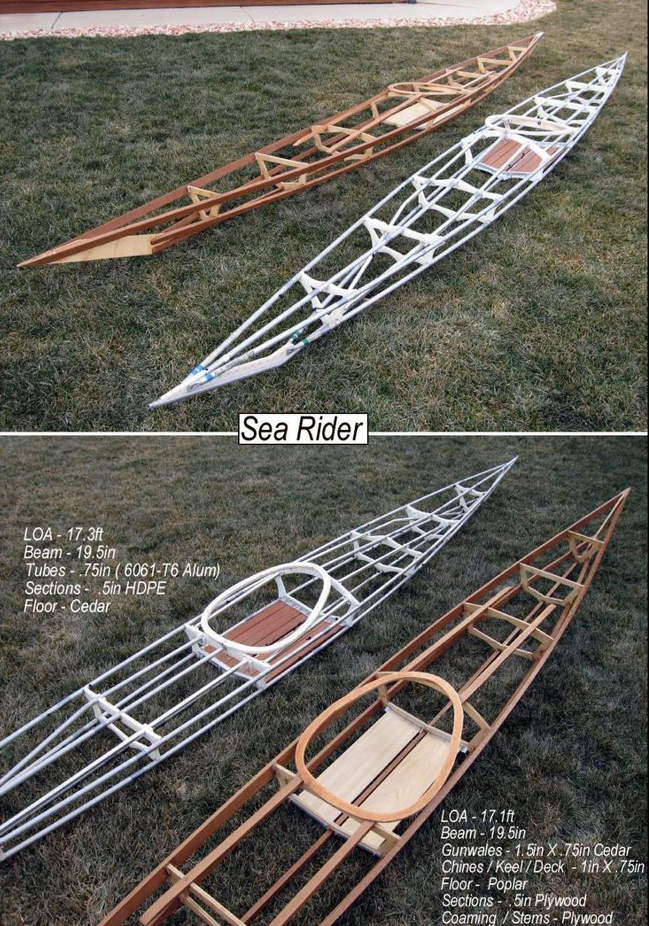
There’s something uniquely satisfying about building your own watercraft, and a skin-on-frame kayak is a fantastic project for a passionate DIYer. The image you’ve seen showcases two stunning examples, based on traditional designs. This style of kayak is known for being lightweight, incredibly strong, and a joy to paddle.
The two kayaks in the image are similar designs but are built with different materials. The top kayak is a “Sea Rider” made from aluminum tubes and plastic sections, which is a modern take on the traditional skin-on-frame concept. The bottom two kayaks are more traditional, made from wood, specifically cedar and poplar, and plywood for the floor and coaming.
What is a Skin-on-Frame Kayak?
A skin-on-frame kayak is exactly what it sounds like: a framework of lightweight materials covered by a durable, waterproof “skin.” Historically, the frame was made from driftwood or bone and covered with animal hide. Today, builders use materials like wood, aluminum, or PVC pipe for the frame, and a waterproof fabric like ballistic nylon or Hypalon for the skin.
How to Build a Wood-Framed Kayak
Building a traditional wood-framed kayak is a rewarding project that combines woodworking skills with a bit of patience. Here’s a general overview of the process.
Step 1: Gather Your Plans and Materials 🛠️
You’ll need a set of detailed plans. Many resources are available online and in books, with designers like Chris Cunningham and George Dyson offering modern interpretations of traditional designs. The plans will specify the dimensions and type of wood you need, such as cedar for the longitudinal stringers and poplar for the cross-sectional ribs. You’ll also need plywood for the deck, cockpit coaming, and floorboards.
Step 2: Assemble the Frame 🪵
The first step is to create the longitudinal pieces: the keel, chines (the corners where the sides meet the bottom), and gunwales (the top rails). These give the kayak its length. Next, you’ll create and install the cross-sectional ribs, also known as the ribs. These are bent into shape by steaming or soaking the wood and then clamping it into a form. Once the wood is dry and holds its shape, you’ll lash them to the longitudinal stringers using strong cord or artificial sinew. No nails or screws are used in this traditional method, as lashing allows the frame to flex and absorb shock.
Step 3: Fabricate the Coaming and Deck ⚙️
The coaming is the rim around the cockpit that keeps water out and provides a place to attach a spray skirt. This is typically made from bent plywood. The deck is often a simple piece of plywood cut to fit inside the coaming.
Step 4: The Skinning Process 🧵
This is where the kayak truly comes to life. A single piece of ballistic nylon or other suitable fabric is stretched tightly over the frame. The fabric is cut with a few inches of extra material all around. It’s then sewn together along the top centerline. The goal is to get the fabric as tight as possible over the frame to create a smooth, taut surface with no wrinkles.
Step 5: Waterproofing the Skin 💧
Once the skin is on and the seams are sewn, the final step is to waterproof the fabric. The most common method is to apply a polyurethane coating. The fabric will absorb the polyurethane and become completely waterproof.
Once the coating is dry, your kayak is ready for the water. Building your own kayak is a journey that teaches you about design, engineering, and craftsmanship. The result is a personal vessel that connects you to the water in a way a store-bought boat never could.