Ready to tackle a fun and eco-friendly project? This guide will show you how to build a powerful 1.72kWh backup battery system using repurposed laptop batteries and a military surplus box. Not only will you save money and help the environment, but you’ll also end up with a durable and portable power solution perfect for emergencies, camping trips, or off-grid adventures.
Step 1: Gather Your Gear
You won’t need a ton of fancy tools, but a few key components are a must. The heart of this project is the 18650 lithium-ion batteries you’ll salvage from old laptops. You can find these at electronics recycling centers or in discarded computers. You will also need:
- 4×5 and 3×5 cell holders to organize the batteries.
- An ammo can to house your battery system.
- A 40 Amp BMS (Battery Management System) to safely manage charging and discharging.
- A spot welder to connect the batteries with nickel strips.
- Fused nickel strips, heat shrink, and Kapton tape for insulation and protection.
Step 2: Plan Your Battery Layout
The key to a successful build is figuring out your cell configuration. In this project, we’ll use a total of 182 batteries to create a 24V system. We’ll arrange them in two packs of 91 cells, connecting them with 7×13 cell holders.
To get the desired voltage, we’ll create a 7S configuration, which means we’ll connect seven groups of cells in a series. Since a single 18650 cell has a nominal voltage of 3.7V, a 7S configuration will give us a nominal voltage of 25V.
Step 3: Start Connecting the Cells
For this project, we’re using Samsung ICR18650-28A cells, each with a capacity of 2800mAh. Before you start, rewrap each cell with heat shrink and add an insulator disk to the positive side for extra safety.
To build the pack, we’ll connect the cells in a 7S2P configuration, which will give us a total capacity of 72.8 amp-hours (26 cells x 2.8mAh). This is done by connecting the first 26 cells in parallel, followed by the next 26 cells with opposite polarity in a series connection.
Step 4: Complete the Series Connections
We’ll use a four-wide fused nickel strip and a spot welder to connect the cells safely. Each cell is individually fused, so if a cell fails, it won’t affect the rest of the pack. The nickel strip connects the cells in the 7S2P configuration, giving us a maximum capacity of 72.8 amp-hours and a nominal voltage of 25V.
To finish the connections, we’ll use standard 0.15mm nickel strips to link the positive ends of the pack. We’ll carefully bend these strips to connect to a separate copper busbar that will lead to the positive terminal of the BMS.
Step 5: Connect Both Battery Packs
With the individual packs built, we’ll stack them and connect them in a series using a fused nickel strip. This doubles the capacity and ensures a total voltage of 25V. We’ll use Kapton tape to insulate the connection and keep the packs secure.
Next, we’ll insert a thin ABS plastic sheet between the two packs for added pressure distribution and support. Then, we’ll wrap the entire pack tightly with Kapton tape to hold everything in place and prevent any movement or short circuits.
Step 6: Attach the Main Wires
To connect the battery bank to an external system, we’ll attach THHN copper wire to the positive and negative ends of the battery pack. We’ll then use an XT90 connector to link the terminal wires, which is a great choice for high-power applications because it can handle high current.
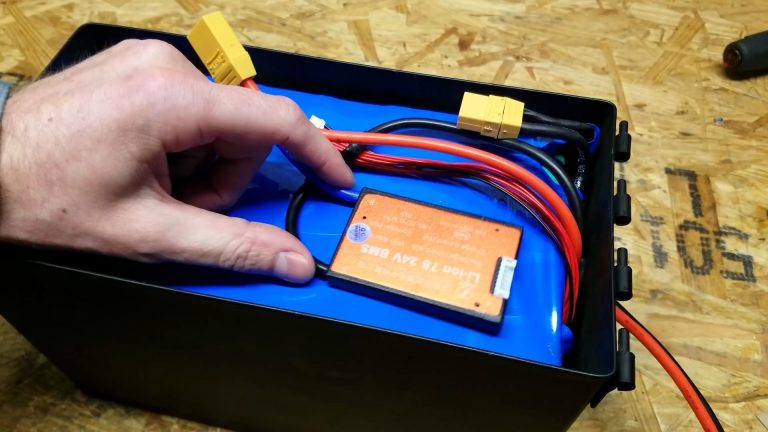
Step 7: Connect the BMS
The BMS is the brain of your battery system, protecting each cell from overcharging or becoming unbalanced. We’re using a 7S 24V BMS with a charge current of 20A and a discharge current of 40A.
The BMS has 8 balancing wires that need to be connected to each series of cell groups. The black wire connects to the most negative terminal, while the red wires connect sequentially to each series group, with the last red wire connecting to the main positive terminal. Once everything is wired, wrap the entire pack in heat shrink for an extra layer of protection.
Step 8: Insulate the Ammo Box
Before you install the battery, you need to prepare the ammo box. Drill a hole in the back to run the cables through, then place a small piece of ABS plastic at the bottom to insulate and support the battery pack.
Step 9: Install the Battery and Finish Up
Carefully place the battery pack inside the ammo box and set the BMS on top. Connect the XT90 connector and balancing wires from the battery to the BMS. Add two more pieces of ABS plastic to the sides of the box to prevent the pack from shifting.
Put the lid back on the ammo box, and you’re done! You’ve successfully built a powerful, portable, and eco-friendly backup battery system.