In a long-term survival scenario, reliable light sources quickly become more valuable than gold. Beyond the obvious need to see, light provides comfort, security, and the ability to continue vital tasks after sundown. While candles and flashlights are great, what happens when their supplies run out? This homemade lightbulb isn’t about mass production; it’s about understanding the principles of electricity and incandescence, allowing you to innovate when standard solutions are gone.
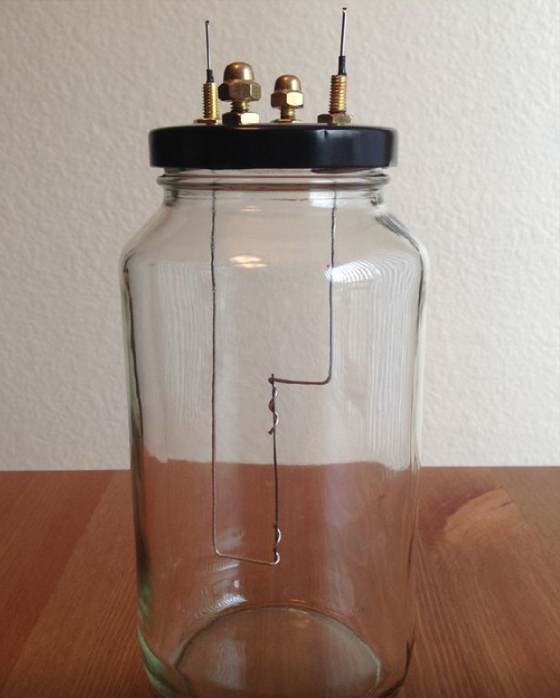
The image shows a simple, yet profoundly important, invention: a basic light source created from common materials. It demonstrates how a thin conductor, made to resist electrical flow, can generate light and heat when connected to a power source. Crucially, it also highlights the challenge of oxygen—the very air we breathe will destroy a glowing filament in seconds.
The Survivalist’s Lightbulb: Understanding the Essentials
This project teaches us several critical survival lessons:
- Resourcefulness: It utilizes everyday items—a jar, wires, and a power source—to solve a fundamental problem.
- Basic Physics: It reinforces the relationship between electricity, resistance, heat, and light. Understanding these allows for improvisation.
- Problem-Solving: It confronts the issue of oxidation (burning out the filament) and offers a basic solution (the sealed jar, however imperfect).
How to Improvise a Light Source in a Pinch
Critical Survival Warning: This project involves electricity. In a survival situation, any power source should be handled with extreme care. Only use low-voltage DC power sources (like a car battery, a few 9V batteries in series, or a solar-charged 12V battery). NEVER use household AC current. Short circuits can cause fires, burns, or even electrocution. If you’re unsure, do not proceed without expert guidance.
What You’ll Need (Scavenge or Prep These Items) 🛠️
- Glass Jar with Lid: A pickle jar, canning jar, or any sturdy glass container with a metal or plastic lid that seals relatively well. Clean and dry.
- Conductive Wires (Electrodes): Scavenged copper wire (from old appliances, lamp cords, or even fencing wire if thick enough), or stiff metal rods. You’ll need two pieces long enough to reach from the lid to the bottom of the jar.
- Filament Material: This is the most crucial part. You need something thin with high electrical resistance.
- Fine Steel Wool: The finer the grade, the better. A single, very thin strand is ideal.
- Graphite Pencil Lead: The “lead” in pencils is graphite. You can carefully shave the wood off a pencil to expose a length of lead. This is brittle but works.
- Very Fine Nichrome Wire: (If prepped) This is ideal for heating elements but less likely to be scavenged.
- Power Source:
- 12V Car Battery: The most likely high-amp DC source in a survival scenario.
- Multiple 9V Batteries: Wired in series to increase voltage.
- Solar-Charged Battery Pack: If available.
- Connecting Hardware: Small bolts, nuts, washers (scavenged from anything), or heavy-duty wire that can be tightly twisted.
- Tools: A drill (hand-crank if grid-down), wire cutters/strippers, a small wrench or pliers.
- Sealant (Optional but Recommended): Epoxy, silicone sealant, or even melted wax for a better air seal.
Step-by-Step Improvised Construction 💡
- Prepare the Lid:
- Carefully drill two holes through the lid, spaced a few inches apart. Ensure the holes are just large enough for your bolts or wires to pass through tightly.
- If using bolts, push them through the holes. On the underside, securely attach your long electrode wires by wrapping them tightly around the bolt shafts. Fasten with nuts on top if possible, or twist the wire tightly around itself if only using wire.
- Survival Tip: If you don’t have bolts, you can strip insulation from a thick wire, pass it through the lid, and twist it into a knot or loop on both sides to hold it securely.
- Seal the openings: Apply sealant around where the wires/bolts penetrate the lid. This is vital to reduce oxygen inside. Let it cure.
- Fashion the Filament:
- Steel Wool: Take a single, extremely fine strand of steel wool. Twist each end securely around the stripped ends of your electrode wires. The thinner the strand, the less power it needs to glow.
- Graphite Lead: Carefully expose about 1-2 inches of graphite lead. You’ll need to make good electrical contact. You can try tightly twisting thin copper wires around each end of the exposed graphite or even using conductive clay if available. Be very gentle, as graphite is brittle.
- Assemble the “Bulb”:
- Carefully lower the filament and electrode wires into the glass jar. Ensure the filament hangs freely in the center and does not touch the glass.
- Screw the lid on as tightly as possible. The goal is to minimize the amount of oxygen inside. This will not create a true vacuum, but less oxygen means the filament will last longer.
- Power Up (Cautiously!) ⚡
- Connect your power source to the external ends of the electrodes on the lid.
- Observe: The filament should glow brightly, providing light.
- Expect it to burn out: Because you can’t create a perfect vacuum at home, the filament will eventually oxidize and break. This project is about temporary light and learning, not long-term illumination without spare filaments.
This homemade lightbulb is more than just a novelty; it’s a profound demonstration of resilience and the power of fundamental knowledge. In a world plunged into darkness, the ability to understand and manipulate basic scientific principles can be the difference between fumbling in the dark and finding your way forward.