The sun does not need a fancy collector to do useful work.
A dark surface left in direct sunlight can climb well above the surrounding air temperature within minutes. Run water slowly through a coil resting on that surface, and the water leaves noticeably warmer than it went in. That is the entire operating principle behind a DIY solar water heater, and it is simple enough to build in a weekend with basic tools.
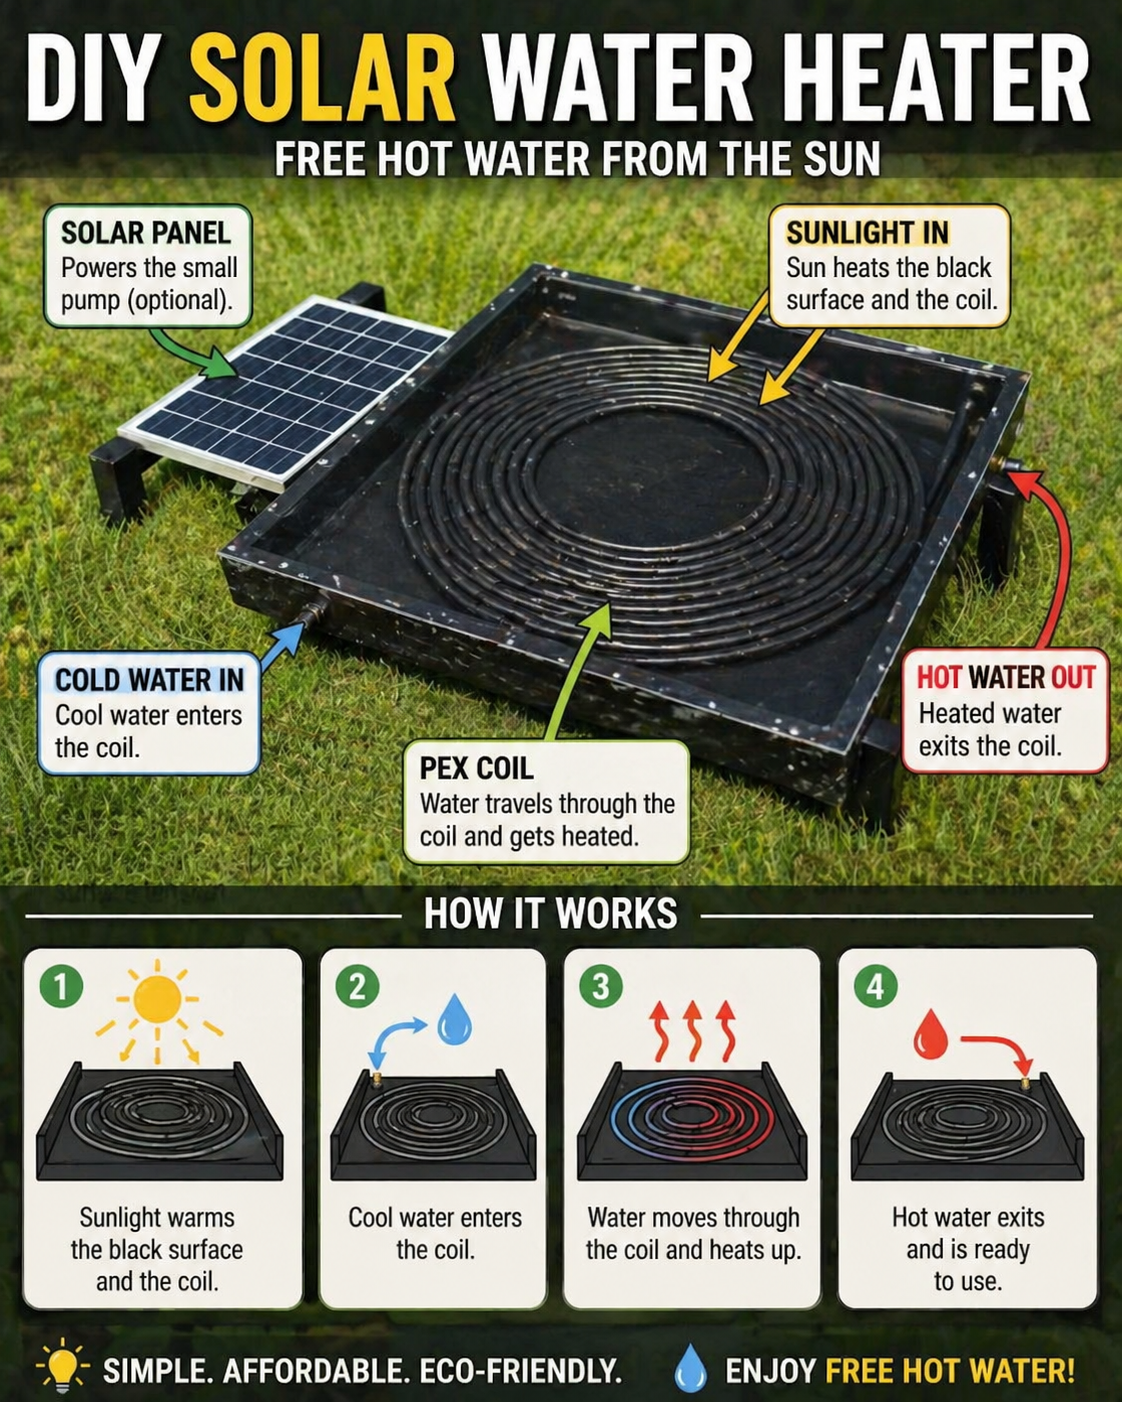
The design uses:
- A rigid, insulated frame lined with a black absorber surface
- A coiled length of PEX tubing laid across that surface
- Cold-water-in and hot-water-out fittings at opposite corners
- An optional small solar panel to power a low-voltage circulation pump
When the sun is out, water enters the coil cool, absorbs heat as it winds across the blackened panel, and exits noticeably warmer. When the sun goes down, the system simply stops working — there is nothing to unplug or shut off.
The basic principle is:
A black absorber surface + a coiled water line + sunlight = free preheated water
However, this project has real limits.
A panel like this is a preheating device, not a replacement for your water heater, and it is not designed to deliver water hot enough for bathing, dishwashing, or drinking without further heating or careful safety controls. It should never be plumbed directly into a home’s potable hot-water line without a mixing valve, backflow protection, and a real understanding of the pressures and temperatures involved.
What a DIY Solar Coil Panel Can — and Cannot — Do
A well-built panel can meaningfully warm water for uses such as:
- Filling an outdoor shower or garden hose bib with less-cold water
- Preheating water before it enters a conventional water heater
- Warming water for livestock troughs, greenhouses, or hydroponics
- Rinsing off pool or camp gear
- Supplementing a cabin or off-grid system with modest hot-water demand
- Small-scale experiments in solar thermal design
It cannot reliably replace a household water heater.
Real limitations include:
- Output temperature depends entirely on sun intensity, flow rate, and ambient temperature
- Cloudy days, winter sun angles, and nighttime provide no heat at all
- A single panel produces a small volume of warm water, not a continuous hot-water supply
- Uncontrolled systems can also get hot enough to scald, especially with stagnant water on a clear, still day
- PEX has a maximum rated temperature and pressure; exceeding either can weaken or damage the tubing over time
- Freezing weather can burst a coil left full of water
Do not use a DIY panel for:
- A primary source of potable drinking water heating without a mixing valve and pressure-relief protection
- Pressurized, direct-to-house plumbing without a licensed plumber’s review
- Any location where stagnant water could scald a child or pet
- Freezing climates without a drain-down or antifreeze plan
- Roof mounting without confirming structural capacity and safe access
Why Stagnation and Pressure Matter
A coil sitting in full sun with no water moving through it can reach surprisingly high temperatures — sometimes hot enough to scald on contact or to produce a burst of scalding water the moment flow resumes.
The risk grows with:
- Longer stagnation periods
- Darker absorber coatings
- Still, sunny, windless days
- Shorter distances between the panel and the point of use
- Sealed systems with no pressure relief
If the coil is plumbed into a closed loop, PEX tubing that overheats can also expand, soften, or degrade at the fittings faster than expected. A simple pressure-relief valve and an open, gravity-fed design (rather than a sealed pressurized loop) meaningfully lower these risks for a backyard build.
For anything beyond a simple, open, low-pressure preheating panel, consult a plumber or a manufactured solar water heating kit rated for your intended use.
Choose the Right Location
Start with a spot that gets strong, unobstructed sun for most of the day.
Good candidates may include:
- A south-facing (in the Northern Hemisphere) patch of ground or low rack
- A garage or shed roof with confirmed structural capacity
- A raised stand near a garden or outdoor shower
- A flat area free of overhanging trees or shade from midday through late afternoon
Poor candidates include:
- A shaded yard or a spot blocked by structures for most of the day
- A steep or unsecured roof without proper mounting hardware
- Anywhere near open flame, exhaust vents, or flammable material
- A location where a tripped hose or leaking fitting would create a hazard
Before mounting anything to a roof, confirm what’s underneath — rafters, sheathing, and flashing — and whether the structure can safely support the panel’s weight, especially when wet.
Preserve Safe, Simple Operation
Before building, think through how the system will actually be used.
- Will anyone touch the panel or fittings, in full sun, on a hot day?
- Is there a way to know if the water coming out is too hot before it reaches skin?
- Can the system be isolated or drained quickly if a leak develops?
- Will freezing temperatures ever be a risk in your climate?
- Is the panel secured against wind, so it can’t blow off a roof or stand?
Design the system so hot water is never delivered directly to a shower head, sink, or hose end without the user being able to check temperature first — a simple mixing valve or a bucket-and-thermometer check goes a long way.
Recommended Design
The pictured system consists of four main components.
1. Insulated frame and black absorber surface
A shallow box — often built from wood or a repurposed frame — lined with rigid foam insulation and topped with a dark, heat-tolerant surface (such as flat black high-temperature paint over sheet metal, or a commercial absorber plate) collects and holds solar heat.
2. Coiled PEX tubing
A single length of PEX tubing, coiled in a flat spiral across the absorber surface, gives water a long, sun-exposed path to travel without needing multiple joints or fittings in the middle of the coil.
3. Cold-water-in and hot-water-out fittings
Barbed or threaded fittings at opposite ends of the coil connect the panel to a garden hose, tank, or pump line. Keeping the coil as one continuous piece between these two fittings reduces the number of potential leak points.
4. Optional solar-powered pump
A small solar panel can power a low-voltage pump to circulate water slowly through the coil, which improves consistency compared to relying on gravity or hose pressure alone. This step is optional — a simple gravity-fed or hose-pressure system works too, just with less control over flow rate.
Materials List
Exact dimensions depend on your available space and intended water volume.
Panel components
- Plywood or scrap lumber for the frame
- Rigid foam board insulation
- Sheet metal, aluminum flashing, or a purpose-made absorber plate
- Flat black, high-heat-tolerant paint (non-toxic, rated for outdoor or high-temp use)
- PEX tubing (sized for your expected flow)
- Barbed or threaded PEX fittings and clamps
- Exterior-grade screws or fasteners
- Weatherproof sealant or caulk
- Optional: tempered glass or clear polycarbonate cover to reduce heat loss
Optional pump components
- Small solar panel
- Low-voltage DC water pump rated for the expected flow and temperature
- Wiring and weatherproof connectors
- Mounting hardware for the solar panel
Tools
- Tape measure
- Straightedge and square
- Drill and bits
- Utility knife
- PEX cutter and crimping or clamping tool
- Paintbrush or roller
- Caulking gun
- Level
Safety equipment
- Safety glasses
- Work gloves
- Dust mask for cutting or sanding
- A thermometer for testing outlet water temperature
Testing supplies
- Garden hose
- Bucket
- Thermometer
- Stopwatch
- Towels
Step 1: Plan Your Water Flow
Decide how water will move through the system before you build anything.
Options include:
- Gravity-fed: a supply barrel or tank positioned above the panel, feeding water downhill through the coil by gravity alone.
- Hose-pressure fed: a garden hose supplying cold water directly, with the heated water drawn off at the outlet.
- Pump-assisted: a small pump (solar-powered or otherwise) circulating water at a controlled, slow rate for more consistent heating.
Slower flow generally means hotter output water; faster flow means more total warm water but at a lower temperature. There’s no single right answer — it depends on whether you want a little bit of very warm water or a larger volume of mildly warmed water.
Step 2: Build the Frame and Insulate It
- Cut the frame pieces to size and assemble a shallow, rigid box.
- Check that the box is square.
- Line the bottom and sides with rigid foam insulation to reduce heat loss into the ground or mounting surface.
- Seal seams and gaps with weatherproof caulk.
- Confirm the frame is stiff enough to support the absorber plate and coil without flexing.
Insulation on the back and sides matters more than people expect — a surprising amount of collected heat can be lost downward if the panel isn’t insulated underneath.
Step 3: Prepare and Install the Absorber Surface
- Cut the sheet metal or absorber plate to fit inside the frame.
- Clean the surface thoroughly.
- Paint it matte black with a high-heat-tolerant, outdoor-rated paint.
- Allow the paint to cure fully before proceeding — off-gassing paint near a coil intended for water use is worth avoiding.
- Fasten the absorber plate securely inside the frame.
A flat, even, well-adhered black surface is what actually does the heat-absorbing work — this step is worth taking slowly.
Step 4: Coil the PEX Tubing
- Starting from the center or one edge, bend the PEX into a flat spiral that fills as much of the absorber surface as possible without kinking.
- PEX has a minimum bend radius — forcing a tighter bend can crimp the tube and restrict flow.
- Leave enough straight tubing at both ends to reach your fittings.
- Secure the coil to the absorber surface with clips, straps, or high-temperature adhesive so it stays in place and maintains good contact with the black surface.
- Attach fittings at both ends and label them COLD IN and HOT OUT.
Good contact between the coil and the absorber surface improves heat transfer — a coil that floats above the surface loses much of the benefit.
Step 5: Add an Optional Cover
A clear cover (tempered glass or polycarbonate) trapped a few inches above the absorber surface can meaningfully reduce heat loss to wind and cool air, similar to a greenhouse effect.
If you add one:
- Leave a small ventilation gap or valve to prevent excessive pressure buildup from trapped hot air.
- Use a material rated for outdoor UV exposure.
- Seal the edges to keep out rain and debris, while still allowing any built-up moisture to escape.
A cover is optional — many simple builds skip it and still produce noticeably warm water on sunny days.
Step 6: Connect the Solar-Powered Pump (Optional)
- Mount the small solar panel where it will get consistent direct sun, angled toward the sun’s typical path.
- Wire it to the low-voltage pump following the pump manufacturer’s instructions.
- Position the pump so it draws from your cold-water source and pushes water into the coil’s cold-water-in fitting.
- Use weatherproof connectors for all wiring exposed outdoors.
- Test the pump in shade first to confirm it runs before connecting it to water.
Because the pump is solar-powered, it naturally runs only when the sun is out — which conveniently matches when the panel is actually producing heat.
Step 7: Dry-Fit and Test for Leaks
Before relying on the system, test it during calm daytime conditions.
- Connect the cold-water supply and run water through the coil at a slow, steady rate.
- Inspect every fitting and connection for drips.
- Let water run for several minutes, then check the outlet temperature with a thermometer.
- Note how the temperature changes as flow rate changes.
- Check the frame and mounting for any shifting or instability.
If you see a leak, stop the flow, tighten or reseat the fitting, and retest before considering the system ready for regular use.
Step 8: Establish Safe Operating Habits
Because a stagnant coil in full sun can get unexpectedly hot:
- Always check outlet temperature with your hand or a thermometer before use, especially after the system has sat idle in sunlight.
- Consider adding a simple mixing valve if the panel will feed anything used for bathing.
- Keep children and pets from touching fittings or the panel surface during peak sun hours.
- Drain the coil before hard freezes if you live somewhere winter temperatures drop below freezing.
Common Building Mistakes
Skipping insulation under the absorber
Heat lost downward into the ground or roof deck is heat you don’t get in your water.
Using paint that isn’t rated for high heat or outdoor exposure
Ordinary interior paint can peel, off-gas, or fail under repeated sun exposure.
Kinking the PEX coil
A tight, forced bend restricts flow and can weaken the tubing at that point.
Sealing the system completely with no pressure relief
A closed loop that heats up in full sun can build unexpected pressure. Keep the system open or vented unless you know what you’re doing with pressurized plumbing.
Mounting without checking the surface below
A roof or stand that can’t support the panel’s wet weight is a hazard waiting to happen.
Assuming the output is always safe to touch
Stagnant water in a sealed coil on a hot, sunny day can be surprisingly hot. Always check before use.
Maintenance Schedule
Monthly during the sunny season
- Inspect fittings for drips or corrosion.
- Check that the coil hasn’t shifted on the absorber surface.
- Clean debris off the absorber surface and any cover.
Seasonally
- Confirm mounting hardware is still secure.
- Check for UV damage to any exposed tubing or cover material.
- Test outlet temperature and flow to confirm performance hasn’t dropped.
Before winter (in freezing climates)
- Drain the coil completely.
- Disconnect and store removable components indoors if practical.
- Cover or shield the panel from ice and snow load if it will stay outdoors.
After any storm or high-wind event
- Check that the panel and any solar-pump mount haven’t shifted or loosened.
- Inspect for cracked fittings or tubing.
Is a DIY Solar Water Heater Worth Building?
It may be worthwhile when:
- You want to preheat water for an outdoor shower, hose, or secondary use.
- You have a sunny, stable, structurally sound location to mount it.
- You’re comfortable checking water temperature before use.
- You understand it supplements, rather than replaces, your main water heater.
It may not be appropriate when:
- You intend to plumb it directly into your home’s potable hot water without professional review.
- Your climate has hard freezes and you can’t commit to seasonal draining.
- You need a dependable, weather-independent hot water source.
- You can’t verify safe roof or structural mounting.
For a reliable year-round hot water supply, a manufactured solar thermal system — properly sized, pressure-tested, and installed by a qualified professional — remains the safer choice.
Final Note
A DIY solar water heater is a genuinely useful little project: a black surface, a coil of tubing, and the sun do most of the work for free. Built simply — as an open, low-pressure preheating panel rather than a sealed, pressurized system — it’s a low-risk way to warm water for outdoor and secondary uses.
Keep it simple, keep it open to the air rather than sealed and pressurized, check the temperature before anyone touches the output, and drain it before winter if freezing is a risk where you live.
It won’t replace your water heater — but on a sunny afternoon, it can save you from ever turning it on.