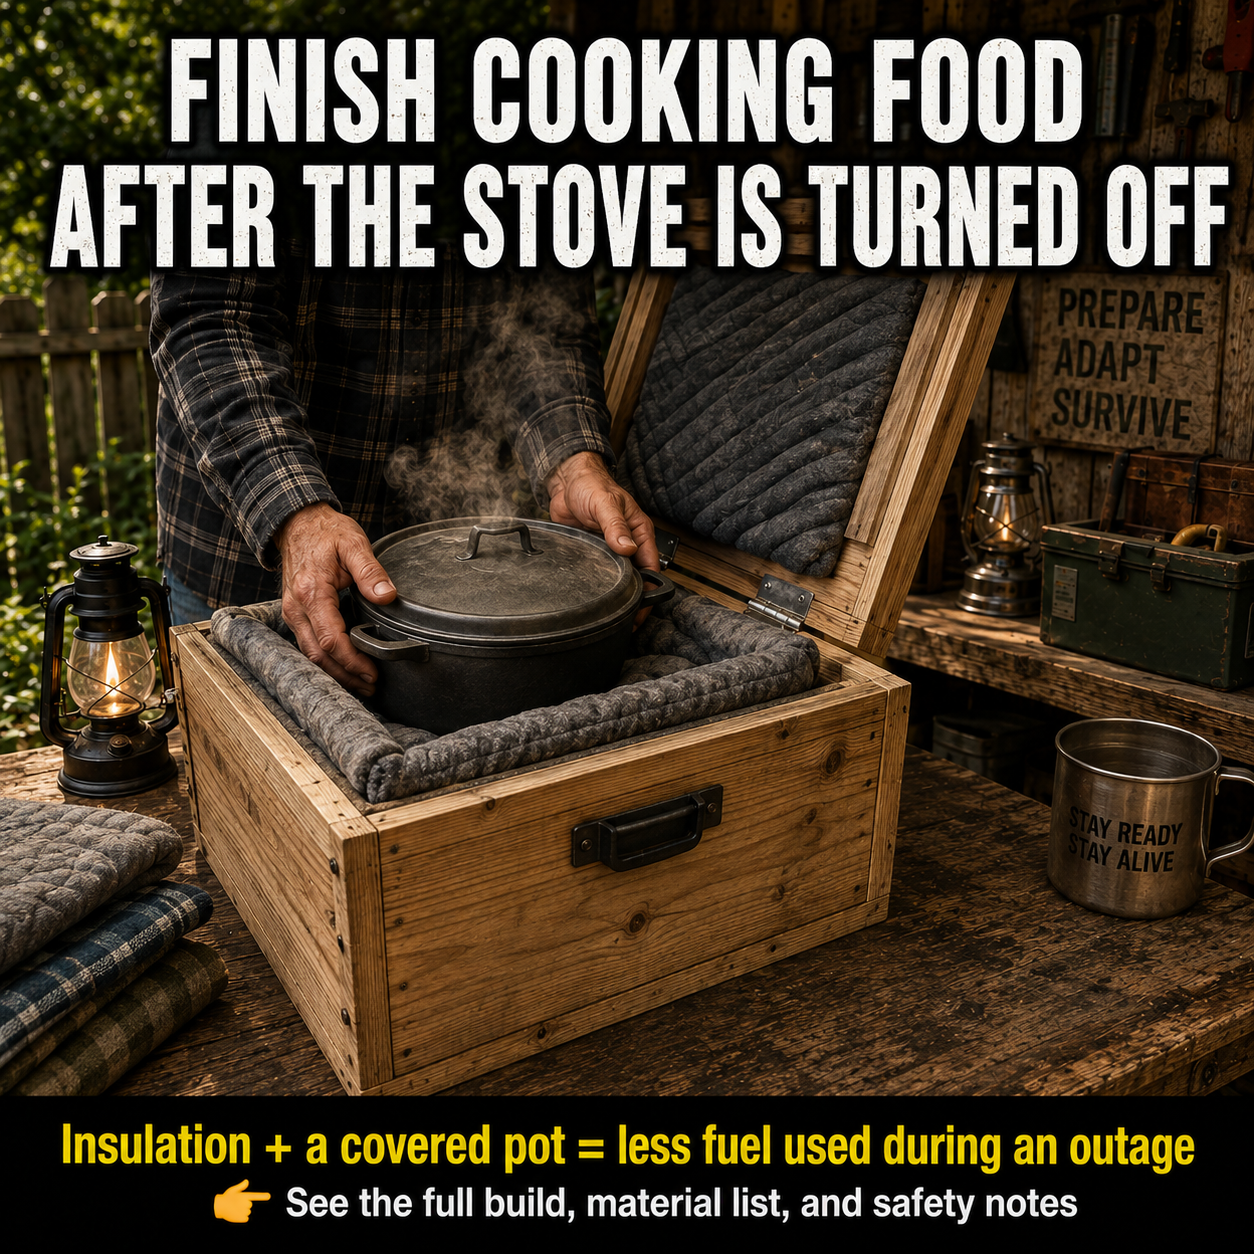
When fuel is limited, keeping a pot simmering for an hour can feel wasteful.
A retained-heat cooking box offers a simple alternative. The food is first brought to a full boil or proper cooking temperature on a conventional stove. The covered pot is then moved into a heavily insulated container, where stored heat continues cooking the meal without an active flame.
This old technique is commonly called:
- Haybox cooking
- Fireless cooking
- Retained-heat cooking
- Thermal cooking
- Insulated-box cooking
Despite the name “fireless cooker,” it does not eliminate the stove completely. You must still use a safe heat source to bring the food and pot to the required starting temperature.
The basic principle is:
A hot covered pot + close-fitting insulation = less fuel needed to complete some meals
A good insulated cooker can be useful during:
- Power outages
- Propane shortages
- Camping
- Outdoor cooking
- Fuel conservation
- Emergency meal preparation
- Hot weather, when you want less heat released into the kitchen
However, insulation is not a substitute for proper cooking temperatures. A poorly used box can allow meat, rice, beans, soup, or other perishable food to remain lukewarm long enough for harmful bacteria to multiply.
A food thermometer is therefore an essential part of this project.
How Retained-Heat Cooking Works
When a pot is heated on a stove, heat is stored in:
- The food
- The cooking liquid
- The pot
- The lid
After the stove is turned off, that heat begins escaping into the surrounding room.
An insulated box slows that heat loss.
Instead of escaping quickly, much of the heat remains around the pot and continues moving through the food. This can soften grains, vegetables, lentils, and some slow-cooking meals without continuous burner use.
The method works best when:
- The food contains plenty of hot liquid.
- The pot is nearly full.
- The lid fits tightly.
- The pot matches the insulated cavity.
- Insulation surrounds the pot on every side.
- The box is closed immediately.
- The cooking period is not unnecessarily long.
- The final temperature is checked.
It works poorly when:
- The pot is only partly filled.
- The lid leaks steam.
- Large air gaps surround the pot.
- The insulation is damp or compressed incorrectly.
- The box is opened repeatedly.
- The food begins at an inadequate temperature.
- The meal requires dry heat, browning, frying, or crisping.
- A cold or oversized box absorbs too much heat.
The system does not generate new heat. It only preserves heat already placed in the pot.
Food Safety Comes First
The featured image presents the project as a way to “finish cooking food after the stove is turned off.” That description is accurate only when the food reaches a safe starting temperature and remains hot enough to continue cooking safely.
The USDA identifies 40°F to 140°F, or approximately 4°C to 60°C, as the temperature “danger zone” in which bacteria can grow rapidly. Hot food should generally be held at 140°F or above, and perishable food should not remain in the danger zone for more than two hours. When the surrounding temperature is above 90°F, that limit is reduced to one hour. USDA Food Safety and Inspection Service
West Sussex County Council’s guidance for DIY thermal cookers similarly advises checking retained food with a thermometer and not allowing cooked food to remain below 61°C, approximately 142°F, for more than two hours. West Sussex County Council
For safe use:
- Start with a clean pot and fresh ingredients.
- Bring the complete meal to a vigorous boil or its prescribed starting temperature.
- Simmer it on the active stove for the recipe’s required initial period.
- Transfer the covered pot immediately into the box.
- Close the insulation without delay.
- Do not repeatedly open the box to look inside.
- Check the center of the food with a food thermometer at the planned finishing time.
- Return undercooked food to the active stove.
- Reheat questionable food rapidly to at least 165°F or 74°C.
- Discard perishable food when its time-and-temperature history is unknown.
Never judge food safety by smell, taste, or appearance alone.
What This Cooker Can and Cannot Do
It can help:
- Reduce the time a burner remains active
- Conserve propane, electricity, wood, charcoal, or other cooking fuel
- Finish certain moist foods gently
- Keep a hot covered pot protected from drafts
- Reduce supervision after the initial stove stage
- Keep some meals hot for a limited period
- Reduce heat released into the kitchen
It cannot:
- Cook cold ingredients without an initial heat source
- Make unsafe food safe through insulation alone
- Replace a pressure cooker
- Replace tested canning equipment
- Preserve food for shelf storage
- Fry, roast, grill, or brown food
- Reliably cook every recipe
- Guarantee a safe temperature for a fixed number of hours
- Safely hold perishable food overnight without verification
- Produce drinking water through reliable sterilization
- Burn fuel inside the box
Never place an operating stove, candle, alcohol burner, charcoal, embers, or other flame inside the insulated container.
This project is a heat-retention device—not a combustion chamber.
Recommended Materials
Outer container
Choose one of the following:
- A sturdy wooden chest
- A heavy plastic storage tote rated for the expected conditions
- A lidded cooler
- A strong plywood box
- A metal container with a separate insulated liner
The container must be large enough for the pot and insulation but not so oversized that enormous air spaces remain.
If you build a wooden box, use clean, dry lumber or plywood.
Avoid wood that is:
- Rotten
- Moldy
- Oil-soaked
- Chemically contaminated
- Pressure-treated for exterior use
- Taken from pesticide or solvent containers
- Infested with insects
- Badly split
Insulation
Possible materials include:
- Wool blankets
- Cotton quilts
- Purpose-made thermal padding
- Heat-resistant mineral-wool insulation that is fully enclosed
- Cork
- Several layers of clean, dry towels
- A commercially made insulated cooking bag
- Rigid insulation that is suitable for the temperature and completely isolated from the pot
The insulation must remain clean, dry, stable, and protected from direct contact with food.
Do not use loose fiberglass where fibers can escape into the kitchen or food area.
Do not allow foam insulation, plastic sheeting, polyester batting, or other heat-sensitive materials to touch a very hot pot unless the material manufacturer specifically approves that temperature and application.
Avoid improvised insulation made from:
- Newspaper touching the pot
- Loose sawdust
- Dry grass
- Straw
- Flammable packing material
- Meltable plastic foam
- Dirty clothing
- Damp blankets
- Materials contaminated by rodents
- Unknown industrial scraps
Historically, hay and other loose natural fibers were used. For a modern household cooker, enclosed, washable, predictable materials are generally easier to maintain safely.
Heat-resistant inner layer
Use a removable barrier between the hot pot and the main insulation.
Possible options include:
- A washable heavy-cotton pot wrap
- A purpose-made heat-resistant pad
- A fitted cork liner
- A metal or plywood inner cradle with appropriate clearance
- A thick folded cotton towel used within its safe temperature range
The inner layer should:
- Withstand the hot pot
- Protect the insulation
- Catch minor condensation
- Be removable for cleaning
- Fit closely around the pot
- Avoid obstructing the lid
Cooking equipment
Use:
- A heavy pot with a tight-fitting lid
- A pot sized to fit the box
- Heat-resistant handles
- A reliable instant-read or probe food thermometer
- Heavy oven mitts
- A trivet or heat-resistant base
- A timer
A heavy stainless-steel, enameled-steel, or cast-iron pot can work well. Cast iron retains substantial heat but is also heavy and can burn or crush unsuitable insulation.
Do not use a pot with:
- A loose lid
- Cracked enamel
- Damaged handles
- A warped base
- A melted knob
- A pressure-sealed lid not intended for this use
Never move a pressurized cooker into the box while it is operating under pressure.
Tools for Building the Wooden Box
You may need:
- Tape measure
- Pencil
- Framing square
- Saw
- Drill or driver
- Wood screws
- Wood glue
- Hinges
- Lid latch
- Carrying handles
- Sandpaper
- Clamps
- Safety glasses
- Hearing protection
- Dust mask
- Stapler or fasteners for the liner
- Scissors or utility knife
- Washable fabric for removable insulation covers
Step 1: Choose the Cooking Pot First
Do not build the box and then search for a pot that happens to fit.
The pot determines the dimensions of the insulated cavity.
Choose one pot that will normally be used with the cooker. Measure:
- Pot diameter
- Pot height with the lid installed
- Handle-to-handle width
- Lid-knob height
- Clearance required to lift it safely
A narrow, deep pot usually retains heat better than a very wide, shallow pan because it has less exposed surface area relative to the amount of food.
The lid should fit securely and release little steam.
Choose a pot capacity suited to your household. The retained-heat method works best when the pot is reasonably full, so an enormous stockpot is inefficient for cooking two portions.
Step 2: Plan the Insulation Thickness
The pot should be surrounded on:
- The bottom
- Both sides
- Both ends
- The top
Aim for a close, nest-like fit rather than a large empty chamber.
The exact thickness depends on the material, box, pot, food volume, starting temperature, and weather. Several inches of dense, dry insulation on every side is a reasonable experimental starting point, but the completed cooker must be tested with hot water before it is trusted with perishable food.
Include enough room to lift the pot without dragging your hands across the insulation.
Do not make the cavity so tight that:
- The lid is pushed sideways.
- Pot handles become trapped.
- The box cannot close.
- The pot cannot be removed quickly.
- Insulation falls into the food when the lid is opened.
Step 3: Build or Prepare the Outer Box
If using a ready-made chest, inspect:
- Bottom strength
- Lid alignment
- Hinge condition
- Handles
- Sharp fasteners
- Interior cleanliness
- Water damage
- Previous chemical use
For a new plywood box:
- Cut the base, sides, ends, and lid.
- Sand rough edges.
- Assemble the base and walls with suitable glue and screws.
- Reinforce corners if the hot filled pot will be heavy.
- Attach the lid with sturdy hinges.
- Add a simple latch that does not lock automatically.
- Add handles capable of supporting the empty box.
Do not carry the entire cooker with a hot pot inside unless it was specifically designed and tested for that purpose. A shifting pot can spill boiling liquid or tear out the box handles.
Finish the exterior if desired, but allow all paint, glue, stain, and sealant to cure completely before use.
Avoid strong-smelling finishes on interior surfaces.
Step 4: Create a Heat-Resistant Base
The bottom must support the full weight of:
- The pot
- The food
- The cooking liquid
- The insulation
Install a level heat-resistant platform or trivet in the center of the box.
A practical layered base might use:
- A structurally sound box floor
- A protected insulating layer
- A rigid heat-resistant board or cradle
- A removable cotton or heat-resistant pad
- The cooking pot
Make sure the pot cannot tip.
Do not place a hot cast-iron pot directly onto:
- Bare foam
- Thin plastic
- Vinyl
- Synthetic carpet
- Unprotected cardboard
- Fragile glass
- A damp towel
Test the base using a filled pot while everything is cold before attempting a hot transfer.
Step 5: Make the Insulated Nest
Arrange the insulation so it closely follows the shape of the pot.
One simple design uses:
- A thick bottom cushion
- A padded ring around the pot
- Removable side cushions
- A thick insulated lid pad
Sew or enclose loose padding inside washable cotton covers.
The pot should settle into the cavity without forcing, tilting, or sinking.
Check that:
- Handles remain reachable.
- The lid stays level.
- No insulation can fall under the lid.
- The top cushion fills the space above the pot.
- The wooden lid closes easily.
- The latch does not compress the pot lid.
- The hot pot can be removed while wearing oven mitts.
The top insulation is particularly important because hot air rises and the pot lid is a major path for heat loss.
Step 6: Provide Safe Pot-Lifting Clearance
The image shows a person lowering a heavy pot into the box by its side handles. This can be awkward when the cavity is deep.
Before heating anything, practice the movement using a cold pot filled with water.
Confirm that you can:
- Lift the filled pot safely
- Keep it level
- Lower it without touching the box
- Avoid trapping your fingers
- Remove it while wearing bulky oven mitts
- Set it on a heat-resistant surface immediately
If the box walls interfere with your grip, redesign the opening.
Never use loose rope loops attached to pot handles. They can shift, burn, or allow the pot to swing.
Keep children and pets away during every hot-pot transfer.
Step 7: Test the Cooker With Hot Water
Do not make the first test with chicken, meat, cooked rice, or an expensive stew.
Use water.
Basic heat-retention test
- Fill the chosen pot approximately three-quarters full with water.
- Put on the lid.
- Bring the water to a full boil on the stove.
- Record the starting temperature.
- Turn off the burner.
- Immediately place the covered pot in the insulated box.
- Add the top insulation and close the box.
- Start a timer.
- Keep the box closed for one hour.
- Open it and measure the water temperature.
- Repeat the test for two, three, and four hours on separate trials.
Record:
- Starting temperature
- Room or outdoor temperature
- Water volume
- Pot size
- Temperature after each interval
- Any moisture inside the box
- Areas that feel unusually hot
- Damage, melting, odor, or discoloration
Stop using the cooker if any material:
- Melts
- Smokes
- Scorches
- Produces a chemical odor
- Becomes dangerously hot on the exterior
- Releases fibers
- Becomes wet and cannot be dried
Water testing helps you understand the cooker, but it does not automatically validate every food recipe. Thick stews, large meat pieces, beans, and grain dishes heat differently.
Step 8: Prepare Food on the Active Stove
Use recipes suited to moist, covered cooking.
Before the pot enters the box:
- Wash your hands and prepare ingredients hygienically.
- Cut ingredients into consistent pieces.
- Add the required amount of liquid.
- Cover the pot.
- Bring the complete contents to a vigorous boil.
- Stir to eliminate cool areas.
- Keep the meal boiling or simmering on the stove for the recipe’s initial cooking period.
- Verify temperature when appropriate.
- Transfer the pot immediately.
Do not heat only the liquid and then add cold meat, vegetables, or beans immediately before putting the pot in the box. The entire mixture needs to be heated properly.
Large frozen ingredients should not be used. Thaw food safely before cooking.
Step 9: Transfer the Pot Safely
Prepare the box before turning off the burner.
The bottom insulation should already be in position, and the top cushion should be folded back.
Then:
- Clear the path between stove and box.
- Place the cooker on a stable, heat-resistant surface.
- Remove children, pets, cords, and obstacles.
- Put on dry oven mitts.
- Turn off the stove.
- Lift the pot with both hands.
- Keep the lid installed.
- Lower the pot into the center of the nest.
- Pack the removable insulation around it.
- Place the thick top cushion over the pot.
- Close the outer lid.
- Start the timer.
Do not set the cooker on a combustible surface if the exterior becomes warm during testing.
Never put the insulated box directly over an active burner.
Step 10: Leave the Box Closed
Every time the lid is opened, valuable heat escapes.
Do not open the box merely to stir, smell, or photograph the meal.
Use the cooking interval established through careful testing and a suitable recipe.
The necessary time changes with:
- Starting temperature
- Food type
- Ingredient size
- Liquid volume
- Pot material
- Pot fullness
- Insulation quality
- Room temperature
- Outdoor temperature
- Box dimensions
There is no universal “three-hour” or “six-hour” rule that makes every meal safe.
Step 11: Check the Final Temperature
At the planned finishing time:
- Prepare a heat-resistant landing place.
- Open the box.
- Remove the top insulation.
- Lift out the pot with dry oven mitts.
- Open the lid carefully, directing steam away from your face.
- Stir the food.
- Measure the temperature in several locations.
- Check the largest or densest pieces.
- Confirm tenderness and doneness.
- Return the pot to an active burner if more cooking is needed.
USDA minimum internal-temperature guidance includes:
| Food | Minimum internal temperature |
|---|---|
| Poultry, stuffing and casseroles containing poultry | 165°F / 74°C |
| Ground beef, pork, lamb or veal | 160°F / 71°C |
| Whole cuts of beef, pork, lamb or veal | 145°F / 63°C, followed by the recommended rest |
| Fish | 145°F / 63°C |
| Leftovers being reheated | 165°F / 74°C |
Consult the complete USDA safe minimum internal-temperature chart for the food you are preparing.
Meeting a minimum final temperature does not correct every time-and-temperature error. The food must also heat promptly and avoid spending excessive time in unsafe temperature ranges.
Step 12: Serve, Reheat or Refrigerate Promptly
Serve the meal while it is safely hot.
Do not leave the pot in the box indefinitely.
If food has cooled below the safe hot-holding temperature but has not exceeded the allowable time limit, reheat it rapidly on an active stove to 165°F or 74°C.
Do not attempt slow reheating inside the insulated box. It preserves heat but does not create enough new heat to reheat food rapidly.
Refrigerate leftovers promptly in shallow containers. USDA guidance advises dividing large quantities so they cool more quickly rather than leaving an entire deep pot to cool slowly. USDA Leftovers and Food Safety
If you do not know how long perishable food remained between 40°F and 140°F, discard it.
Foods That May Work Well
After the cooker has been tested, suitable meals may include:
- Vegetable soup
- Lentil soup
- Split-pea soup
- Oatmeal
- Barley
- Quinoa
- Rice prepared with a tested method
- Potato soup
- Moist stews
- Rehydrated dehydrated vegetables
- Pasta sauce
- Some soaked dried beans after adequate stove boiling
- Precooked ingredients that need gentle finishing
Foods with abundant liquid generally transfer heat more evenly than thick, dry mixtures.
Cut vegetables and meats into moderate, uniform pieces rather than leaving very large chunks.
Foods Requiring Extra Caution
Meat and poultry
Raw meat and poultry require careful temperature control.
For early testing, use vegetable soups or hot water rather than high-risk meat dishes. Do not depend on a new DIY cooker to prepare poultry until its heat retention is well understood and you can verify the final temperature throughout the meal.
Rice and grains
Cooked rice and grains are perishable foods. They should not be left sitting lukewarm for long periods.
Use an established ratio and timing method, measure the final temperature, serve promptly, and refrigerate leftovers quickly.
Dried beans
Beans should be soaked and boiled according to reliable crop-specific instructions before being transferred for retained-heat finishing.
Do not assume insulation replaces required boiling.
Red kidney beans deserve particular caution because inadequate cooking may leave harmful lectins active. If you do not have a reliable recipe specifying a full stove-boiling stage, choose a different food for this cooker.
Pasta
Pasta can become soft or gummy during long retained-heat cooking. It may work in short, tested intervals, but it is not always the best use of the box.
Eggs and dairy
Custards, egg dishes, cream sauces, and dairy-heavy meals require especially careful temperature control and are poor choices while learning to use a homemade cooker.
Seafood
Seafood cooks quickly and can become unsafe or overcooked when time and temperature are uncertain. Use a conventional cooking method unless you have a tested retained-heat recipe and accurate temperature monitoring.
A Safe Beginner Test Meal: Vegetable-Lentil Soup
This is a practice framework, not a universal preservation recipe.
Ingredients
- 1 cup rinsed lentils
- 1 chopped onion
- 2 chopped carrots
- 2 chopped celery stalks
- 1 can diced tomatoes
- 6 cups water or broth
- Preferred dried herbs
- Salt and pepper as appropriate
Method
- Place all ingredients in the selected pot.
- Leave enough headspace to prevent boiling over.
- Cover and bring the complete mixture to a vigorous boil.
- Stir thoroughly.
- Continue boiling or actively simmering on the stove for at least 10 to 15 minutes.
- Transfer the closed pot immediately into the prepared insulated box.
- Close the insulation and start the timer.
- Check after the interval established during prior tests.
- Remove the pot, stir and measure the center temperature.
- Return it to the stove if the lentils are not tender or the temperature is inadequate.
- Bring it back to a full simmer before serving if necessary.
Record the results. Your notes will help establish an appropriate process for that exact pot, box, quantity, and recipe.
Using the Cooker During a Power Outage
An insulated cooker is most useful when a safe stove is already available, such as:
- A propane camp stove used outdoors
- A butane stove used exactly as its manufacturer directs
- An outdoor wood stove
- A charcoal grill used outdoors
- A functioning gas or electric kitchen stove
- A properly installed permanent solid-fuel appliance
Never burn charcoal, operate a generator, or use an outdoor grill inside a house, garage, tent, shed, basement, or other enclosed area. Carbon monoxide cannot be seen or smelled and can be fatal.
Keep active cooking equipment away from:
- Curtains
- Dry grass
- Fuel containers
- Wooden walls
- Bedding
- Children
- Pets
- The insulated cooker’s loose fabric
Complete the high-heat stove stage in a safe cooking location. Then move only the closed pot—not the burning stove—into the insulation box.
During an outage, water access and refrigeration may also be limited. Prepare only the amount of perishable food that can be eaten promptly unless safe cold storage is available.
Fire and Burn Safety
The insulation shown in the image resembles thick fabric or moving blankets. Such material can retain heat, but it may also burn, scorch, melt, or produce fumes if unsuitable.
Follow these rules:
- Keep the box away from all flames.
- Never put a burner inside it.
- Never transfer burning coals or heated stones into it.
- Do not use the cooker as a seat or workbench.
- Keep the exterior latch simple and easy to open.
- Use only dry oven mitts.
- Keep handles accessible.
- Open the pot lid away from your face.
- Place the cooker where it cannot be knocked over.
- Never leave it where children can climb into it.
- Allow the pot and liner to cool before cleaning.
- Stop use immediately if you smell scorching material.
- Keep a suitable fire extinguisher accessible near cooking areas.
A lockable chest creates an additional suffocation and entrapment risk for children. Do not install a latch that can trap someone inside.
Common Building Mistakes
Making the box too large
A large air space allows more heat to escape from the pot.
Fit the insulation closely around the selected pot.
Using meltable foam against the pot
A boiling-hot pot may deform foam or release unpleasant fumes.
Use a verified heat-resistant inner barrier.
Depending on the wooden walls as insulation
Wood slows heat loss somewhat, but large gaps and thin boards do not create an effective thermal cooker.
Insulate the bottom, sides and top.
Forgetting the top cushion
A thin lid with no insulation may become the greatest source of heat loss.
Add a thick removable top pad.
Using damp insulation
Moisture carries heat away, encourages mold and can damage the box.
Dry every part completely before storage.
Making the cavity too tight
The cook should be able to lift the pot out safely while wearing oven mitts.
Ignoring the pot’s full weight
A large pot of water is heavy. Reinforce the box floor and practice the transfer while the pot is cold.
Using contaminated materials
Do not reuse insulation or boxes exposed to chemicals, pests, mold or petroleum products.
Common Cooking Mistakes
Starting with merely warm food
The complete contents must reach an appropriate high temperature before entering the box.
Adding cold ingredients at the last moment
Cold meat, vegetables or liquid can pull the entire meal into an unsafe temperature range.
Opening the box repeatedly
Every inspection releases stored heat.
Guessing instead of measuring
A thermometer provides information that touching the pot cannot.
Cooking a tiny amount in a large pot
A fuller pot retains heat better than a nearly empty one.
Leaving food overnight
A homemade retained-heat cooker is not automatically safe for unattended overnight cooking.
Using it for canning
The box cannot maintain the precise processing temperature required for safe home canning.
Follow only tested canning processes from the USDA or National Center for Home Food Preservation.
Assuming reheating fixes every mistake
Some microorganisms may produce toxins that ordinary reheating does not reliably remove. When the food’s temperature history is unsafe or unknown, discard it.
Cleaning and Maintenance
After each use:
- Remove the cooled pot.
- Inspect the liner for spills.
- Wash removable fabric as appropriate.
- Dry all components completely.
- Wipe the box interior.
- Check for trapped condensation.
- Leave the lid open until everything is dry.
- Inspect insulation for scorching or melting.
- Store the thermometer clean and protected.
Every few months, inspect:
- Hinges
- Handles
- Latch
- Box floor
- Insulation covers
- Heat-resistant base
- Mold or mildew
- Rodent or insect activity
- Chemical odors
- Loose fibers
- Pot-handle condition
- Thermometer accuracy
Replace insulation that becomes:
- Burned
- Melted
- Moldy
- Oil-soaked
- Permanently damp
- Contaminated
- Torn open
- Difficult to clean
Create a Cooking Log
Record every trial.
| Date | Recipe | Amount | Stove time | Box time | Start temperature | Final temperature | Result |
|---|---|---|---|---|---|---|---|
| Aug. 4 | Hot-water test | 4 qt | Boiled | 2 hr | 212°F | 165°F | Good retention |
| Aug. 6 | Lentil soup | 4 qt | 15 min | 1.5 hr | 205°F | 170°F | Tender |
| Aug. 9 | Oatmeal | 3 qt | 5 min | 45 min | 202°F | 178°F | Slightly thick |
Results from one pot do not necessarily apply to another pot or a different food volume.
Repeat tests during colder weather because the surrounding temperature affects heat loss.
Is an Insulated Cooking Box Worth Building?
It can be worthwhile when:
- Cooking fuel is limited or expensive.
- Your meals commonly include soups, grains or stews.
- You already own a suitable covered pot.
- You are willing to test the cooker carefully.
- You have a reliable food thermometer.
- You can keep the insulation clean and dry.
- You understand safe food temperatures.
- You want a backup cooking method that uses simple materials.
It may not be suitable when:
- No safe initial heat source is available.
- The box materials cannot tolerate the hot pot.
- Accurate temperature checking is impossible.
- The cooker must be left unattended for many hours.
- Household members cannot lift the filled pot safely.
- The only available insulation is contaminated or highly flammable.
- You need to fry, grill, roast or pressure-cook food.
- You intend to use it for home canning.
A commercially manufactured thermal cooker may be a better option for households that want a lighter, more portable and easier-to-clean system.
Final Safety Note
An insulated cooking box can reduce burner time, but it cannot replace the initial cooking stage or proper food-safety practices.
Bring the complete meal to the required starting temperature on a safe stove. Transfer the covered pot immediately. Keep the box away from flames and combustible cooking equipment. Test heat retention with water before relying on the cooker for perishable food.
Use a thermometer every time while learning the system. If food has not finished cooking, return it to an active stove. If it has remained in the temperature danger zone too long—or you cannot determine its temperature history—discard it.
Never use the box for canning, never place burning fuel inside it, and never assume that a warm pot is automatically a safe pot.
Used carefully, retained-heat cooking can be a practical fuel-saving skill for outages, camping and everyday preparedness.