A refrigerator is essentially an insulated cabinet that continually removes heat while electricity is available.
When the power fails, the cooling stops—but the insulation remains. Cold food, frozen containers, shelves, and interior air temporarily act as stored thermal mass. The warmer the surrounding room becomes, the faster heat moves back into the appliance.
A removable blackout refrigerator blanket may help slow some of that heat transfer.
The idea is simple:
- Wrap the inactive appliance with additional insulation.
- Keep the doors firmly closed.
- Avoid blocking the door seals.
- Leave mechanical and ventilation areas uncovered.
- Remove the blanket before restoring power.
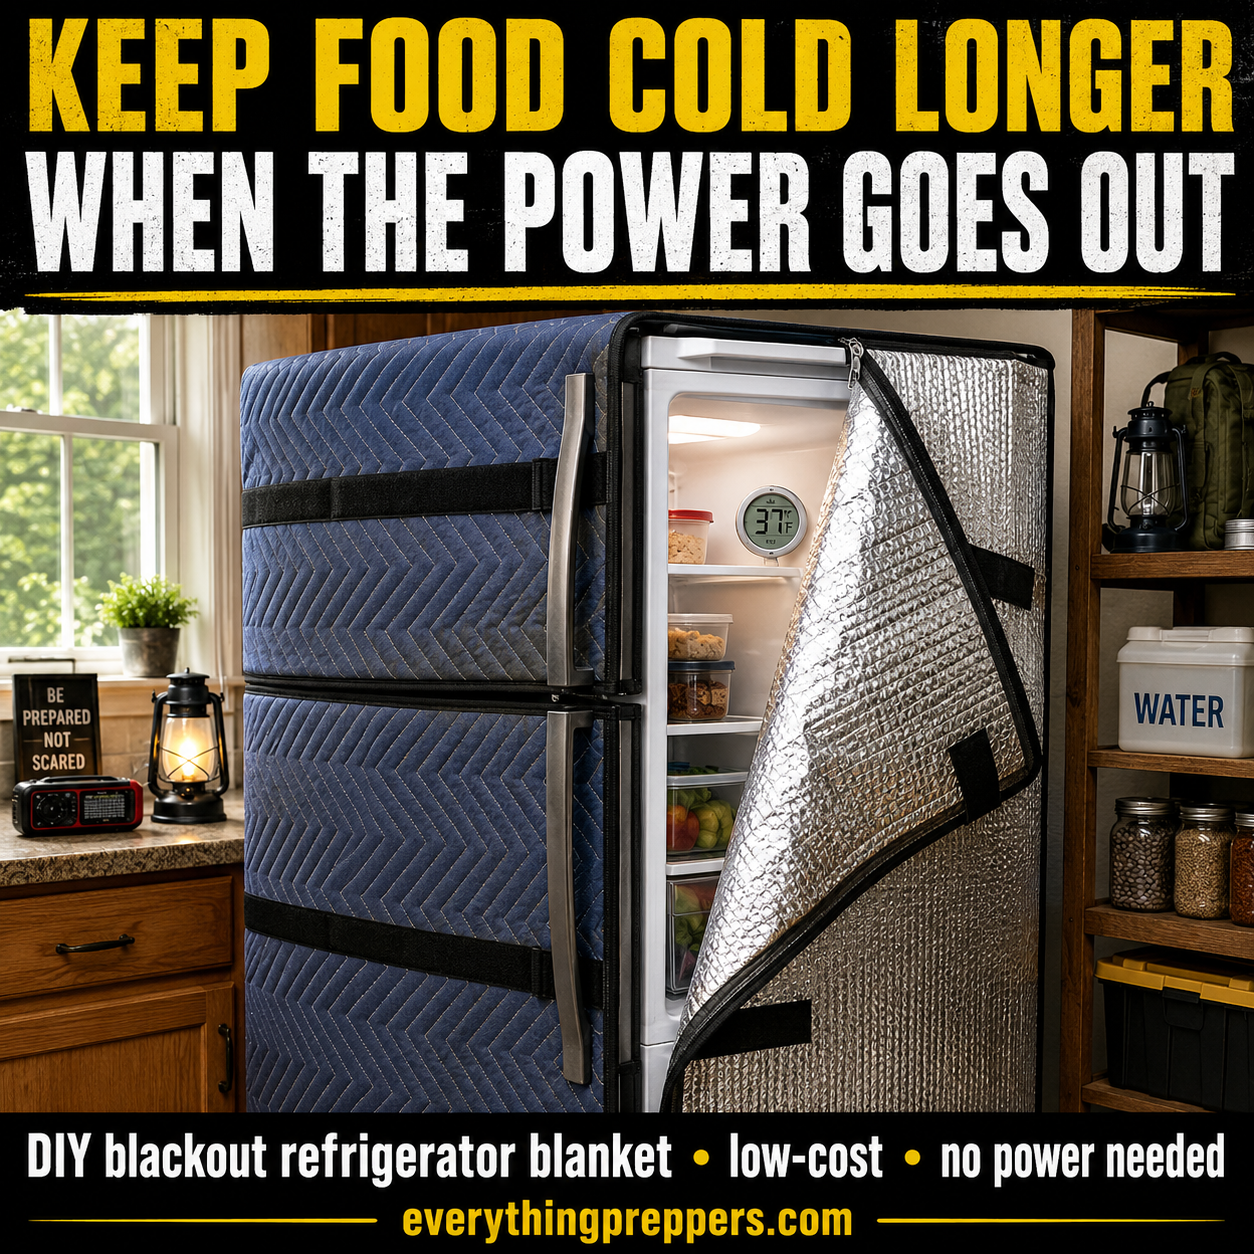
However, the blanket shown in the featured image should not be treated as a replacement for established food-safety precautions.
A refrigerator blanket does not create cold, restart the compressor, or guarantee that food will remain safe beyond four hours.
FDA guidance states that an unopened refrigerator generally keeps food cold for about four hours after losing power. A full freezer may maintain its temperature for approximately 48 hours, while a half-full freezer may last about 24 hours if its door remains closed. (U.S. Food and Drug Administration)
The blanket is an experimental supplemental measure. The appliance thermometer—not the blanket, elapsed time alone, appearance, or smell—provides the best information about the temperature inside.
Important Correction to the Featured Image
The refrigerator door is open in the image to show the thermometer and interior.
During a real outage, the door should remain shut.
Each opening releases cold air and introduces warmer, more humid room air. Official emergency guidance consistently identifies keeping refrigerator and freezer doors closed as the most important immediate action. (U.S. Food and Drug Administration)
The blanket should also never cover an operating refrigerator as shown.
The safer configuration is:
- Confirm that the appliance is not running.
- Close both doors completely.
- Apply the removable insulation without blocking seals or ventilation areas.
- Remove the entire blanket before the refrigerator is powered again.
What the Blanket Can and Cannot Do
What it may do
A properly fitted insulating cover may:
- Slow some heat movement through exposed cabinet surfaces
- Reduce warming from nearby sunlight
- Protect against warm drafts
- Help maintain more stable temperatures for a limited period
- Make existing cold mass slightly more effective
- Provide a reusable component of a broader outage plan
What it cannot do
It cannot:
- Refrigerate food without a cold source
- Reverse warming that has already occurred
- Make spoiled food safe
- Replace ice, frozen gel packs, or a working cooler
- Extend official safety times by a guaranteed amount
- Protect food indefinitely
- Safely remain installed while the appliance runs
- Tell you whether the food is safe
No standard performance rating exists for a homemade moving-blanket refrigerator cover. Its effectiveness will vary with the appliance, insulation, room temperature, freezer fullness, door openings, blanket coverage, and starting food temperature.
Treat any extra time as unverified unless you have tested your own setup with thermometers under controlled conditions.
The Food-Safety Numbers That Matter
Before building the blanket, remember these four temperatures and times.
Refrigerator target: 40°F or below
A refrigerator should normally remain at or below 40°F. Keep an appliance thermometer inside so you can monitor the actual temperature before, during, and after an outage. (U.S. Food and Drug Administration)
Unopened refrigerator: approximately four hours
A closed refrigerator generally keeps food cold for about four hours after power loss. This is a planning guideline—not a guarantee that every appliance will remain below 40°F for exactly four hours. (U.S. Food and Drug Administration)
Full freezer: approximately 48 hours
A full unopened freezer may remain cold for around 48 hours.
Half-full freezer: approximately 24 hours
A half-full unopened freezer may hold its temperature for approximately 24 hours. Grouping frozen items together and filling empty spaces with frozen water containers can help the frozen contents stay cold longer. (U.S. Food and Drug Administration)
The blanket must not be used to ignore these established guidelines.
Materials
This project uses a removable, reusable wrap rather than permanently attaching insulation to the appliance.
Main insulation
Choose one:
- Clean quilted moving blankets
- Insulated appliance blankets
- Sewn cotton-and-polyester moving pads
- Removable insulated curtain material
- Flexible insulated shipping blankets
Avoid blankets that are:
- Wet
- Moldy
- Oil-soaked
- Treated with unidentified chemicals
- Shedding loose fibers
- Damaged by rodents
- Strongly scented
- Previously used around fuel or pesticides
Do not use loose fiberglass insulation.
Optional reflective layer
A removable reflective layer can be added to the room-facing side using:
- Reflective bubble insulation
- Foil-faced fabric
- Clean automotive sunshade material
- Radiant-barrier fabric
The reflective surface should face outward.
Do not place bare foil where it could contact electrical components, terminals, damaged cords, or the power outlet.
Reflective bubble material is not a replacement for thick insulation. It works best as a clean outer layer paired with a quilted blanket.
Fasteners
Use removable fasteners such as:
- Wide hook-and-loop straps
- Adjustable luggage straps
- Sewn fabric ties
- Side-release buckles
- Large clips positioned away from the door seals
Avoid:
- Screws
- Nails
- Staples driven into the refrigerator
- Adhesive applied permanently to the appliance
- Thin cords that may cut into the gasket
- Metal wire near electrical components
Monitoring and outage supplies
- Refrigerator thermometer
- Freezer thermometer
- Optional remote wireless thermometer
- Frozen water bottles
- Frozen gel packs
- Insulated cooler
- Ice or access to block ice
- Permanent marker
- Outage-time record card
- Flashlight
FDA recommends keeping appliance thermometers in both refrigerator and freezer compartments and preparing frozen water containers, gel packs, coolers, and ice before an emergency. (U.S. Food and Drug Administration)
Tools
- Tape measure
- Scissors
- Heavy-duty needle
- Strong thread
- Fabric marker
- Straightedge
- Sewing machine, optional
- Binding tape, optional
Step 1: Read the Refrigerator Manual
Before designing the blanket, find the appliance’s model number and review its installation manual.
Identify:
- Condenser location
- Compressor compartment
- Ventilation grille
- Required wall clearances
- Water connections
- Electrical cord location
- Ice-maker connections
- Exterior surfaces that become warm
- Manufacturer warnings
Refrigerator designs differ.
Some models release heat primarily from the rear or lower front. Others use cabinet surfaces as part of the heat-dissipation system. Manufacturers require clearance around certain refrigerators because compressor heat must escape during operation. Insufficient clearance can reduce cooling performance and increase energy use. (LG Electronics)
This is why the blanket must be removed before restart.
Step 2: Identify the Areas That Must Remain Uncovered
Mark these locations before measuring:
- Rear compressor compartment
- Rear condenser coils
- Lower-front ventilation grille
- Electrical cord
- Wall receptacle
- Water line
- Drain pan area
- Door hinges
- Door gaskets
- Dispenser controls
- Appliance identification label
The safest beginner blanket covers only:
- Top
- Left side
- Right side
- Front doors after they are closed
Leave the complete rear open.
If the refrigerator manual indicates that the sides dissipate heat, remove all side insulation before restoring power.
Do not tuck blanket material beneath the refrigerator.
Step 3: Install Thermometers Before an Outage
Place one appliance thermometer inside the refrigerator and another inside the freezer.
Good locations include:
- Middle shelf of the refrigerator
- Between frozen packages near the center of the freezer
Do not place the refrigerator thermometer directly against:
- A cooling vent
- The wall
- An ice pack
- A frozen container
- The door
Those locations may give a misleading reading.
A remote thermometer is especially useful because it allows you to monitor conditions without opening the door.
Check the temperatures regularly during normal operation so you understand how your appliance behaves before an emergency. FDA recommends keeping the refrigerator at or below 40°F and the freezer at or below 0°F during normal operation. (U.S. Food and Drug Administration)
Step 4: Measure the Refrigerator
Measure:
- Cabinet width
- Cabinet depth, excluding the rear machinery
- Height from the top to the floor
- Refrigerator-door height
- Freezer-door height
- Location of handles
- Location of hinges
- Distance around the perimeter seals
Do not include the open space required behind the refrigerator.
A simple design uses three main pieces:
- Top-and-side wrap
- Upper freezer-door flap
- Lower refrigerator-door flap
Separate door flaps allow one section to be opened briefly without removing the entire wrap, although opening the appliance should still be avoided whenever possible.
Step 5: Create the Top-and-Side Panel
Cut a blanket long enough to travel:
- Up one side
- Across the top
- Down the opposite side
The bottom edges should stop several inches above the floor.
Do not let the material interfere with:
- Bottom ventilation
- Leveling feet
- Wheels
- Door hinges
- Electrical wiring
Bind cut blanket edges to prevent loose batting or threads.
Add two broad straps around the sides of the cabinet. Position them so they do not cross the doors or door seals.
The wrap should rest gently against the surfaces rather than being tightened forcefully.
Step 6: Create the Front Flaps
Cut separate insulated panels for the freezer and refrigerator doors.
Each panel should be slightly smaller than the door face so it does not cover:
- Gasket edges
- Hinges
- Control panels
- Dispenser openings
- Handle attachment points
Attach fabric loops to the top panel so each front flap can hang from it.
Secure the lower corners with removable hook-and-loop tabs or straps attached to the side blanket—not to the appliance.
The flaps should lift away immediately without tools.
Do not wedge fabric between the doors and cabinet.
Even a thin obstruction can prevent the magnetic gasket from sealing completely.
Step 7: Add the Optional Reflective Outer Layer
Attach reflective material to the outside of the quilted blanket.
Use stitching, fabric adhesive away from the appliance, or removable clips.
Cover all sharp foil edges with binding tape.
The reflective side should face the room, window, or nearby warm surface.
Do not allow reflective material to touch:
- The power plug
- Damaged electrical wiring
- Exposed terminals
- An operating compressor
- Hot machinery
- Heating appliances
The reflective layer is optional. A clean, well-fitted quilted cover is simpler and less likely to tear.
Step 8: Label the Blanket Clearly
Attach a large label to the front:
REMOVE COMPLETELY BEFORE RESTORING POWER
Add another label:
DO NOT COVER REAR, LOWER GRILLE, COMPRESSOR OR VENTS
Everyone in the household should understand that this is an outage-only cover.
Store the blanket near the refrigerator with its straps and thermometer instructions.
Step 9: Test the Fit With the Refrigerator Off
Choose a time when food can be protected in another refrigerator or cooler.
Safely switch off or unplug the empty appliance according to its manual.
Install the blanket and check:
- Both doors remain fully closed.
- Gaskets remain unobstructed.
- Hinges move freely.
- The blanket cannot slide behind the appliance.
- The lower grille remains uncovered.
- The rear remains open.
- Straps cannot enter the door opening.
- The power cord remains accessible.
- No blanket edge touches a hot component.
Remove the blanket before powering the refrigerator again.
Never conduct the first fitting test during an actual emergency with perishable food at risk.
Prepare Before the Power Goes Out
The blanket is only one part of the plan.
Freeze water containers
Fill clean freezer-safe containers with water, leaving space for expansion, and freeze them.
They provide:
- Additional cold mass
- Ice for a cooler
- Drinking water after melting when the original water was safe
Keep the freezer reasonably full
Group frozen food together. A full freezer retains cold longer than a half-empty one. Fill unused space with frozen water containers or gel packs. (U.S. Food and Drug Administration)
Do not block interior air vents while the appliance is operating. Refrigerator manufacturers warn that blocked vents restrict air circulation and can create temperature and moisture problems. (Product Help | Whirlpool)
Prepare a cooler
Keep a large insulated cooler and frozen gel packs ready.
When an outage will exceed four hours, perishable refrigerator food should be moved into a cooler containing enough ice to hold it at 40°F or below. (Ask USDA)
Organize the food
Keep commonly needed items together so you can remove them quickly.
Consider placing a small outage supply in a cooler before severe weather begins:
- Milk
- Medicine requiring refrigeration
- Sandwich ingredients
- Drinks
- Infant food
- Food needed for the next meal
This prevents repeated refrigerator openings.
How to Use the Blanket During an Outage
Step 1: Record the outage time
Write down the exact or estimated time the power failed.
Do not depend on memory several hours later.
Step 2: Keep the doors closed
Do not open the refrigerator merely to inspect the thermometer unless it has an exterior display.
Assume that every unnecessary opening shortens the useful cold-storage period.
Step 3: Confirm the appliance is inactive
The safest approach is to switch off the refrigerator at its control, unplug it, or turn off its dedicated breaker—only when the area is dry, the plug is safely accessible, and the appliance instructions permit it.
This prevents the compressor from restarting unexpectedly beneath a blanket.
Do not handle plugs, cords, or electrical panels while standing in water.
Step 4: Install the blanket
Apply the top-and-side panel, then secure the closed-door flaps.
Confirm again that:
- The back is open.
- The bottom grille is open.
- Nothing crosses the gaskets.
- The blanket cannot fall onto the receptacle.
Step 5: Monitor time and temperature
Use a remote thermometer whenever possible.
Do not interpret the blanket as permission to ignore the four-hour planning guideline.
Step 6: Move food when necessary
When the outage is expected to continue beyond four hours, move refrigerator perishables to a prepared cooler with ice or frozen gel packs.
Keep the cooler at or below 40°F and add ice as it melts. (Ask USDA)
What Food Requires Special Attention?
After a prolonged outage, higher-risk refrigerated foods include:
- Raw or cooked meat
- Poultry
- Fish and seafood
- Milk
- Eggs
- Soft cheese
- Leftovers
- Deli meat
- Cooked rice
- Cooked vegetables
- Casseroles
- Soups
- Cut fruit
- Cut vegetables
- Cream-based dressings
- Prepared salads
USDA recommends discarding these foods after more than four hours without refrigeration when they were not transferred to another cold source. (Food Safety and Inspection Service)
Never taste food to decide whether it is safe.
Dangerous contamination may not produce an obvious odor, appearance, or flavor. (U.S. Food and Drug Administration)
What About the Freezer?
Keep the freezer blanket flap closed and avoid opening the door.
When power returns:
- Food that still contains ice crystals may generally be refrozen or cooked.
- Food measured at 40°F or below may generally be refrozen or cooked.
- Quality may decline even when the food remains safe.
- Fully thawed perishable food held above 40°F too long should be discarded.
FDA specifically advises using ice crystals and measured temperature—not appearance or odor—to evaluate frozen food after an outage. (U.S. Food and Drug Administration)
Place raw meat and poultry where thawing liquid cannot drip onto other foods.
Using Ice During a Longer Outage
Block ice and frozen containers
Block ice generally lasts longer than small loose cubes.
Place it inside:
- A cooler
- The refrigerator compartment in a leak-resistant tray
- The freezer where appropriate
Keep food packaging protected from meltwater.
Dry ice
Dry ice can maintain low temperatures during an extended outage, but it requires special handling.
USDA states that approximately 50 pounds of dry ice may keep a fully stocked 18-cubic-foot freezer cold for about two days. Do not touch dry ice with bare skin or place it directly against food. (U.S. Food and Drug Administration)
Dry ice releases carbon dioxide gas.
Use it only according to supplier instructions, maintain appropriate ventilation, and never store it in an airtight container.
A refrigerator blanket does not change dry-ice safety requirements.
When the Power Returns
Remove the blanket first
Before plugging in the refrigerator or switching its breaker back on:
- Remove every front flap.
- Remove the top-and-side wrap.
- Check behind and beneath the appliance.
- Confirm that all ventilation openings are clear.
- Inspect the electrical cord.
- Make sure no fabric has fallen near the compressor.
- Restore power according to the appliance manual.
Do not leave even part of the blanket hanging over the back, sides, top, or lower grille while the refrigerator runs unless the manufacturer has specifically approved that configuration.
Check the thermometers
Record the refrigerator and freezer temperatures.
Do not assume that rapid cooling after power restoration makes previously unsafe food safe again.
Cooling food back below 40°F does not erase the time it spent at an unsafe temperature.
Inspect for condensation
Remove moisture from:
- Cabinet surfaces
- Door seals
- Floor
- Blanket
- Wall behind the refrigerator
Dry the insulation completely before storage.
A damp blanket can develop mildew and transfer moisture back to the appliance during the next use.
Common Mistakes
Wrapping a powered refrigerator
This can interfere with required heat dissipation.
Remove the blanket before the compressor restarts.
Covering the back
The rear often contains hot mechanical components, condenser equipment, wiring, and a drain system.
Leave it open.
Covering the lower grille
Many refrigerators move air through the lower front.
Do not block it.
Tucking insulation beneath the appliance
Material can contact warm machinery, wheels, electrical parts, or the drain pan.
Stop the blanket several inches above the floor.
Blocking the gasket
A blanket edge trapped in the door seal can release more cold air than the insulation saves.
Keep the perimeter completely clear.
Opening the door to check whether food feels cold
Use a remote thermometer and keep the door closed.
Assuming the blanket guarantees extra safe time
It may slow warming, but it has no certified extension period.
Follow official temperature and time guidance.
Covering only the refrigerator while ignoring the freezer
The freezer may contain a much larger quantity of valuable food.
Prepare separate flaps without connecting the doors together.
Using wet moving blankets
Moist insulation performs poorly, adds weight, and may support mold.
Use clean, dry materials.
Leaving the wrap on when the household is away
An outage may end while no one is present.
Either keep the appliance safely disconnected until the blanket is removed or do not install the blanket.
Depending on smell
Foodborne pathogens do not always produce an obvious smell.
Use temperature and elapsed time.
Optional Improvements
Add a remote thermometer
A sensor inside the refrigerator with an external display allows monitoring without opening the door.
Choose a model rated for refrigerator and freezer temperatures.
Add labeled thermometer pockets
Sew a clear pocket into the front of the blanket for:
- Outage time
- Last temperature reading
- Ice added
- Food moved
- Power restored
Build separate insulated panels
Rigid removable panels can be constructed for the sides and top using enclosed foam board.
Keep foam completely covered, maintain all required clearances, and remove every panel before restart.
Add a sunlight shield
When the refrigerator receives direct sunlight through a window, close blinds or curtains.
Do not place loose reflective material where it can focus sunlight or contact electrical equipment.
Prepare a refrigerator-to-cooler transfer basket
Keep high-risk food in one or two removable bins.
During an extended outage, the complete bin can be transferred quickly into an iced cooler.
Store a freezer map
Tape a diagram of freezer contents nearby.
Knowing where each item is located reduces the time the door remains open.
How to Test Whether the Blanket Helps
Do not test with perishable food.
A safer comparison can use the empty appliance or containers of water.
- Cool the refrigerator normally.
- Place several water containers inside.
- Record the interior temperature.
- Switch it off.
- Keep the door closed.
- Record temperature at regular intervals without a blanket.
- Restore, cool, and repeat under similar room conditions with the blanket.
- Compare the temperature curves.
For a meaningful comparison, keep these factors similar:
- Starting temperature
- Room temperature
- Refrigerator contents
- Door-opening frequency
- Test duration
- Thermometer position
- Sun exposure
The results apply only to your appliance and conditions.
Do not use a home experiment to override official food-safety limits.
Is This Project Worth Building?
Possibly—as one inexpensive layer in a complete outage plan.
Its advantages include:
- Low cost
- Reusable materials
- No power required
- Simple construction
- Potential reduction in cabinet heat gain
- Protection from sunlight and warm drafts
- Easy storage
- Useful preparedness practice
Its limitations are significant:
- No verified extension time
- Possible ventilation hazard
- Must be removed before restart
- Cannot restore lost cooling
- Does not replace ice
- Does not replace thermometers
- Cannot determine food safety
- May trap moisture
- May be incompatible with some refrigerator designs
The most valuable preparations remain:
- Keep appliance thermometers installed.
- Freeze water containers.
- Keep the freezer full.
- Keep doors closed.
- Prepare coolers and ice.
- Move refrigerated perishables after four hours when necessary.
- Evaluate food by temperature and official guidance.
The blanket may support those precautions. It should never replace them.
Final Safety Note
A blackout refrigerator blanket is for temporary use only while the appliance is inactive.
Never cover an operating refrigerator, compressor compartment, condenser, electrical connection, rear surface, lower ventilation grille, water connection, or door gasket. Read the appliance manual before use and remove the entire cover before restoring power.
An unopened refrigerator generally keeps food cold for about four hours. A full unopened freezer may remain cold for approximately 48 hours, and a half-full freezer for approximately 24 hours. Use appliance thermometers and move refrigerated perishable food into an iced cooler when the outage extends beyond the safe period. (U.S. Food and Drug Administration)
When you are uncertain about food safety, discard the food.