Many households own emergency supplies but cannot reach them quickly.
Flashlights disappear into kitchen drawers. Gloves are stored in the garage. Water is in the pantry. First-aid supplies are in a bathroom cabinet, while important documents are somewhere else entirely.
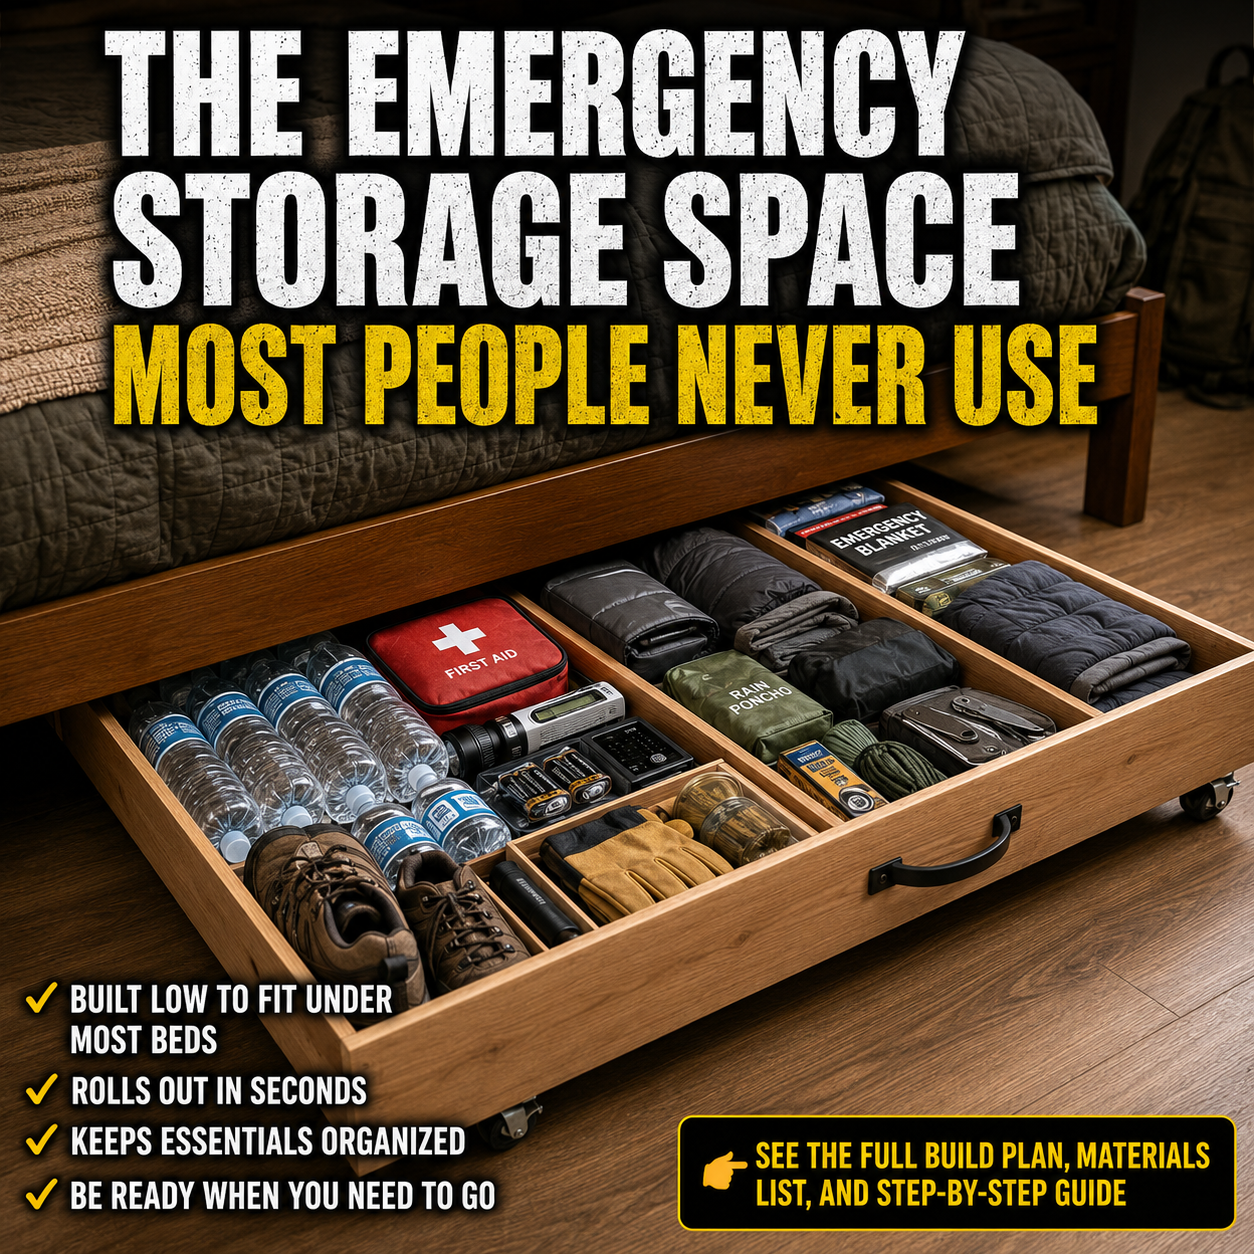
A wide, low-profile drawer beneath the bed can bring essential items together without requiring another closet, cabinet, or shelving unit.
The finished drawer can hold:
- Sturdy shoes
- Work gloves
- Flashlights and a radio
- First-aid supplies
- Warm clothing
- Rain gear
- Emergency blankets
- Hygiene supplies
- Copies of important documents
- A small evacuation bag
- Limited food and water
- Supplies for children or pets
Ready.gov and FEMA recommend preparing emergency supplies that include water, nonperishable food, a flashlight, radio, batteries, first-aid equipment, medications, hygiene supplies, cash, clothing, sturdy shoes, and household-specific items. The kit should reflect the actual needs of the people and animals in the home. (Ready.gov)
Under-bed storage is particularly useful in:
- Apartments
- Small homes
- Bedrooms without large closets
- Households with limited mobility
- Homes where nighttime emergencies are a major concern
- Areas prone to earthquakes, tornadoes, winter storms, or outages
However, the drawer should not become your household’s only emergency kit.
Use it as a rapid-access home station containing removable modules—not as one enormous drawer that must be dragged through an evacuation.
A packed wooden drawer may be easy to roll across a bedroom floor but impossible to carry down stairs, place in a vehicle, or move across debris. The best design holds one or more smaller bags that can be lifted out immediately.
What This Project Actually Builds
The project is a shallow wooden platform with:
- Low side walls
- A reinforced bottom
- Small casters or furniture rollers
- A front pull handle
- Removable dividers
- Labeled supply zones
- Optional dust cover
It rolls beneath an ordinary bed and pulls out in seconds.
The drawer has two primary purposes.
Immediate nighttime access
The front section holds items you may need within seconds:
- Shoes
- Flashlight
- Gloves
- Eyeglasses
- Whistle
- Respirator or dust mask
- Small first-aid pouch
Organized emergency storage
The rear compartments hold supplies for sheltering in place or loading into a vehicle:
- Clothing
- Blankets
- Sanitation supplies
- Radio
- Food
- Copies of records
- Pet supplies
- A removable evacuation bag
This separation is more practical than filling the drawer randomly.
Important Correction to the Featured Image
The image presents the drawer as a place for emergency water.
That is useful in moderation, but a low wooden drawer is not the ideal location for an entire household water supply.
CDC recommends storing at least one gallon of water per person per day for three days, with a two-week supply when practical. Extra water may be needed in hot climates and for people who are sick, pregnant, or nursing, as well as for pets. (CDC)
For a household of four, the minimum three-day recommendation equals 12 gallons—roughly 100 pounds of water before counting the containers or drawer.
Putting all of that beneath one bed can:
- Overload small casters
- Make the drawer difficult to move
- Stress the wooden joints
- Damage flooring
- Leave the household without water if the bedroom floods
- Consume most of the available storage space
A better arrangement is:
- Keep several small bottles in the drawer for immediate access.
- Store the main water supply in stronger containers elsewhere.
- Divide bulk water between more than one location.
- Keep stored water away from heat, sunlight, chemicals, and flood risk.
FDA advises keeping emergency food, water, and medications on shelving that will remain protected when flooding is possible. (U.S. Food and Drug Administration)
Before Building: Decide What the Drawer Must Do
Do not begin by measuring the bed.
Begin by deciding whether the drawer is primarily for:
- Nighttime emergency access
- Sheltering in place
- Rapid evacuation
- A combination of all three
The answer determines its layout.
Nighttime-access drawer
Best for:
- Flashlight
- Shoes
- Gloves
- Eyeglasses
- Whistle
- First-aid pouch
- Warm layer
- Respirator
The drawer can be relatively small and positioned near the sleeper’s side of the bed.
Shelter-in-place drawer
Best for:
- Blankets
- Radio
- Hygiene items
- Backup lighting
- Food
- Limited water
- Sanitation supplies
- Charging equipment
This version may use most of the area beneath the bed.
Evacuation-ready drawer
Best for:
- One removable backpack per person
- Copies of documents
- Clothing
- rain gear
- Medications
- Pet supplies
- Small food and water modules
The drawer itself stays home. The bags inside leave with you.
For most households, the combined design is the most useful.
Do Not Block Your Escape Route
Pull the drawer into the room and imagine using it in darkness.
It should not:
- Block the bedroom door
- Cover an emergency-exit window
- Interfere with a wheelchair or walker
- Extend across the route to a child’s bed
- Require walking backward over supplies
- Trap the user between the bed and wall
- Need tools or keys to open
- Be so heavy that only one household member can move it
Install the handle where it can be found by touch.
A small piece of glow-in-the-dark tape can help identify the pull point during a blackout.
Practice opening the drawer while the room is dark.
Measure the Available Space
Beds and frames vary considerably.
Measure these areas before buying materials.
Height
Measure from the floor to the lowest obstruction beneath the bed.
Check:
- Side rails
- Center support beam
- Slats
- Bed-frame bolts
- Motor housing on adjustable beds
- Storage brackets
- Sagging fabric or box-spring material
Take measurements at the front, center, and rear.
Use the smallest measurement.
Leave at least ½ inch of vertical clearance above the completed drawer. Carpet may require more because the wheels can sink into the pile.
Width
Measure the clear opening between:
- Bed legs
- Frame supports
- Wall
- Nightstand
- Other furniture
Do not assume that the full mattress width is available beneath the frame.
Depth
Measure how far the drawer can travel before striking:
- A center bed leg
- Wall molding
- Electrical cords
- Heating vent
- Adjustable-bed mechanism
Leave enough of the drawer exposed—or install a long enough handle—that it cannot disappear beyond reach.
Suggested Dimensions
A practical medium-size drawer might measure:
- Width: 42 to 48 inches
- Depth: 24 to 30 inches
- Overall height: 5 to 7 inches
- Side-wall height: 3½ to 5 inches
These are starting dimensions only.
A king-size bed may accommodate two separate drawers. Two smaller units are often better than one enormous drawer because they:
- Weigh less
- Roll more easily
- Can be assigned to different people
- Remain accessible from both sides
- Are less likely to strike a center support
For a shared bedroom, consider one drawer per side rather than one full-width drawer.
Materials
Wooden structure
- ½-inch or ¾-inch plywood for the bottom
- Straight 1×4 or 1×6 lumber for the sides
- 1×2 lumber for internal reinforcement
- Exterior or cabinet-grade screws
- Wood glue
- Small corner braces, optional
- Sandpaper
- Water-based finish, optional
Use clean, dry wood that is free from:
- Mold
- Rot
- Oil
- Chemical contamination
- Insect damage
- Severe warping
- Protruding nails
Avoid unidentified pallet lumber and pressure-treated wood for an indoor bedroom project.
Rolling hardware
Choose one:
- Low-profile fixed casters
- Small swivel casters
- Furniture rollers
- Heavy-duty drawer slides for a built-in version
- Furniture glides for thick carpet
Each wheel should have a published load rating.
Calculate the required rating using:
Expected loaded weight ÷ number of wheels, plus a generous safety margin
For example, a drawer expected to weigh 120 pounds should not use four wheels rated for only 30 pounds each. That leaves no margin for uneven loading, shock, or one wheel briefly carrying more weight.
Six rollers can distribute a wide drawer’s load better than four.
Hardware and organization
- Recessed pull handle
- Two side handles, optional
- Plastic baskets
- Removable dividers
- Hook-and-loop straps
- Labels
- Nonslip drawer liner
- Waterproof document pouch
- Lidded containers
- Dust cover, optional
Avoid a protruding handle that could catch feet or clothing.
Tools
- Tape measure
- Pencil
- Carpenter’s square
- Saw
- Drill
- Countersink bit
- Screwdriver
- Clamps
- Sandpaper
- Safety glasses
- Hearing protection
- Work gloves
Example Cut List
For a drawer measuring 46 inches wide, 28 inches deep, and approximately 5½ inches tall:
- One plywood bottom: 46 × 28 inches
- Two long side rails: 46 inches
- Two end rails cut to fit between the long rails
- Two 1×2 reinforcement strips: 44½ inches
- Three or four short divider strips
- One front pull block, optional
- Six low-profile casters
The exact end-rail length depends on the thickness and orientation of the side boards.
Dry-fit everything before applying glue.
Step 1: Cut the Bottom Panel
Mark the plywood carefully.
Confirm that the panel will pass between the bed legs and through the room’s doorway before cutting.
Cut the base and sand all edges.
Round the front corners slightly. Sharp corners can damage ankles, bedding, furniture, and walls.
Set the bare panel beneath the bed temporarily.
Confirm that:
- It slides fully into position.
- It clears the center supports.
- It can be reached from the intended side.
- There is space for wheels and side rails.
- It does not cover a floor vent or electrical outlet.
Correct the dimensions now rather than after building the full box.
Step 2: Build the Perimeter Frame
Arrange the side and end rails around the plywood base.
Apply wood glue along the joints.
Clamp the frame square.
Fasten the corners using screws driven through predrilled holes.
Measure both diagonals. When the measurements match, the frame is square.
Attach the plywood bottom using screws spaced around the perimeter.
Countersink every screw head so it cannot scrape the floor or snag stored items.
Do not rely on nails alone. Repeated rolling and heavy supplies can loosen lightly fastened joints.
Step 3: Reinforce the Bottom
A wide plywood base can sag under concentrated weight.
Install two or three shallow reinforcement strips beneath or above the bottom panel.
Position them:
- Across the drawer’s width
- Beneath heavy compartments
- Clear of the casters
- Low enough to preserve bed clearance
When height is limited, use the thicker plywood option and keep reinforcement inside the drawer as divider walls.
Test for flex by supporting the empty drawer at the caster locations and pressing gently on the center.
Add reinforcement when the panel bends noticeably.
Step 4: Install the Casters
Turn the drawer upside down on a protected surface.
Position one caster near each corner.
For a wide drawer, add:
- One center-front caster
- One center-rear caster
The wheels should sit far enough inward that screws do not split the side rails but close enough to the edges to prevent tipping.
Predrill every fastener hole.
Use screws that are long enough to hold securely but short enough that their tips cannot enter the storage compartment.
After installation:
- Turn the drawer upright.
- Place it on the floor.
- Push it in every direction.
- Check for rocking.
- Confirm that every wheel contacts the floor.
- Roll it beneath the bed.
Fixed casters track straight and may be easier on a narrow path. Swivel casters improve maneuverability but can make a large drawer wander sideways.
Step 5: Add the Pull Handle
A recessed handle is safest.
Center it on the front panel and position it where the user can reach it without placing fingers beneath the drawer.
Alternatives include:
- A webbing loop
- Recessed trunk handle
- Low-profile cabinet pull
- Rope handle passing through smooth holes
A fabric or webbing pull can fold flat when not in use.
Test the handle with the drawer partly loaded.
The front panel should not flex or separate when pulled.
Add a reinforcement block behind the handle if necessary.
Step 6: Add Removable Dividers
Permanent compartments look neat but can make the drawer difficult to update.
Removable dividers provide more flexibility.
A useful layout includes:
Front-left compartment
- Shoes
- Gloves
- Flashlight
- Eyeglasses
- Dust mask
Front-center compartment
- First-aid kit
- Essential medication pouch
- Whistle
- Radio
Front-right compartment
- Removable go-bag
- Keys
- Copies of contacts
- Small amount of cash
Rear compartments
- Clothing
- Blankets
- Rain gear
- Food
- Hygiene supplies
- Pet items
Use thin plywood, corrugated plastic, or washable plastic baskets.
Round every exposed divider corner.
Do not make the compartments so tight that supplies must be unpacked in a specific order.
Step 7: Protect Supplies From Dust and Moisture
The space beneath a bed collects dust, hair, insects, and moisture.
Protect the contents with:
- Lidded plastic bins
- Zippered fabric cubes
- Waterproof pouches
- Resealable bags
- A fitted drawer lid
- A washable fabric cover
Do not place loose food, exposed bandages, open batteries, or unprotected documents directly into the wooden drawer.
Leave slight ventilation around clothing and blankets so unnoticed moisture does not remain trapped indefinitely.
In flood-prone homes, under-bed storage may be unsuitable for medications, documents, electronics, and the primary emergency supply. Keep crucial items on higher shelving instead. (U.S. Food and Drug Administration)
Step 8: Finish and Label the Drawer
Sand every surface.
Remove splinters around:
- Handles
- Divider slots
- Upper edges
- Corners
An optional water-based finish can make the wood easier to wipe clean.
Allow it to cure completely before placing blankets, food, medications, or medical supplies inside.
Label the front:
EMERGENCY SUPPLIES
Add the date of the last inspection.
Inside, label the compartments by function rather than item name:
- LIGHT
- FIRST AID
- CLOTHING
- WATER
- SANITATION
- DOCUMENTS
- GO BAG
- PET
Functional labels remain useful when individual products change.
What to Put in the Drawer
1. Immediate bedside module
Store this closest to the handle:
- Sturdy closed-toe shoes
- Work gloves
- Flashlight or headlamp
- Eyeglasses
- Whistle
- Dust mask
- Small first-aid pouch
FEMA emergency-kit guidance includes sturdy shoes, gloves, flashlights, first-aid supplies, clothing, rain gear, and blankets. (FEMA)
Shoes deserve a front position.
Broken glass, sharp debris, nails, and fallen objects can make walking barefoot dangerous after an earthquake, storm, structural failure, or nighttime evacuation.
Store them with the toes facing the drawer opening so they can be found by touch.
2. Lighting and communication module
Include:
- LED flashlight
- Headlamp
- Battery-powered or hand-crank radio
- Spare batteries
- Phone charging cable
- Small power bank
- Printed emergency contacts
- Local map
- Pen and waterproof notebook
Ready.gov recommends alternative phone-charging methods, a radio, flashlights, and backup batteries as part of home preparedness. (Ready.gov)
Test the flashlight and radio regularly.
Do not store every battery loose in one metal container. Keep conventional batteries:
- In original packaging
- With their terminals protected
- Away from moisture
- Separate from coins and tools
- Checked for leakage
3. First-aid module
Use a portable zippered kit rather than placing loose medical supplies into the drawer.
Possible contents include:
- Adhesive bandages
- Sterile gauze
- Medical tape
- Antiseptic wipes
- Disposable gloves
- Tweezers
- Trauma shears
- Elastic wrap
- Cold pack
- Emergency instructions
The first-aid pouch should lift out in one motion.
A kit is more valuable when household members also know how to use it. FEMA preparedness materials encourage both maintaining a first-aid kit and obtaining basic first-aid training. (Ready.gov)
4. Medication module
Keep an up-to-date medication list containing:
- Medication name
- Strength
- Dose
- Frequency
- Reason it is taken
- Allergies
- Prescriber
- Pharmacy
- Required medical supplies
CDC recommends discussing an emergency medicine supply with a doctor or pharmacist and preparing a list of prescriptions, dosages, medical needs, and allergies. Some medications also require a cooler and chemical ice packs. (CDC)
Store medicines:
- In original labeled packaging
- In a waterproof container
- According to label temperatures
- Where children and pets cannot reach them
- Within their expiration dates
FDA advises keeping most medicines in a cool, dry place but notes that some require refrigeration or other specific conditions. Improper temperature and humidity can reduce effectiveness. (U.S. Food and Drug Administration)
A low unlocked drawer is not suitable for controlled substances or medication in a home with young children. Use a secured location and keep the medication list or a removable emergency pouch in the drawer instead.
5. Clothing and warmth module
Pack:
- Long-sleeved shirt
- Pants
- Socks
- Underwear
- Warm hat
- Rain poncho
- Compact blanket
- Emergency bivy
- Hand warmers appropriate to your climate
Use compression bags cautiously. They save space, but a punctured bag can expand and prevent the drawer from closing.
Choose clothing that fits now.
Children’s sizes and seasonal needs should be reviewed frequently.
6. Hygiene and sanitation module
Possible items include:
- Toilet paper
- Moist towelettes
- Soap
- Hand sanitizer
- Toothbrush and toothpaste
- Menstrual supplies
- Garbage bags
- Zip-top bags
- Disposable masks
- Small towel
- Nitrile gloves
Ready.gov includes moist wipes, garbage bags, plastic ties, hygiene items, and sanitation supplies in basic emergency planning. (Ready.gov)
Keep liquids in a leak-resistant secondary bag.
A single bottle of sanitizer can ruin paper records, bandages, clothing, and electronics when its cap fails.
7. Food and water module
Good drawer foods include:
- Energy bars
- Dried fruit
- Crackers
- Nut or seed butter packets
- Ready-to-eat pouches
- Shelf-stable snacks
- Manual can opener
Choose foods that:
- Require little or no cooking
- Need minimal water
- Match dietary restrictions
- Are familiar to the household
- Remain inside sealed pest-resistant containers
Store several small water bottles for immediate use, but keep the main household supply elsewhere.
Commercially bottled water is CDC’s safest and most reliable emergency option. When filling reusable containers, use food-grade water-storage containers and replace the water on the recommended schedule. (CDC)
Do not store food directly beside:
- Cleaning chemicals
- Fuel
- Medicines that could leak
- Used shoes
- Batteries
- Pet waste supplies
8. Documents and cash module
Keep copies—not irreplaceable originals—of:
- Identification
- Insurance information
- Medical information
- Emergency contacts
- Pet vaccination records
- Home inventory
- Important phone numbers
- Meeting locations
- Evacuation routes
Place them in a waterproof and fire-resistant document pouch when possible.
Include a modest amount of small-denomination cash. Electronic payment systems and ATMs may be unavailable during an outage. FEMA’s emergency-kit guidance includes cash and important family records. (FEMA)
Keep encrypted digital copies in another secure location.
9. Pet module
Include:
- Leash or harness
- Collapsible bowl
- Food
- Small water supply
- Waste bags
- Medication
- Vaccination information
- Recent photograph
- Comfort item
A large carrier will rarely fit beneath a bed, but it should remain close enough to retrieve quickly.
Ready.gov recommends separate emergency supplies for pets, including food, water, medicine, records, restraint equipment, sanitation items, and a carrier. (Ready.gov)
Add a Removable Go-Bag
The drawer should contain at least one bag that can be lifted out without sorting individual supplies.
A practical go-bag might contain:
- Copies of documents
- Medication pouch
- Clothing
- Rain poncho
- Flashlight
- Phone charger
- Small first-aid kit
- Food
- Water
- Cash
- Hygiene kit
Wildfire evacuation guidance recommends prepacked kits containing medicines, family records, contact information, cash, clothing, food, and water so they can be taken quickly when evacuation becomes necessary. (U.S. Fire Administration)
Do not overload the bag.
A kit that cannot be carried by its intended user is not an evacuation kit.
Battery and Power-Bank Safety
A power bank is convenient, but placing rechargeable lithium-ion equipment beneath bedding requires caution.
The U.S. Fire Administration recommends storing lithium-ion batteries:
- At room temperature when possible
- Away from direct sunlight
- Away from combustible material
- In a cool, dry location
- According to the manufacturer’s instructions
Stop using a lithium-ion battery that becomes unusually hot, changes shape or color, leaks, produces an odor, or makes unusual noises. (U.S. Fire Administration)
For the under-bed drawer:
- Do not charge a power bank while it is inside the closed drawer.
- Do not cover charging devices with blankets.
- Do not store damaged or swollen batteries.
- Keep battery terminals away from metal tools and coins.
- Use the charger specified by the manufacturer.
- Store large battery stations somewhere with better ventilation and separation from bedding.
- Recycle damaged or spent lithium batteries through an appropriate program rather than household trash.
A small emergency power bank can be stored in a protective case, inspected routinely, and removed for charging.
Items That Should Not Be Stored Under the Bed
Do not put these items in the drawer:
- Propane cylinders
- Butane canisters
- Gasoline
- Kerosene
- Alcohol fuel
- Charcoal
- Fireworks
- Road flares unless their storage instructions clearly permit it
- Candles or oil lamps intended for immediate indoor use
- Loose matches
- Corrosive chemicals
- Pesticides
- Bleach beside food or medicine
- Damaged lithium batteries
- Large portable power stations
- Ammunition
- Temperature-sensitive medication without proper control
- Irreplaceable original documents
- Excessive quantities of water
Flame-producing and fuel-powered equipment belongs in an appropriate location away from bedding and escape routes.
The drawer should improve bedroom safety, not introduce a fire or chemical hazard.
Weight Management
A beautifully organized drawer can still fail when it is overloaded.
Estimate the total weight before loading.
Include:
- Wood
- Casters
- Water
- Canned food
- Tools
- Batteries
- First-aid equipment
- Clothing
Place the heaviest items:
- Low
- Near the wheels
- Evenly distributed
- Away from the pull handle
Do not place all water and tools in one corner.
An unbalanced drawer can twist, jam against the bed, or overload one caster.
After loading:
- Pull the drawer fully out.
- Push it back in.
- Repeat from a seated position.
- Ask the least physically strong intended user to test it.
- Roll it across any floor transition.
- Listen for cracking or wheel noise.
Reduce the contents when it requires excessive force.
Hard Floors Versus Carpet
Hardwood, tile, or laminate
Use:
- Soft rubber casters
- Nonmarking wheels
- Adequate wheel diameter
- Clean rolling surfaces
Small hard plastic wheels can scratch floors or stop on tiny debris.
Low-pile carpet
Use larger wheels or broad furniture rollers.
Very small casters may sink and make the loaded drawer nearly impossible to move.
Thick carpet
A wheeled drawer may not work well.
Consider:
- Low-friction furniture glides
- A rigid pull-out tray
- A shallow box with a long handle
- Raising the bed slightly with approved furniture risers
Do not raise a bed using loose bricks, buckets, scrap blocks, or unstable homemade supports.
Special Considerations for Adjustable Beds
Do not place a large drawer beneath an adjustable bed until you have inspected the full movement range.
Motorized frames may contain:
- Linkages
- Wiring
- Control boxes
- Moving bars
- Folding sections
- Massage motors
Operate the empty bed through all positions and measure the minimum clearance.
Never allow the drawer to touch or restrict electrical wiring or moving hardware.
When clearance is uncertain, use narrow side drawers that stay outside the mechanism’s working area.
Special Considerations for Children
A heavy rolling drawer can injure fingers or feet.
In a child’s room:
- Use slow-rolling casters.
- Eliminate sharp corners.
- Install finger-safe handles.
- Keep medicines locked elsewhere.
- Do not store choking hazards loose.
- Prevent children from climbing inside.
- Use a removable stop preventing the drawer from rolling freely during play.
- Keep the drawer light enough for the supervising adult to control.
Teach older children where the emergency flashlight and shoes are located, but do not treat the drawer as a toy box.
Special Considerations for Limited Mobility
The drawer can be especially useful when designed around the user.
Consider:
- An extra-long pull strap
- High-contrast labels
- Large-print instructions
- Braille or tactile markers
- Lightweight removable modules
- Side access from a wheelchair
- Medication list near the front
- Backup hearing-aid batteries
- Communication cards
- Mobility-device supplies
Do not place critical items deeper than the person can reach safely.
Test the setup from the position in which it will actually be used—not only while standing.
Protecting the Drawer From Flooding
Under-bed storage is inherently low to the floor.
In homes where water intrusion is a realistic hazard:
- Keep documents in waterproof pouches.
- Keep electronics inside sealed containers.
- Do not make the drawer your sole medical-supply location.
- Store the main food and water supply on higher shelves.
- Move the drawer before a forecast flood when it is safe to do so.
- Keep a second go-bag above likely flood height.
FDA advises protecting emergency food, medication, and water from expected flood damage. (U.S. Food and Drug Administration)
A low drawer is excellent for quick access but poor as the only layer of protection against rising water.
Inspection and Rotation Schedule
Review the drawer at least twice each year and after every use.
Check:
- Water dates
- Food dates
- Medication dates
- Clothing sizes
- Seasonal clothing
- Flashlight operation
- Radio operation
- Power-bank condition
- Battery leakage
- First-aid supplies
- Document accuracy
- Cash
- Pet information
- Wheel condition
- Loose screws
- Mold or moisture
- Pest activity
A simple schedule is:
- Spring: prepare for storms, heat, wildfire, and outages
- Fall: prepare for winter weather, cold, and holiday travel
Also inspect the kit whenever:
- A household member changes medication
- A child changes clothing size
- A pet’s needs change
- Someone moves in or out
- Contact information changes
- The family vehicle changes
- A major supply is used
Write the inspection date on the drawer’s front label.
Common Building Mistakes
Building one drawer as wide as the entire bed
It may strike center legs, become too heavy, or be impossible to remove from the room.
Two smaller drawers are often more practical.
Forgetting the caster height
A wooden box that fits without wheels may no longer fit after they are installed.
Include every hardware component in the height calculation.
Using tiny decorative casters
Furniture wheels intended for light boxes may fail under water, canned goods, tools, and plywood.
Use rated hardware.
Making permanent compartments too small
Emergency supplies change.
Use removable dividers and baskets.
Storing all the household water beneath one bed
The weight can overwhelm the drawer and one flood can compromise the entire supply.
Distribute the water.
Keeping supplies loose
Loose bottles, tools, and batteries shift when the drawer moves.
Use baskets and straps.
Storing medicines without child protection
A low drawer is easily reached by children and pets.
Secure medication appropriately.
Charging batteries inside the drawer
Charging equipment generates heat and should not be buried beneath bedding or enclosed among combustible supplies.
Remove it for charging.
Blocking the bedroom exit
The drawer must open without becoming an obstacle during evacuation.
Never testing it in darkness
A handle that is obvious in daylight may be nearly impossible to locate during a blackout.
Practice.
Optional Improvements
Add a dust lid
Build a thin removable plywood or corrugated-plastic cover.
Keep it lightweight and easy to lift.
Add a folding inventory card
Attach a laminated inventory beneath the lid.
List:
- Contents
- Quantities
- Locations
- Replacement dates
- Important phone numbers
Add color-coded modules
For example:
- Red: first aid
- Blue: water
- Yellow: lighting and communication
- Green: food
- Gray: clothing
- Orange: evacuation documents
Add a detachable bedside section
Create a small front tray holding shoes, flashlight, glasses, and gloves.
It can be removed independently without opening the full drawer.
Add stops
Low wooden or rubber stops can keep the drawer from rolling too far beneath the bed.
Do not make the stops so strong that emergency removal requires tools.
Add a sealed document box
Use a small waterproof pouch for copies of identification and insurance records.
Add one bag per household member
Each bag can contain clothing, hygiene products, medication information, and personal supplies.
The shared drawer then holds common equipment.
Is This Project Worth Building?
Yes—especially in a home where emergency supplies are scattered or closet space is limited.
Its advantages include:
- Uses otherwise wasted space
- Keeps nighttime supplies close
- Reduces clutter
- Protects gear from casual handling
- Allows supplies to be organized by function
- Rolls out quickly
- Can hold removable evacuation bags
- Adapts to apartments and small homes
- Requires no electricity
Its limitations are equally important:
- It can become too heavy.
- It is vulnerable to flooding.
- It may collect dust and moisture.
- It is not portable as a complete unit.
- It can block an exit when poorly positioned.
- It is unsuitable for fuel, flame devices, or large batteries.
- It may not fit beneath adjustable beds.
- It does not replace supplies stored elsewhere.
The strongest system uses several layers:
- Immediate bedside supplies
- Under-bed household modules
- Portable go-bags
- Bulk food and water stored elsewhere
- Vehicle kit
- Copies of critical information in another secure location
Preparedness is more resilient when one damaged, blocked, or inaccessible container does not eliminate the entire supply.
Final Safety Note
An under-bed emergency drawer should improve access without creating a new hazard.
Keep it light enough for every intended user to pull. Do not block bedroom exits, floor vents, electrical cords, or adjustable-bed mechanisms. Store the main household water supply in appropriately rated containers and distribute it between safe locations.
Do not charge lithium-ion devices inside the closed drawer or store damaged batteries near bedding. Keep medication in original packaging, follow its temperature requirements, and secure it from children and pets.
Use removable go-bags so essential supplies can leave the house even when the wooden drawer cannot.