Boiling water kills germs. It does not remove everything else that might be in it.
Distillation goes a step further: it turns water into steam, leaves many impurities behind in the pot, then cools that steam back into liquid water in a separate container. The result is often cleaner than what you started with — but “often cleaner” and “safe to drink anywhere” are not the same claim, and it’s worth understanding the difference before relying on a homemade setup.
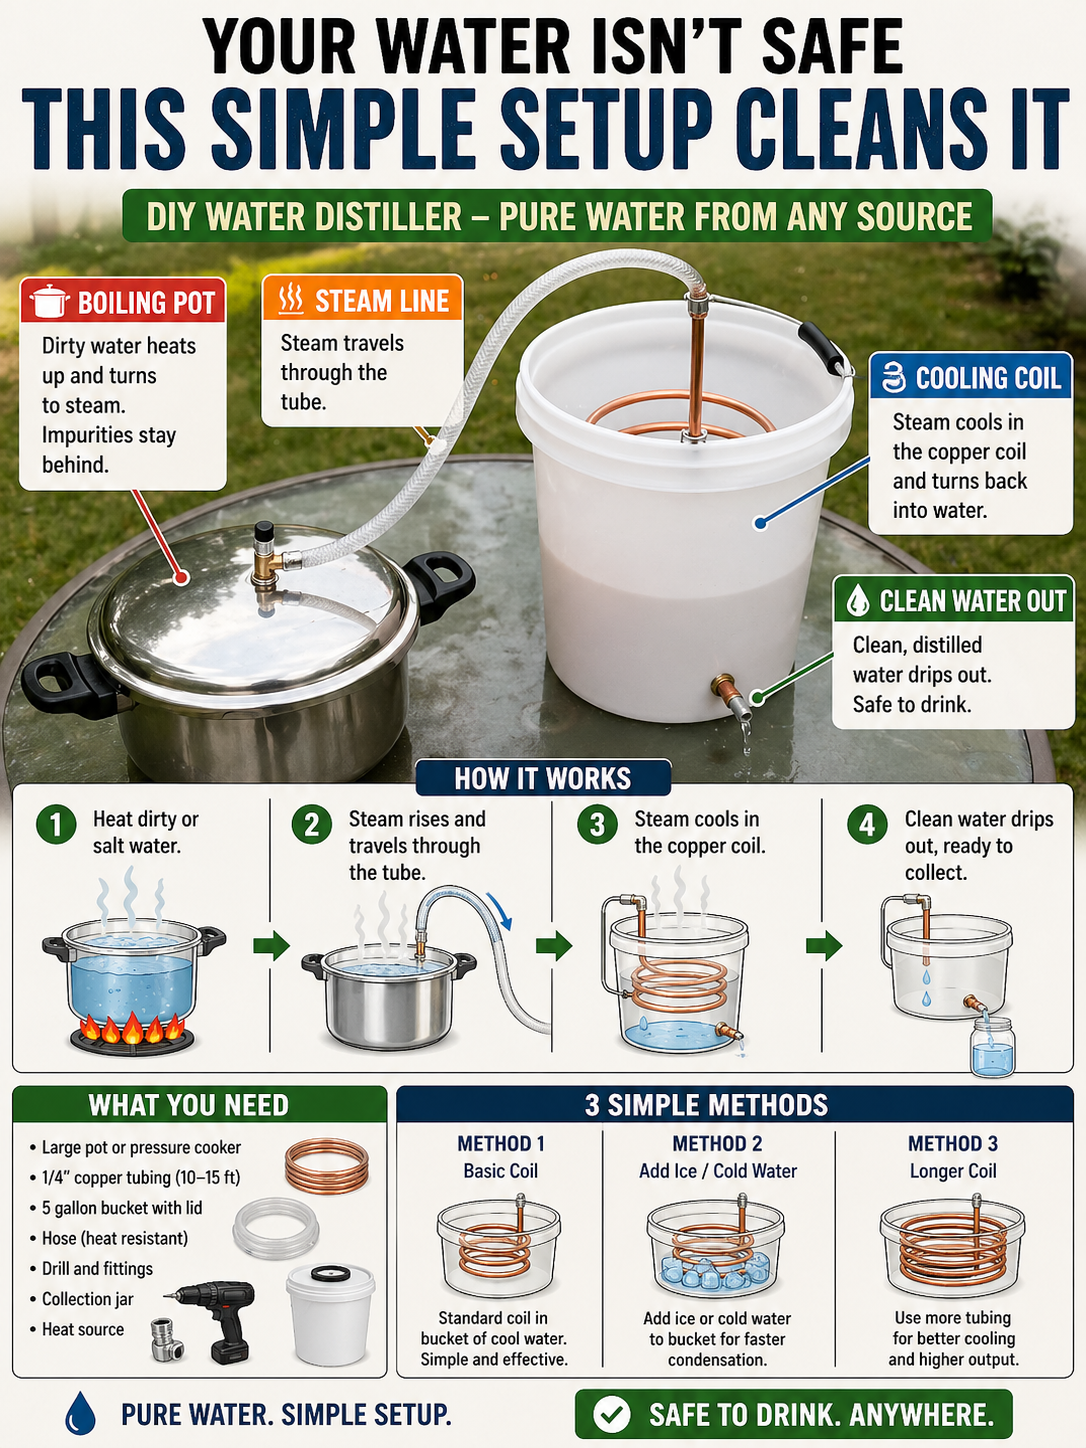
The design uses:
- A pot or pressure cooker to boil the source water
- A heat-resistant hose carrying steam away from the pot
- A coiled length of copper tubing acting as a condenser
- A bucket of cool water surrounding the coil to speed condensation
- A spigot or fitting where finished water drips out
The basic principle is:
Boil water → carry the steam through a cooled coil → collect the condensed liquid = distilled water
However, this project has real limitations, and treating it as a universal water-purification solution can be genuinely dangerous.
A homemade still is not a substitute for a certified water filter, a laboratory water test, or professional treatment when the source water is known or suspected to contain chemical contaminants. It should never be assumed safe for water from an unknown industrial, agricultural, or heavily polluted source without further testing.
What a DIY Distiller Can — and Cannot — Do
Distillation can meaningfully address:
- Bacteria, viruses, and parasites (all are left behind or destroyed by boiling)
- Dissolved minerals and salts, including much of what makes water “hard” or brackish
- Heavy metals and most non-volatile dissolved solids
- Turbidity and sediment
It generally cannot remove or may actually concentrate in the distillate:
- Volatile organic compounds (VOCs) — chemicals like some solvents, pesticides, and fuel residues that boil at or below water’s boiling point and travel with the steam instead of staying behind
- Chlorine and some disinfection byproducts, unless a carbon pre-filter or specific venting step is used
- Certain contaminants that require chemical or filtration treatment rather than heat
It can also introduce new risks if built or used carelessly:
- Lead from solder, if the coil, fittings, or joints were assembled with anything other than certified lead-free, food-safe solder
- Metallic taste or leaching from tubing that isn’t rated for potable water use
- Bacterial growth in a coil, hose, or collection vessel that isn’t cleaned between uses
Do not rely on a DIY still for:
- Water known or suspected to contain industrial chemicals, pesticides, or fuel contamination, without additional testing and filtration
- Any use where solder, flux, or tubing safety cannot be confirmed
- Long-term daily drinking water without periodically testing the output
- A pressurized or sealed system that hasn’t been checked for a safe pressure-relief path
If you have any doubt about your source water — particularly water from an unfamiliar well, an industrial area, or after a chemical spill — get it tested before treating distillation as your only safeguard.
Why Volatile Contaminants Matter
Distillation works by exploiting the fact that pure water boils and evaporates at a known, fixed temperature. Non-volatile impurities — most minerals, salts, heavy metals, and microorganisms — don’t evaporate at that temperature, so they stay behind in the pot.
The problem is that not every contaminant follows that rule.
Some chemicals boil at temperatures at or below water’s boiling point, or evaporate readily alongside steam. If present in the source water, they can travel through the hose and coil right along with the water vapor, ending up in your “clean” output at a similar — or in some cases higher — concentration than the water you started with.
This is why distillation is generally most trustworthy for:
- Biologically contaminated water (bacteria, parasites, viruses)
- Water high in dissolved minerals or salts (including a basic desalination use case)
- Water with sediment or heavy metals
And least trustworthy, on its own, for:
- Water from an area with known chemical, fuel, or pesticide contamination
- Water you can smell chemical odors in
- Water you have no information about at all
Pairing a still with a quality carbon filter on the source water, or getting the source tested, closes much of this gap.
Choose the Right Materials
Boiling vessel
A large pot or pressure cooker works well. A pressure cooker with a fitting for the steam line gives a more sealed, efficient setup, but any heavy pot with a lid modified to accept a hose fitting can work.
Avoid:
- Damaged, heavily pitted, or non-food-grade cookware
- Aluminum cookware with visible corrosion
- Any vessel with a coating not rated for direct heat and food contact
Steam line
Use heat-resistant, food-grade tubing rated for the temperatures involved. Ordinary vinyl or non-rated plastic hose can soften, deform, or leach compounds into the steam path at these temperatures.
Cooling coil
Copper tubing is a common, effective choice because it conducts heat well, which helps the coil condense steam quickly.
Use:
- Food-grade, refrigeration- or plumbing-rated copper tubing
- Joints assembled with certified lead-free, food-safe solder — or better, mechanical/flare fittings that avoid solder in the water path entirely
- Tubing that has been cleaned of manufacturing residue before first use
Avoid:
- Copper tubing of unknown origin or rating
- Any solder that isn’t explicitly labeled lead-free and food-safe
- Reusing tubing that was previously used for a non-potable purpose (refrigerant lines, gas lines, etc.)
Cooling bucket and collection vessel
A food-grade bucket and a clean glass or food-grade plastic jar for collecting the finished water round out the build. Avoid buckets that previously held chemicals, paint, or other non-food substances.
Materials List
Distiller components
- Large pot or pressure cooker with a lid fitting for a hose
- Heat-resistant, food-grade hose (10–15 ft is common for a basic build)
- 1/4-inch food-grade copper tubing (10–15 ft), enough to form a cooling coil
- Certified lead-free, food-safe solder or mechanical flare fittings
- 5-gallon food-grade bucket with lid
- Bulkhead fitting or drilled spigot for the bucket
- Collection jar or clean food-grade container
- Heat source (stove, camp burner, or fire-safe surface)
Tools
- Drill and appropriately sized bits
- Tubing bender or a careful hand for shaping the coil
- Wrench or pliers for fittings
- Level (for a stable setup)
- Heat-safe gloves
Safety and testing supplies
- Food-grade thermometer
- Water test strips or a lab water-testing kit
- Heat-resistant gloves
- A stable, level, heat-safe surface for the pot
Step 1: Confirm Your Source Water Situation
Before building anything, think through what water you actually intend to treat.
- Is it from a known, tested well or municipal supply that’s simply hard, cloudy, or biologically questionable?
- Is there any chance of chemical, fuel, or agricultural runoff contamination?
- Do you smell anything unusual, or is there any visible sheen?
If there’s real uncertainty, get the source tested, or pair the still with a carbon pre-filter and continued periodic testing of the output.
Step 2: Prepare the Boiling Vessel
- Clean the pot or pressure cooker thoroughly.
- Fit the lid with a hose connection, either through an existing valve port (on a pressure cooker) or a drilled and sealed fitting rated for heat and food contact.
- Confirm the fitting seals well enough to direct steam into the hose rather than escaping around the lid.
- Check that the pot sits stably on your intended heat source.
Step 3: Build and Shape the Cooling Coil
- Measure and cut the copper tubing to your intended coil length.
- Clean the interior of the tubing to remove manufacturing oils or residue — a mild vinegar rinse followed by thorough water flushing is a common approach; confirm with your tubing’s documentation.
- Coil the tubing into a spiral or helix shape that will fit inside your cooling bucket, leaving straight sections at both ends to connect to the steam hose and the outlet fitting.
- Assemble any necessary joints using lead-free solder or mechanical fittings only.
- Test-fit the coil inside the bucket before finalizing connections.
Step 4: Set Up the Cooling Bucket
- Drill and install a bulkhead fitting or spigot near the bottom of the bucket for the finished water to exit.
- Position the coil inside the bucket so the top connects to the steam hose and the bottom connects to the outlet fitting.
- Fill the bucket with cool water, ice, or a mix, surrounding the coil.
- Confirm the coil is fully submerged along its cooling length for the most effective condensation.
Step 5: Connect and Test the System
- Connect the pot’s steam line to the top of the copper coil.
- Place a collection jar under the outlet spigot.
- Bring the source water to a boil.
- Watch for steam traveling through the hose and into the coil.
- Confirm water begins dripping from the outlet as the coil cools the rising steam.
- Check all joints for leaks and reseat or reseal as needed.
Run a first batch primarily as a test — flush the system with a batch of water you don’t intend to drink, in case any manufacturing residue, flux, or dust remains in new tubing or fittings.
Step 6: Manage the “First Runnings”
Just as with any distillation setup, the very first output can carry a disproportionate share of some volatile compounds that boil off before the bulk of the water. Many practical builds discard the first small portion of output from each batch rather than collecting it, especially for source water of uncertain quality.
This is a simple habit, not a guarantee — it does not replace proper testing when contamination is genuinely suspected.
3 Ways to Adjust Cooling Performance
Method 1: Basic coil in cool water
A standard coil submerged in a bucket of cool water is simple and effective for most casual, small-batch use.
Method 2: Add ice or actively cooled water
Adding ice, or periodically swapping in cold water, speeds condensation and can increase output rate, especially in warm weather.
Method 3: Use a longer coil
More tubing length gives steam more surface area and time to cool, which can improve both condensation efficiency and total output — at the cost of more material and a bigger footprint.
Common Building Mistakes
Using tubing or solder not rated for potable water
This is the single most important thing to get right. Non-food-safe solder is a real source of lead contamination in homemade stills.
Reusing hose or tubing from an unrelated project
A hose that once carried fuel, chemicals, or non-potable fluids can leach residue into your water indefinitely.
Skipping the source-water check
A still built and used without any idea what’s in the water it’s treating is a guess, not a guarantee.
Not testing the coil and fittings before first use
New copper and new solder joints can carry manufacturing residue. Flush and discard the first batch.
Assuming distillation removes everything
Volatile chemical contaminants can pass through a still along with the steam. Distillation is not a universal purifier.
Poor bucket cooling
A coil surrounded by water that’s already warmed up produces much slower, less complete condensation. Refresh or ice the cooling bath as needed.
Maintenance Schedule
After every use
- Empty and clean the pot.
- Flush the coil with clean water.
- Dry and store the collection jar.
- Refresh the cooling bucket water for next use.
Monthly with regular use
- Inspect all fittings and joints for corrosion or leaks.
- Check the hose for softening, cracking, or discoloration.
- Confirm the bucket spigot seals properly.
Periodically
- Test a sample of finished distilled water, especially if the source water changes or you’re treating water from a new location.
- Descale the pot if mineral buildup accumulates from repeated distillation of hard water.
Is a DIY Distiller Worth Building?
It may be worthwhile when:
- Your main concern is biological contamination, hardness, or dissolved salts in a known water source.
- You’ve confirmed all materials — tubing, solder, hose — are food-safe and lead-free.
- You’re prepared to test the output periodically.
- You’re using it for backup, off-grid, or supplemental water treatment rather than as your sole daily supply.
It may not be appropriate when:
- Your water source has any real chance of chemical or fuel contamination.
- You can’t confirm the safety of your tubing, solder, or fittings.
- You need a guaranteed, certified-safe water source with no ability to test the output.
- You’re building it under time pressure without testing joints and connections first.
For an unknown or higher-risk water source, a certified water filter rated for the specific contaminants involved — or professional water treatment — remains the safer choice.
Final Safety Note
A DIY still built from a pot, a hose, and a properly sourced copper coil can genuinely improve water that’s biologically contaminated, hard, or salty. It is a useful, low-cost tool — not a guarantee against every possible contaminant.
Use food-safe, lead-free materials throughout. Know your source water. Discard the first runnings of each batch. Test your output periodically rather than assuming it’s clean indefinitely.
Distillation removes a lot. It doesn’t remove doubt — testing does.