A small garden can produce a surprising amount of food when young plants are protected at the right time. Wind, insects, birds, cool nights, and sudden light frost can damage seedlings before they get established. That is where a simple low-hoop garden row-cover tunnel becomes useful.
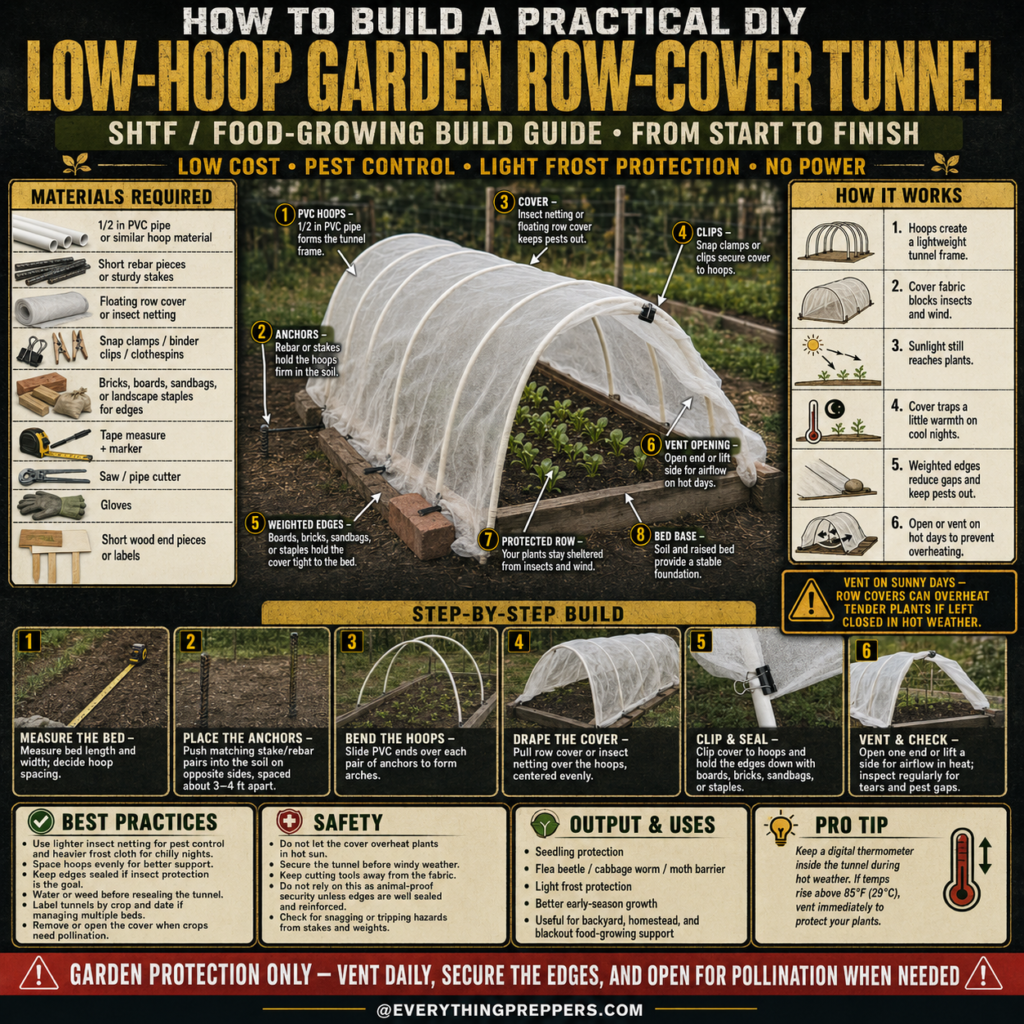
A DIY low-hoop garden row-cover tunnel is a lightweight frame made from PVC hoops, stakes, and garden fabric. It covers a row of vegetables while still allowing sunlight, air, and moisture to reach the plants. Depending on the cover material, it can help reduce insect damage, protect seedlings from wind, and provide light frost protection during early-season or cool-weather growing.
This project is low-cost, requires no power, and can be built with basic materials. It is especially useful for backyard gardeners, homesteaders, and preppers who want to grow more food with fewer losses.
What Is a Low-Hoop Garden Row-Cover Tunnel?
A low-hoop garden tunnel is a small protective cover placed over a garden row or raised bed. The hoops create a curved frame, and a fabric cover is draped over the top.
The cover can be insect netting, floating row cover, frost cloth, or lightweight garden fabric. Each type has a different purpose.
A low-hoop tunnel can help with:
- Seedling protection
- Light frost protection
- Wind protection
- Flea beetle control
- Cabbage worm and moth protection
- Bird protection
- Early-season growth
- Backyard food security
- Small-space gardening
- Emergency food-growing practice
It is not a permanent greenhouse, and it should not be left closed in hot weather without checking the temperature.
How This Garden Tunnel Works
The design is simple but effective.
PVC pipes or similar hoop material bend over the garden bed to form a tunnel frame. Short rebar pieces, sturdy stakes, or anchor rods hold the hoops in place. A cover is pulled over the hoops and secured along the edges with clips, bricks, boards, sandbags, or landscape staples.
The tunnel works in several ways:
1. Hoops Create the Frame
The PVC hoops make a lightweight structure that keeps the fabric above the plants.
2. Cover Fabric Blocks Pests and Wind
Insect netting can reduce pest access, while row cover fabric can soften wind and protect young plants.
3. Sunlight Still Reaches Plants
Most garden row covers allow light through, so plants can keep growing.
4. Cover Traps a Little Warmth
On cool nights, row cover fabric can hold a small amount of warmth around the plants.
5. Weighted Edges Reduce Gaps
Secured edges help keep pests out and prevent wind from lifting the fabric.
6. Venting Prevents Overheating
On sunny days, the inside can become too warm. Opening or lifting one side allows heat to escape.
The most important habit is daily checking. A row-cover tunnel can protect plants, but it can also overheat them if ignored.
Materials Needed
You can build this with simple garden supplies.
Basic Materials
- 1/2 inch PVC pipe or similar hoop material
- Short rebar pieces, sturdy stakes, or anchor rods
- Floating row cover or insect netting
- Snap clamps, binder clips, clothespins, or garden clips
- Bricks, boards, sandbags, or landscape staples for edges
- Tape measure
- Marker
- Saw or pipe cutter
- Gloves
- Optional short wood end pieces or labels
Choosing the Right Cover
Use the cover based on your goal:
Insect netting: Best for pest control and airflow.
Floating row cover: Best for light frost protection and wind protection.
Heavier frost cloth: Better for cold nights but may reduce airflow and light.
Shade cloth: Useful in heat, but not ideal for frost protection.
For most beginner gardeners, lightweight insect netting and floating row cover are the two most useful options.
Step-by-Step Build Guide
Step 1: Measure the Bed
Measure the length and width of your garden row or raised bed. Decide how tall the hoops should be based on the crop.
Low crops like lettuce, spinach, radishes, carrots, and cabbage seedlings need less height. Taller crops need more space or a different support system.
Decide hoop spacing before cutting. A common spacing is about 3 to 4 feet apart. Closer spacing gives the tunnel more support, especially in windy areas.
Step 2: Place the Anchors
Push matching pairs of stakes or short rebar pieces into the soil on opposite sides of the bed. These anchors will hold the PVC hoops upright.
Place each pair across from each other so the hoop bends evenly over the row.
Make sure the anchors are deep enough to stay firm. If they wobble, the tunnel may shift in wind.
Good anchor options include:
- Short rebar pieces
- Wooden stakes
- Metal garden stakes
- Sturdy fiberglass rods
Keep sharp ends low and covered where possible to reduce injury risk.
Step 3: Bend the Hoops
Slide one end of a PVC pipe over one anchor, bend the pipe over the bed, and slide the other end over the anchor on the opposite side.
Repeat for each hoop until the tunnel frame is complete.
Check that the hoops are similar in height and shape. Uneven hoops can make the cover sag or pull too tightly in one area.
If the tunnel is long, you can add a simple top support line along the hoops to reduce sagging.
Step 4: Drape the Cover
Pull the row cover or insect netting over the hoops. Center it evenly so both sides reach the ground.
Leave extra fabric at each end so the tunnel can be closed if needed. Make sure the cover is not stretched so tight that it tears.
If using insect netting, check carefully for gaps. Small openings can allow pests inside.
If using frost cloth, make sure the material reaches the ground and is secured before cold nights.
Step 5: Clip and Seal the Edges
Use clips to hold the fabric to the hoops. Then secure the bottom edges with boards, bricks, sandbags, soil, or landscape staples.
The edges matter. If you are using the tunnel for pest control, gaps along the bottom can make the cover almost useless.
For pest protection, seal the edges well. For heat management, leave a section easy to lift for venting and watering.
Do not pull the fabric too tight. Plants need space to grow, and the cover should not press heavily against tender leaves.
Step 6: Vent and Check Daily
Open one side or lift an end during warm sunny weather. Row covers can trap heat quickly, especially over dark soil.
Check plants regularly for:
- Overheating
- Wilting
- Pest gaps
- Tears in the fabric
- Moisture problems
- Pollination needs
- Plants outgrowing the cover
If temperatures rise too high inside the tunnel, vent immediately. A small digital thermometer inside the tunnel is a useful upgrade.
Best Crops for a Low-Hoop Tunnel
Low-hoop tunnels work best for seedlings, cool-season vegetables, and shorter crops.
Good crops include:
- Lettuce
- Spinach
- Kale
- Cabbage seedlings
- Broccoli seedlings
- Cauliflower seedlings
- Radishes
- Carrots
- Beets
- Green onions
- Arugula
- Cilantro
- Parsley
They can also be used for young squash, cucumber, and melon plants early in the season, but those crops usually need the cover removed or opened when flowering begins so pollinators can reach the flowers.
When to Use Insect Netting vs. Row Cover
The best cover depends on the problem you are trying to solve.
Use Insect Netting When:
- Flea beetles are damaging seedlings.
- Cabbage moths are laying eggs on brassicas.
- Birds are pecking young plants.
- You want better airflow in warm weather.
- Frost is not the main concern.
Use Floating Row Cover When:
- Nights are cool.
- Seedlings need wind protection.
- You want light frost protection.
- You want a little extra warmth early in the season.
- Plants are not at risk of overheating.
Remove or Open Covers When:
- Plants need pollination.
- The weather becomes hot.
- Plants are too tall for the tunnel.
- You need to weed, water, or harvest.
- The cover is trapping too much moisture.
No single cover is perfect for every season.
Best Practices
Use these best practices for better results:
- Use lighter insect netting for pest control and heavier frost cloth for chilly nights.
- Space hoops evenly for better support.
- Keep edges sealed if insect protection is the goal.
- Water or weed before resealing the tunnel.
- Label tunnels by crop and date if managing multiple beds.
- Check covers after wind and rain.
- Open the tunnel when crops need pollination.
- Vent daily during warm sunny weather.
- Keep fabric off tender seedlings when possible.
- Repair holes quickly.
A row-cover tunnel works best when it is managed, not forgotten.
Common Mistakes to Avoid
Mistake 1: Leaving the Tunnel Closed on Hot Days
This is the biggest mistake. Even on mild days, the tunnel can heat up under sun. Vent daily and monitor temperature.
Mistake 2: Forgetting Pollination
Crops like squash, cucumbers, melons, and many fruiting plants need pollinators. Open or remove covers when flowers appear.
Mistake 3: Leaving Gaps for Pests
For insect control, the edges must be sealed. If pests can enter from the bottom, they may get trapped inside with the plants.
Mistake 4: Using Weak Anchors
Wind can lift row cover quickly. Use strong anchors and secure edges well.
Mistake 5: Letting Fabric Rub Young Plants
Wind can make fabric rub against leaves and damage seedlings. Keep the cover supported by hoops.
Mistake 6: Ignoring Tears
Small holes in insect netting can allow pests inside. Patch or replace damaged fabric.
Safety Notes
This is a simple garden project, but there are still a few safety points to remember.
- Keep sharp stake ends covered or low to the ground.
- Use gloves when handling rebar, stakes, and clips.
- Secure the tunnel before windy weather.
- Do not rely on this as animal-proof security unless edges are reinforced.
- Watch for tripping hazards from stakes, ropes, bricks, or boards.
- Keep cutting tools away from fabric and children.
- Do not let covers overheat plants in hot sun.
- Remove covers if they become loose and dangerous in strong wind.
A tunnel that is not secured can become damaged or blown into other parts of the garden.
Output and Uses
A DIY low-hoop garden row-cover tunnel can help with:
- Seedling protection
- Light frost protection
- Wind protection
- Pest reduction
- Better early-season growth
- Small garden food production
- Backyard preparedness
- Homestead vegetable growing
- Blackout food-growing support
For preppers, this project is valuable because it helps protect the most vulnerable part of a food garden: young plants.
Simple Upgrades You Can Add
Once your basic tunnel works, you can improve it with small upgrades.
Useful upgrades include:
- Digital thermometer inside the tunnel
- Stronger hoop anchors
- Top ridge support line
- Better snap clamps
- Reusable sandbags for edges
- Labeled bed markers
- Hinged side access
- Drip irrigation under the cover
- Heavier frost cloth for cold snaps
- Insect netting for summer pest control
A thermometer is one of the best upgrades because it tells you when the tunnel is getting too hot.
Final Thoughts
A DIY low-hoop garden row-cover tunnel is one of the simplest ways to protect young plants and improve small-scale food production. It is affordable, reusable, and easy to build with PVC hoops, anchors, garden fabric, clips, and weighted edges.
The key is using the right cover for the job. Insect netting helps with pests. Floating row cover helps with light frost and wind. Both need regular checking, especially on sunny days.
For gardeners, homesteaders, and preppers, this is a practical project that can reduce crop loss and make early-season growing more reliable. Build it before pests or cold weather arrive, vent it daily, and open it when pollination is needed.
Frequently Asked Questions
What is a low-hoop row-cover tunnel used for?
It is used to protect garden rows from insects, wind, light frost, birds, and cool weather. It can also help seedlings establish better.
Can row cover protect plants from frost?
Lightweight row cover can help with light frost, but it will not protect plants from severe cold. Use heavier frost cloth or extra protection during hard freezes.
Can plants overheat under row cover?
Yes. Row covers can trap heat on sunny days. Vent the tunnel if temperatures get too high.
What crops grow well under low hoops?
Lettuce, spinach, kale, radishes, carrots, beets, cabbage seedlings, broccoli seedlings, and other cool-season crops work well.
Should I remove the cover when plants flower?
For crops that need pollination, yes. Open or remove the cover when flowers appear so pollinators can reach them.
How far apart should the hoops be?
A common spacing is about 3 to 4 feet apart. Windy areas may need closer spacing or stronger supports.
What is better: insect netting or floating row cover?
Use insect netting for pest control and airflow. Use floating row cover for light frost protection and wind protection.
How do I keep pests from getting under the cover?
Seal the edges with boards, bricks, sandbags, soil, or landscape staples. Check regularly for gaps and tears.