Cooking without fuel sounds impossible until you understand how simple solar cooking can be. On a clear sunny day, a basic reflector solar box cooker can use direct sunlight, insulation, a dark cooking pot, and a clear cover to slowly heat food without electricity, gas, charcoal, or firewood.
A DIY reflector solar box cooker is a low-cost off-grid cooking project that works best in full sun. It is useful for camping, emergency preparedness, fuel-saving meal prep, homestead experiments, and blackout cooking support when the weather is right.
This is not a fast stove, and it is not reliable in cloudy, rainy, windy, or low-sun conditions. Solar cooking requires patience, good sunlight, and temperature checks. The most important rule is simple: verify food is fully cooked before eating.
What Is a Reflector Solar Box Cooker?
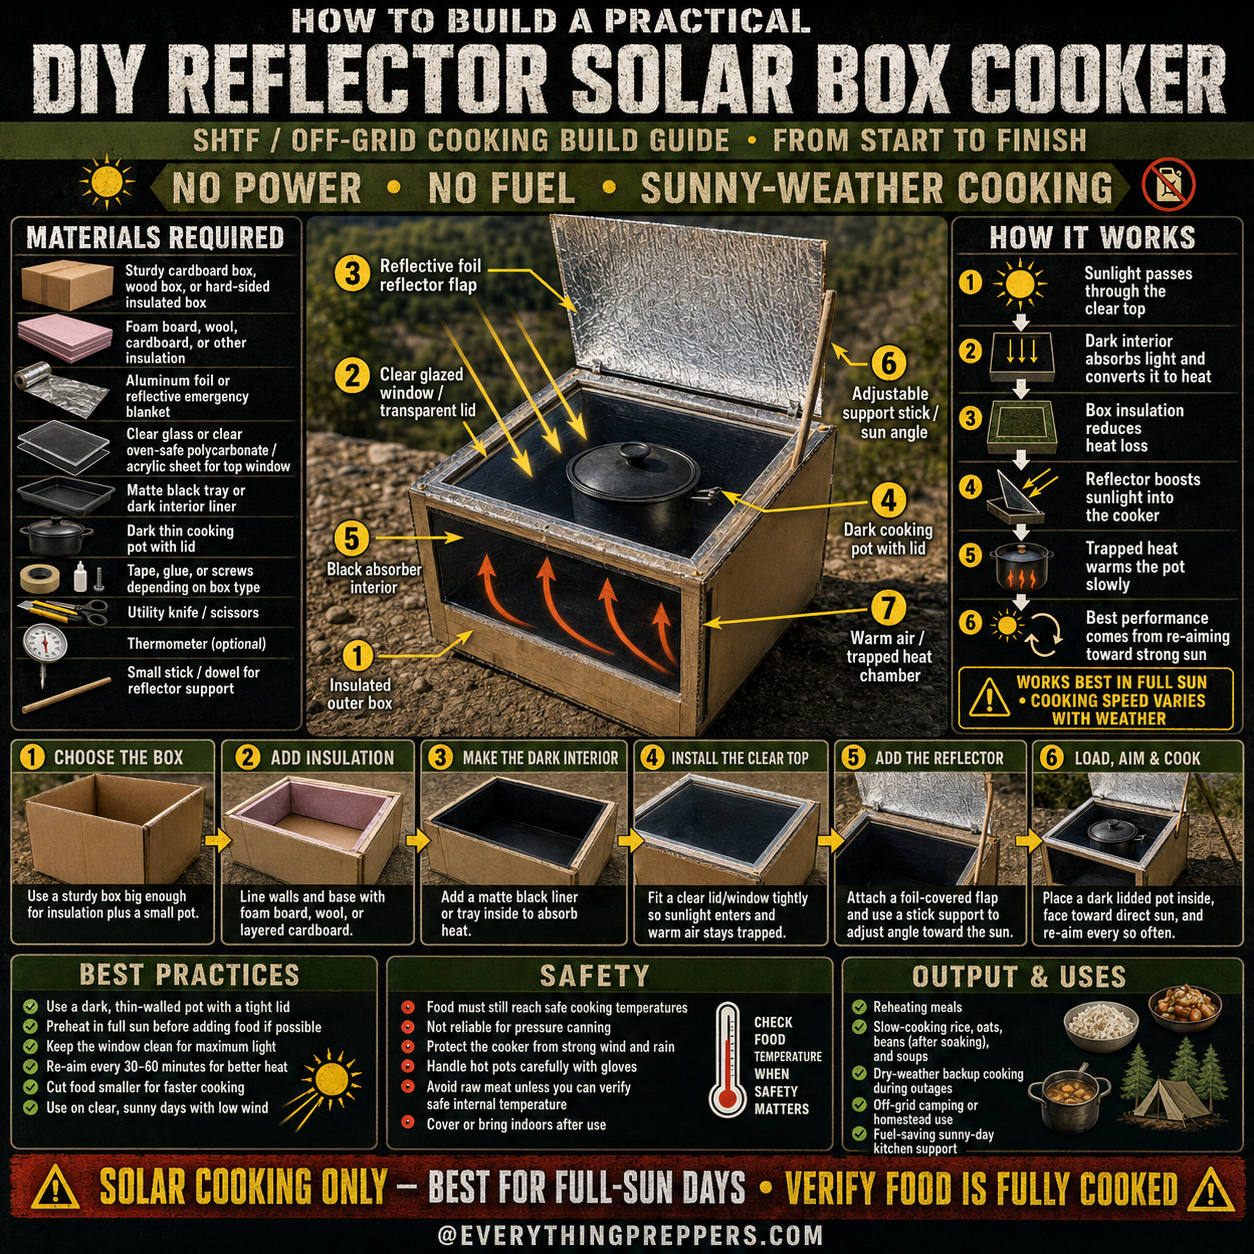
A reflector solar box cooker is an insulated box with a dark interior, a clear top, and a reflective flap. Sunlight passes through the clear cover and hits the dark interior and cooking pot. The dark surfaces absorb light and convert it into heat. The clear cover helps trap that heat inside the box, while the reflector directs extra sunlight into the cooking area.
This type of cooker is simple, quiet, and fuel-free. It can be made from cardboard, wood, foam board, reflective foil, and a clear lid or window panel.
A solar box cooker can be useful for:
- Reheating meals
- Slow-cooking rice, oats, beans, and soups
- Dry-weather emergency cooking
- Off-grid camping
- Homestead kitchen support
- Fuel-saving sunny-day cooking
- Learning passive solar cooking basics
It works best with a dark, thin cooking pot and a tight-fitting lid.
How a Solar Box Cooker Works
A solar box cooker works by collecting sunlight and slowing heat loss.
1. Sunlight Enters Through the Clear Top
The clear top lets sunlight pass into the box while helping trap warm air inside. Clear glass, acrylic, or oven-safe polycarbonate may work depending on your design.
2. Dark Surfaces Absorb Heat
A dark interior and dark cooking pot absorb sunlight better than shiny surfaces. Matte black surfaces usually perform better than reflective surfaces inside the cooking chamber.
3. Insulation Reduces Heat Loss
Insulation around the walls and base helps keep heat inside the cooker instead of letting it escape through the box.
4. Reflector Flap Boosts Sunlight
A reflective foil flap directs more sunlight into the cooking chamber. This can improve heating when aimed correctly.
5. Trapped Heat Warms the Pot
Heat builds slowly inside the box and warms the lidded pot over time.
6. Re-Aiming Improves Performance
Because the sun moves, the cooker performs better when it is re-aimed every 30 to 60 minutes toward strong sunlight.
Solar cooking is slow by design. It is best for patient, low-and-slow cooking rather than quick frying or boiling.
Important Food Safety Warning
Solar cookers can vary widely in performance. Weather, sun angle, wind, food volume, pot type, insulation, and build quality all affect cooking temperature.
For safety:
- Use a food thermometer when cooking foods where temperature matters.
- Do not rely on appearance alone.
- Do not use solar cooking for pressure canning.
- Be cautious with meat, poultry, seafood, eggs, and dairy-based foods.
- Reheat or continue cooking if food has not reached a safe internal temperature.
- Do not leave partially cooked food sitting for long periods.
- Cover or bring the cooker indoors after use.
For beginner solar cooking, start with lower-risk foods such as rice, oats, soups, reheating fully cooked meals, or simple vegetable dishes.
Materials Needed
You can build a simple reflector solar box cooker with basic materials.
Basic Materials
- Sturdy cardboard box, wooden box, or hard-sided insulated box
- Foam board, wool, cardboard, or other insulation
- Aluminum foil or reflective emergency blanket
- Clear glass, acrylic sheet, or clear heat-safe panel for the top
- Matte black tray or dark interior liner
- Dark thin cooking pot with lid
- Tape, glue, or screws depending on box type
- Utility knife or scissors
- Thermometer, optional but recommended
- Small stick or dowel for reflector support
Helpful Tools
- Measuring tape
- Marker
- Straightedge
- Gloves
- Safety glasses
- Heat-resistant gloves for handling hot cookware
Use clean materials that are safe around food containers and heat. Avoid boxes that previously held chemicals, pesticides, fuel, cleaners, or strong-smelling products.
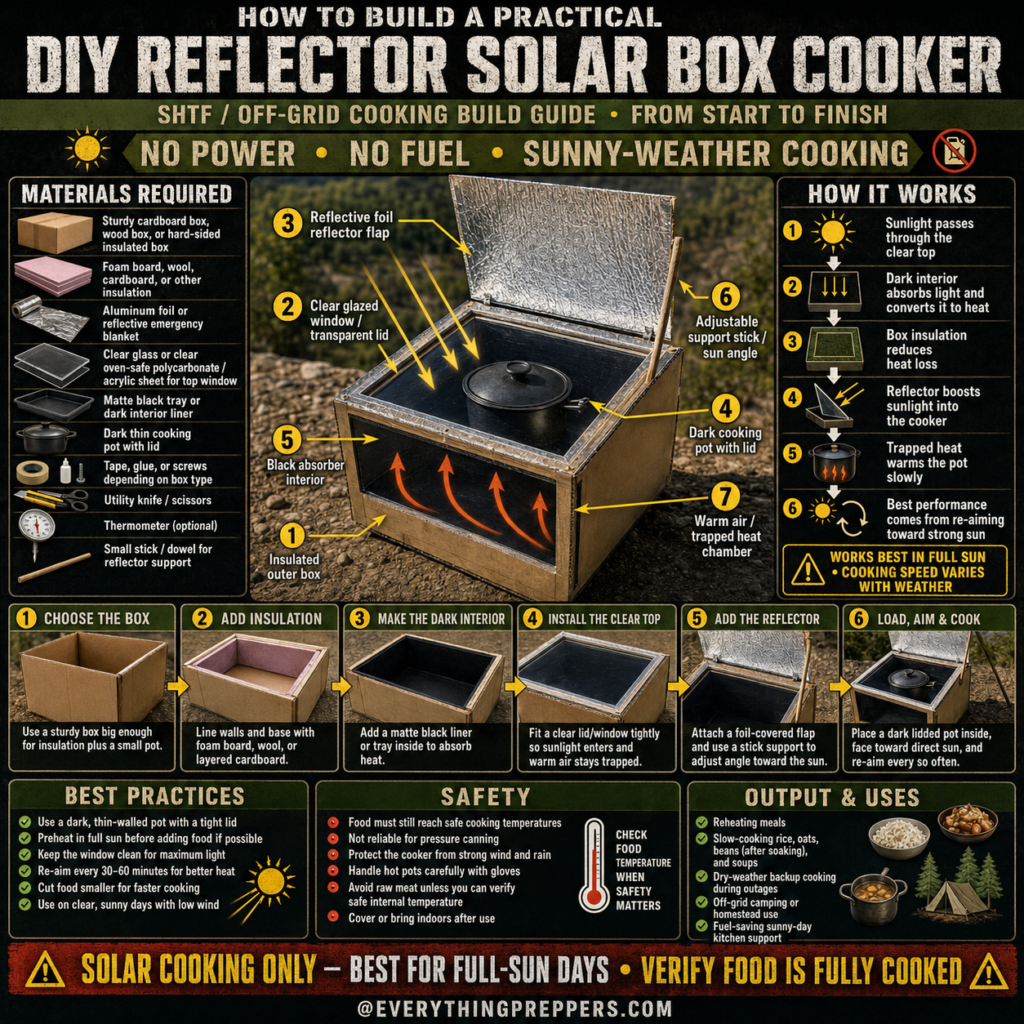
Step-by-Step Build Guide
Step 1: Choose the Box
Choose a sturdy box large enough to hold insulation and a small cooking pot. The box should be deep enough to trap warm air but not so large that it leaves too much empty space.
Good options include:
- Heavy cardboard box
- Wooden box
- Hard-sided cooler-style box
- Insulated food-safe container
If using cardboard, keep it dry and protect it from wind. Cardboard is easy to build with, but it is not weatherproof.
Step 2: Add Insulation
Line the walls and base with insulation. Foam board, layered cardboard, wool, or other insulating material can help reduce heat loss.
The goal is to keep the heat inside the cooker. Pay attention to the bottom of the box because heat can escape downward into the ground or table.
Keep insulation secure so it does not collapse into the cooking area.
Step 3: Make the Dark Interior
Add a matte black liner, black tray, or dark metal surface inside the cooker. This dark interior absorbs sunlight and helps convert it to heat.
Avoid shiny foil inside the lower cooking chamber because it may reflect light away instead of absorbing heat. The reflector flap should be shiny, but the inside cooking surface should be dark.
Use heat-safe materials whenever possible.
Step 4: Install the Clear Top
Fit a clear lid, glass panel, acrylic sheet, or transparent top over the cooking chamber. The clear top should sit tightly enough to trap warm air while still allowing you to open the cooker when needed.
A better seal usually means better heat retention. However, do not make the lid difficult to remove or unsafe to handle.
If using glass, handle it carefully and avoid cracked or sharp edges. If using plastic, make sure it can tolerate heat and sunlight without warping badly.
Step 5: Add the Reflector
Attach a foil-covered reflector flap to the back or top edge of the cooker. The reflector should be adjustable so you can aim sunlight into the cooking chamber.
A simple stick, dowel, or cord can hold the reflector at the right angle.
The reflector works best when it bounces direct sunlight through the clear top and onto the dark pot or interior. Re-adjust the angle as the sun moves.
Step 6: Load, Aim, and Cook
Place a dark, lidded pot inside the cooker. Face the cooker toward direct sun and adjust the reflector until sunlight is focused into the box.
For better performance:
- Preheat the cooker in full sun before adding food.
- Use a dark, thin-walled pot.
- Keep the pot lid on.
- Re-aim every 30 to 60 minutes.
- Keep the cooker out of strong wind.
- Use a thermometer when food safety matters.
Solar cooking is slower than stove cooking. Plan extra time.
Best Foods for a Solar Box Cooker
Solar box cookers work best with foods that can cook slowly and evenly.
Good beginner foods include:
- Rice
- Oats
- Soup
- Stew
- Lentils
- Beans that have already been soaked or partially cooked
- Vegetables
- Reheating fully cooked meals
- Simple one-pot meals
Avoid starting with high-risk foods until you understand your cooker’s performance and can verify safe temperatures.
Best Practices for Better Results
Small details make solar cooking much more effective.
Use these best practices:
- Use the cooker on clear, sunny days with low wind.
- Preheat in full sun before adding food if possible.
- Use a dark, thin-walled pot with a tight lid.
- Keep the clear cover clean.
- Re-aim every 30 to 60 minutes.
- Cut food smaller for faster cooking.
- Use smaller portions while learning.
- Keep the box dry.
- Use a thermometer to check cooking temperature.
- Bring the cooker indoors after use.
The stronger the sun and the better the insulation, the better the results.
Common Mistakes to Avoid
Mistake 1: Expecting Fast Cooking
Solar box cookers are slow. They are best for patient cooking, reheating, and fuel-saving meal prep.
Mistake 2: Cooking in Weak Sun
Clouds, shade, winter sun angle, and wind can reduce performance. Use the cooker in direct full sun.
Mistake 3: Using a Shiny Pot
Shiny pots reflect sunlight. Dark pots absorb heat better.
Mistake 4: Opening the Lid Too Often
Every time you open the cooker, heat escapes. Check only when needed.
Mistake 5: Ignoring Food Temperature
Warm food is not always safe food. Use a thermometer when cooking foods that require safe internal temperatures.
Mistake 6: Leaving the Cooker Outside in Rain
Cardboard and some insulation materials can be damaged by moisture. Store the cooker dry.
Safety Notes
This is a no-fuel cooker, but safety still matters.
Follow these rules:
- Use only in safe outdoor conditions.
- Do not use for pressure canning.
- Protect the cooker from strong wind and rain.
- Handle hot pots with gloves.
- Keep children away from hot surfaces.
- Do not stare into bright reflected sunlight.
- Do not use unsafe plastics near high heat.
- Verify food temperature before eating.
- Do not leave partially cooked food sitting too long.
- Store the cooker dry after use.
A solar cooker may look simple, but the pot and interior can still become hot enough to burn.
Output and Uses
A DIY reflector solar box cooker can help with:
- Reheating meals
- Slow-cooking rice and oats
- Cooking soups and beans
- Dry-weather emergency cooking
- Off-grid camping meals
- Homestead meal support
- Reducing fuel use on sunny days
- Practicing no-power cooking skills
It is most useful as one part of a wider emergency cooking plan. Keep other cooking options available for cloudy days, cold nights, and bad weather.
Simple Upgrades You Can Add
After testing the basic cooker, you can improve performance with small upgrades.
Useful upgrades include:
- Better insulation
- Larger reflector flap
- Extra side reflectors
- Clear double-layer lid
- Dark metal cooking tray
- Better lid seal
- Built-in thermometer
- Wind shield
- More durable wooden box
- Adjustable reflector stand
Upgrade slowly and test one change at a time so you know what actually improves performance.
Cleaning and Storage
After cooking, let the cooker cool before handling. Wipe the inside clean and remove any spilled food.
Storage tips:
- Keep the cooker dry.
- Store it away from pests.
- Avoid crushing cardboard panels.
- Keep the clear lid clean.
- Fold or secure the reflector.
- Store the thermometer with the cooker.
- Inspect tape, glue, and seams before reuse.
A clean, dry cooker lasts longer and performs better.
Final Thoughts
A DIY reflector solar box cooker is a practical no-fuel cooking project for sunny weather. It uses basic materials, direct sunlight, insulation, a dark pot, and a clear lid to slowly heat food without electricity or flame.
The build is simple: choose a box, add insulation, make the interior dark, install a clear top, add a reflector, then load, aim, and cook in strong sun.
The key is understanding its limits. Solar cooking is weather-dependent and slow. It works best on clear days with direct sun, and food temperature should always be checked when safety matters.
For preppers, campers, homesteaders, and off-grid beginners, this project is a smart way to practice fuel-free cooking before an emergency happens.
Frequently Asked Questions
Can a solar box cooker boil water?
Some well-built solar cookers can heat water very hot and may boil in strong sun, but results vary. Do not assume boiling unless you actually observe it and measure performance.
Can I cook meat in this?
It is possible with a high-performing cooker, but beginners should be careful. Use a food thermometer and verify safe internal temperature. Start with lower-risk foods while learning.
Does it work on cloudy days?
Performance drops significantly in clouds, shade, rain, or weak sun. It works best in direct full sun.
How long does solar cooking take?
Cooking time varies widely depending on sunlight, food type, pot size, insulation, and wind. Plan for slow cooking and check temperature instead of relying only on time.
What kind of pot works best?
A dark, thin-walled pot with a tight lid usually works best because it absorbs heat and warms faster.
Can I use aluminum foil inside the whole box?
Use reflective foil mainly for the reflector. Inside the cooking area, a dark absorber surface usually works better.
Is this safe for canning?
No. Do not use a DIY solar box cooker for pressure canning or any food preservation method that requires precise controlled temperatures.
Do I need to re-aim the cooker?
Yes. Re-aiming every 30 to 60 minutes helps keep sunlight directed into the box as the sun moves.