Drying herbs and saving seeds are two of the simplest ways to make a backyard garden more useful. Fresh herbs can spoil quickly after harvest, and seed heads can mold if they are stored before fully drying. A simple screened drying cabinet gives you a clean, shaded, breathable place to dry small garden harvests without electricity.
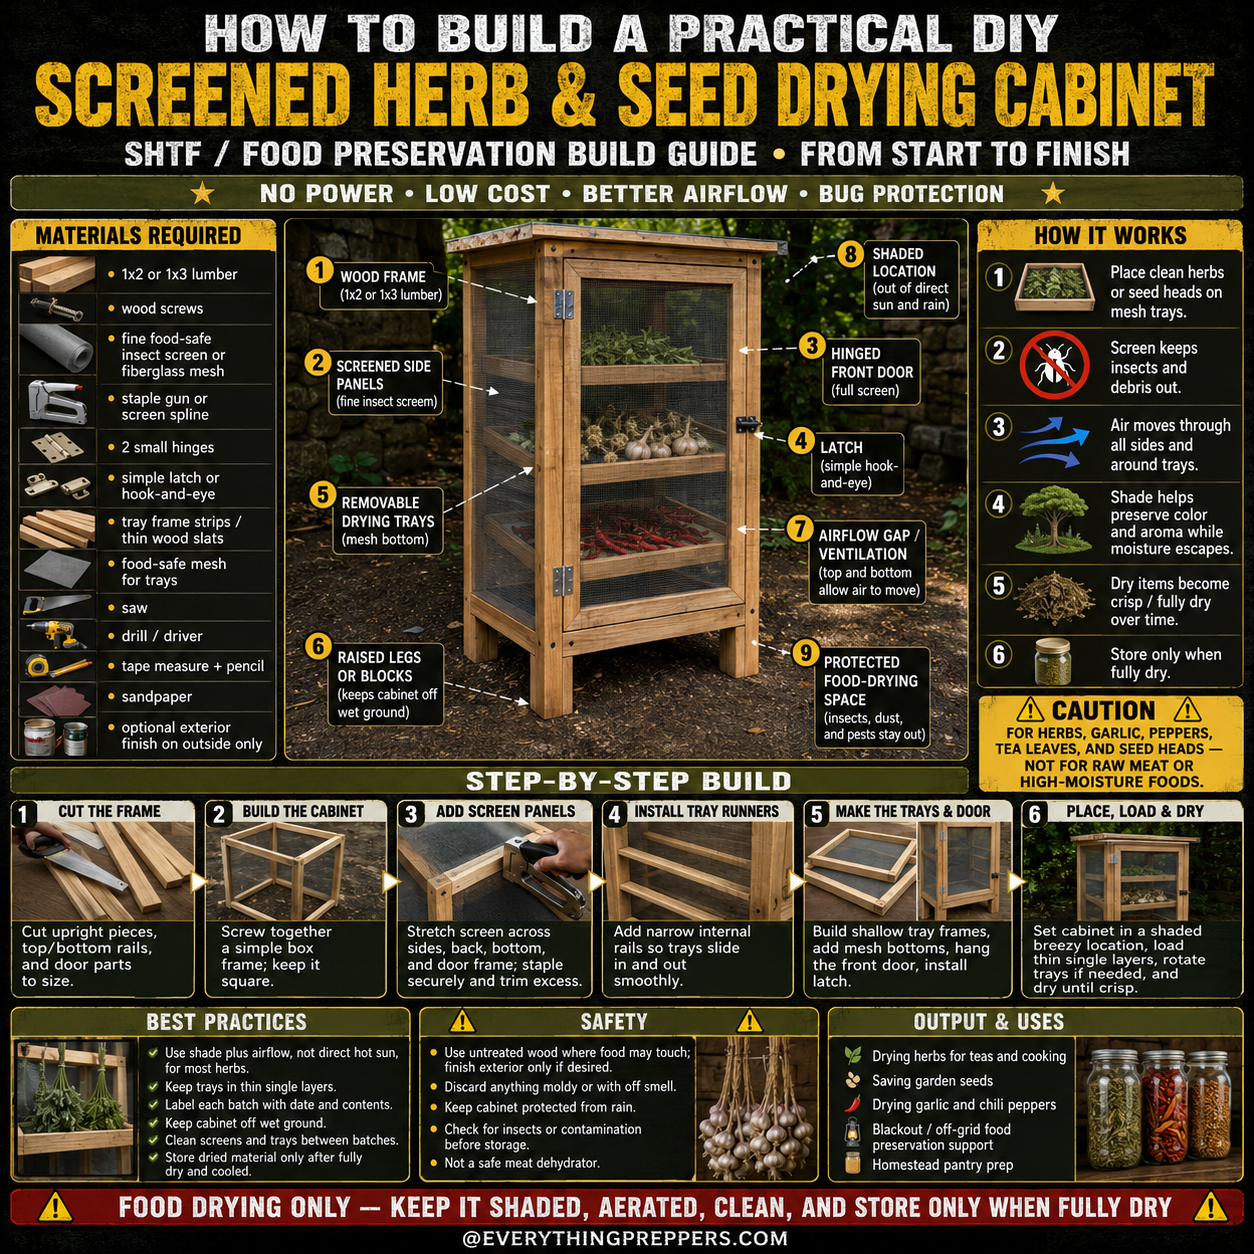
A DIY screened herb and seed drying cabinet is a low-cost food-preservation project made from a wooden frame, fine mesh screen, removable trays, and a front door. It allows air to move through the cabinet while helping keep insects, dust, and debris away from your herbs, garlic, peppers, tea leaves, and seed heads.
This project is not designed for meat, fish, dairy, or high-moisture foods. It is best for herbs, seed saving, garlic curing, chili peppers, tea leaves, and similar low-moisture garden items that dry safely with shade and airflow.

What Is a Screened Herb and Seed Drying Cabinet?
A screened drying cabinet is a ventilated storage box used to dry garden materials in thin layers. The sides are covered with fine mesh screen so air can pass through while bugs and debris stay outside.
Inside the cabinet, removable trays hold herbs, seed heads, peppers, garlic, or other small harvest items. The trays slide in and out so you can rotate, inspect, and clean them easily.
This cabinet can be useful for:
- Drying herbs for tea and cooking
- Saving garden seeds
- Drying garlic
- Drying chili peppers
- Drying tea leaves
- Keeping insects away from drying herbs
- Organizing small harvest batches
- Homestead pantry preparation
- Blackout or off-grid food preservation support
The main goal is clean airflow, not heat.
How This Drying Cabinet Works
The cabinet works by combining shade, airflow, and screened protection.
1. Herbs or Seeds Sit on Mesh Trays
Clean herbs, seed heads, or small garden items are spread in thin layers on removable mesh-bottom trays.
2. Screen Keeps Insects Out
Fine insect screen or fiberglass mesh helps keep flies, mosquitoes, beetles, dust, leaves, and larger debris away from the drying material.
3. Air Moves Through the Cabinet
Screened sides, front, back, top, and bottom allow airflow around the trays. Moving air helps moisture escape.
4. Shade Protects Quality
Drying many herbs in direct hot sun can reduce color, aroma, and flavor. A shaded, breezy location is usually better for herbs.
5. Items Become Dry Over Time
As moisture escapes, herbs become crisp, seed heads dry, and peppers or garlic become easier to store.
6. Storage Happens Only After Full Drying
The dried material should only be packed into jars, bags, or containers when it is fully dry. Storing too early can lead to mold.
The cabinet does not force-dry food quickly. It provides a protected drying space with natural airflow.
Important Food Safety Warning
This cabinet is for drying herbs, seed heads, garlic, peppers, tea leaves, and similar garden materials only.
Do not use this as a meat dehydrator. Do not use it for raw meat, fish, dairy, cooked meals, or very wet foods. Those foods require controlled drying temperatures and food-safe handling methods.
To use this cabinet safely:
- Dry only clean, suitable garden materials.
- Keep items in thin layers.
- Keep the cabinet shaded and protected from rain.
- Check daily for mold, insects, or off smells.
- Discard anything moldy or suspicious.
- Store only when fully dry.
- Clean trays between batches.
- Keep the cabinet away from dust, chemicals, and animals.
If you are unsure whether something is safe to dry this way, choose a tested food preservation method instead.
Materials Needed
You can build this project with basic lumber and mesh.
Basic Materials
- 1×2 or 1×3 lumber
- Wood screws
- Fine food-safe insect screen or fiberglass mesh
- Staple gun or screen spline
- 2 small hinges
- Simple latch or hook-and-eye
- Tray frame strips or thin wood slats
- Food-safe mesh for trays
- Sandpaper
- Optional exterior finish for outside surfaces only
Tools
- Saw
- Drill or driver
- Tape measure
- Pencil
- Square
- Staple gun
- Scissors or utility knife
- Safety glasses
- Work gloves
Use untreated wood where food may touch. If you apply a finish, keep it on the outside only and let it cure fully before use.
Step-by-Step Build Guide
Step 1: Cut the Frame
Cut the upright pieces, top rails, bottom rails, tray runner pieces, and door parts to size. The cabinet can be small enough to sit on a table or large enough to stand on short legs.
A practical beginner size is a narrow cabinet with three to five trays. Keep it light enough to move into shade or shelter if the weather changes.
Sand rough edges after cutting. This makes the cabinet safer to handle and helps prevent screen tearing.
Step 2: Build the Cabinet Frame
Screw the frame together into a simple box shape. Keep the corners square so the trays and door fit properly.
Check the cabinet on a flat surface before tightening all screws. If the frame twists, the door may not close well and trays may not slide smoothly.
Add raised legs or blocks if the cabinet will sit outdoors. Keeping it off damp ground helps reduce moisture and dirt.
Step 3: Add Screen Panels
Stretch fine insect screen across the sides, back, bottom, top, and door frame. Staple or fasten the screen securely, then trim extra mesh.
Pull the screen tight enough to avoid sagging, but do not stretch it so hard that it warps the frame.
Screened panels should allow airflow while keeping insects out. Check for gaps around corners, staples, and edges.
Step 4: Install Tray Runners
Install narrow internal rails on both sides of the cabinet. These rails hold the drying trays and allow them to slide in and out.
Space the tray runners evenly. Leave enough room between trays for air movement. If trays are too close together, airflow will be reduced and drying may slow down.
Test each tray space with a scrap board before final assembly.
Step 5: Make the Trays and Door
Build shallow tray frames from thin wood strips. Add mesh bottoms so air can move through the drying material from below.
The trays should slide smoothly but not wobble too much. Keep them lightweight and easy to remove for cleaning.
Next, attach the screened front door with two small hinges. Add a simple latch or hook-and-eye to keep the door closed.
Make sure the door closes tightly enough to keep insects out.
Step 6: Place, Load, and Dry
Place the cabinet in a shaded, breezy location. Keep it out of direct rain, harsh sun, and dusty areas.
Load herbs or seed heads in thin single layers. Do not pile wet leaves too thickly. If needed, rotate trays during drying so each batch dries evenly.
Check the cabinet daily. Look for moisture, mold, insects, tears in the screen, or items that need to be turned.
Best Items to Dry in This Cabinet
This cabinet works best for small garden harvests that dry well with shade and airflow.
Good options include:
- Mint
- Basil
- Oregano
- Thyme
- Rosemary
- Sage
- Lemon balm
- Chamomile
- Tea leaves
- Garlic
- Chili peppers
- Bean seeds
- Flower seed heads
- Herb seed heads
For thicker items like peppers or garlic, drying time may be longer. Make sure they are fully dry before storage.
Best Practices for Better Drying
Good drying is about airflow, cleanliness, and patience.
Use these best practices:
- Use shade plus airflow, not direct hot sun, for most herbs.
- Keep trays in thin single layers.
- Label each batch with date and contents.
- Keep the cabinet off wet ground.
- Clean trays between batches.
- Check daily for mold or insects.
- Rotate trays if some areas dry slower.
- Store dried material only after fully dry.
- Keep drying materials away from chemicals and smoke.
- Move the cabinet indoors or under cover before rain.
A small label on each tray helps prevent mixing up herbs and seeds.
Common Mistakes to Avoid
Mistake 1: Drying in Thick Piles
Thick piles trap moisture and can mold. Spread herbs and seed heads in thin layers.
Mistake 2: Leaving the Cabinet in Rain
Moisture ruins drying progress. Keep the cabinet sheltered from rain and heavy dew.
Mistake 3: Using Direct Hot Sun for Delicate Herbs
Direct sun can fade herbs and reduce aroma. Shade with airflow usually gives better quality.
Mistake 4: Storing Before Fully Dry
If herbs, seeds, or peppers are stored while damp, they can mold in the jar. Wait until fully dry.
Mistake 5: Ignoring Screen Gaps
Small gaps can let insects inside. Inspect the screen and door edges regularly.
Mistake 6: Drying Unsafe Foods
Do not use this cabinet for meat, fish, dairy, cooked foods, or high-moisture foods that need controlled drying.
Safety Notes
This cabinet is simple, but safe food handling still matters.
Follow these safety notes:
- Use untreated wood where food may touch.
- Finish exterior surfaces only if desired.
- Discard anything moldy or with an off smell.
- Keep the cabinet protected from rain.
- Check for insects or contamination before storage.
- Clean trays between batches.
- Do not use as a meat dehydrator.
- Keep it away from pets, rodents, and chemicals.
- Wash hands before handling dried food.
- Store dried herbs and seeds in clean containers.
If something smells musty, looks fuzzy, or feels damp after storage, do not use it.
How to Know When Herbs Are Dry
Herbs are usually ready when the leaves feel crisp and crumble easily between your fingers. Stems may take longer than leaves.
Signs herbs are dry:
- Leaves feel crisp
- Stems snap instead of bend
- No cool damp feeling
- Strong natural aroma remains
- No visible moisture
- No mold or discoloration
After drying, strip leaves from stems if desired and store them in clean jars or bags.
How to Know When Seeds Are Dry
Seed saving depends on the plant, but most seeds should be fully dry before storage.
Signs seeds may be ready:
- Seed heads are dry and brittle
- Seeds separate easily
- No soft or damp parts remain
- Seeds feel hard, not rubbery
- No musty smell
- Paper envelopes stay dry after storage
Store seeds in labeled envelopes or jars in a cool, dry place. Add the crop name and date.
Storage Tips After Drying
Once items are fully dry, store them properly.
Good storage habits include:
- Use clean glass jars, paper envelopes, or food-safe bags.
- Label with name and date.
- Keep containers in a cool, dry, dark place.
- Check jars after a few days for condensation.
- If condensation appears, remove and dry the contents more.
- Keep herbs away from heat and sunlight.
- Keep saved seeds away from moisture.
For herbs, whole leaves often keep aroma better than finely crushed leaves. Crush only what you need when cooking.
Output and Uses
A screened herb and seed drying cabinet can help with:
- Drying herbs for tea
- Drying cooking herbs
- Saving garden seeds
- Drying garlic
- Drying chili peppers
- Off-grid food preservation support
- Homestead pantry preparation
- Blackout-friendly garden processing
This is a small project, but it supports a larger goal: making more use of what your garden produces.
Simple Upgrades You Can Add
Once the basic cabinet works, you can improve it with small upgrades.
Useful upgrades include:
- More removable trays
- Finer mesh for tiny seeds
- Carry handles
- Roof overhang for shade
- Weather cover
- Tray labels
- Thermometer and humidity gauge
- Raised stand
- Door gasket
- Separate seed-drying trays
Keep the design easy to clean. A drying cabinet should be simple, breathable, and sanitary.
Final Thoughts
A DIY screened herb and seed drying cabinet is a practical low-cost project for anyone growing food at home. It gives herbs, seed heads, garlic, and peppers a clean, shaded, breathable place to dry without electricity.
The build is straightforward: cut the frame, build the cabinet, add screen panels, install tray runners, make removable trays, attach the door, then place it in a shaded breezy location.
The key is patience and cleanliness. Keep trays thin, airflow open, rain out, and insects away. Store only when fully dry.
For gardeners, homesteaders, and preppers, this cabinet is a useful step toward saving more harvest, reducing waste, and building a stronger home food system.
Frequently Asked Questions
Can this cabinet dry meat?
No. This is not a safe meat dehydrator. Meat requires controlled drying temperature and safe food-handling methods.
Should herbs dry in the sun or shade?
Most herbs keep better color and aroma when dried in shade with good airflow rather than direct hot sun.
How long does drying take?
Drying time depends on humidity, airflow, plant type, and thickness. Check daily and store only when fully dry.
What mesh should I use?
Fine insect screen or food-safe mesh works well for the sides. For trays, use mesh that supports the herbs or seeds without dropping small pieces through.
Can I use treated wood?
Use untreated wood where food may touch. If you finish the outside, let it cure fully and keep finishes away from food-contact areas.
How do I stop mold?
Use thin layers, good airflow, clean trays, and a dry shaded location. Do not dry wet piles of herbs.
How should I store dried herbs?
Store fully dried herbs in clean jars or food-safe containers in a cool, dry, dark place.
Can I dry seeds in the same cabinet?
Yes. Use labeled trays and make sure seeds are fully dry before storing them in envelopes or jars.