A productive garden does not start with seeds. It starts with soil. If your soil is weak, compacted, or low in organic matter, your plants will struggle no matter how much effort you put into watering and planting.
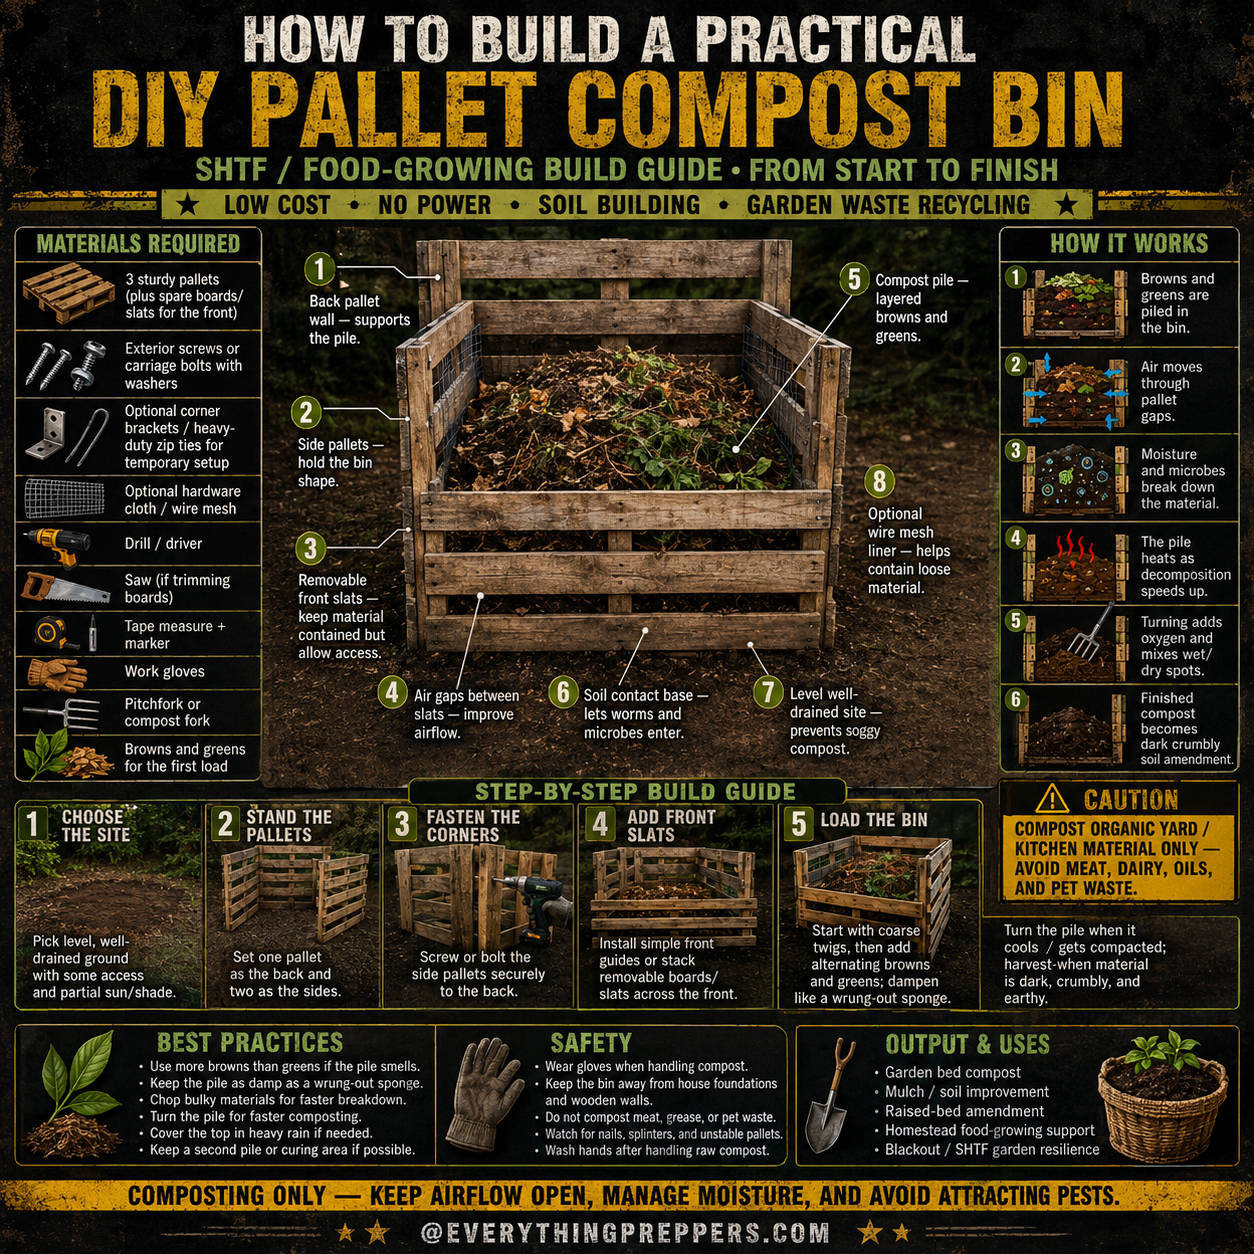
A DIY pallet compost bin is one of the simplest low-cost ways to turn garden waste into useful compost for raised beds, backyard gardens, and homestead food-growing systems. With a few sturdy pallets, basic hardware, and the right mix of “browns” and “greens,” you can create a simple composting station that needs no power and very little money.
This project is useful for gardeners, homesteaders, and preppers who want to recycle yard waste, build better soil, and reduce dependence on store-bought soil amendments.

What Is a Pallet Compost Bin?
A pallet compost bin is a simple outdoor compost container made from wooden pallets. The pallets form the sides and back of the bin, while open gaps between the pallet slats allow air to move through the pile.
The bin holds organic material in one place while it breaks down over time. Finished compost can later be used as a soil amendment in garden beds, raised beds, planters, and around non-sensitive plants.
A pallet compost bin can help with:
- Garden waste recycling
- Soil improvement
- Raised-bed amendment
- Mulch support
- Food-growing preparation
- Homestead garden systems
- Reducing yard waste
- Building long-term garden resilience
This is not a trash bin. Compost works best when you use the right materials and avoid items that attract pests or create odors.
How a Pallet Compost Bin Works
Composting is a natural breakdown process. Microbes, fungi, insects, worms, oxygen, and moisture slowly turn organic material into dark, crumbly compost.
A pallet compost bin helps this process by keeping the pile contained while allowing airflow.
The basic process works like this:
1. Browns and Greens Are Added
“Browns” are carbon-rich materials like dry leaves, straw, shredded cardboard, and small twigs. “Greens” are nitrogen-rich materials like grass clippings, vegetable scraps, coffee grounds, and fresh garden waste.
2. Air Moves Through the Pallet Gaps
The spaces between pallet slats help oxygen reach the pile. Good airflow reduces bad smells and supports healthy decomposition.
3. Moisture Helps the Process
A compost pile should feel like a wrung-out sponge. Too dry, and breakdown slows. Too wet, and the pile can become soggy and smelly.
4. The Pile Warms as It Breaks Down
As microbes work, the pile may heat up. A warm pile usually breaks down faster than a cold pile, but even slow composting still works with time.
5. Turning Mixes Wet and Dry Areas
Turning the pile adds oxygen and helps mix materials. This can speed up composting and reduce compacted spots.
6. Finished Compost Becomes Dark and Crumbly
Finished compost should look dark, earthy, and crumbly. It should not smell rotten or contain large recognizable food scraps.
Materials Needed
You can build this compost bin with basic materials and simple tools.
Basic Materials
- 3 sturdy pallets
- Spare boards or pallet slats for the front
- Exterior screws or carriage bolts with washers
- Optional corner brackets
- Optional heavy-duty zip ties for a temporary setup
- Optional hardware cloth or wire mesh liner
- Browns and greens for the first load
Tools
- Drill or driver
- Saw if trimming boards
- Tape measure
- Marker
- Work gloves
- Pitchfork or compost fork
- Safety glasses
Choose pallets carefully. Avoid pallets with chemical spills, strong odors, unknown stains, or unsafe markings. For garden use, clean heat-treated pallets are usually preferred over chemically treated or contaminated pallets.
Choosing the Best Site
A compost bin should be placed where it is easy to use but not in the way.
Look for a site that is:
- Level
- Well-drained
- Partly sunny or lightly shaded
- Easy to reach from the garden
- Away from house foundations
- Away from wooden walls or siding
- Not in a flood-prone area
- Accessible with a wheelbarrow or bucket
Avoid placing the bin directly against your house, shed wall, or wooden fence. Compost holds moisture, and you do not want damp organic material sitting against structures.
A little shade can help prevent the pile from drying out too fast. Too much shade is fine too, but the pile may break down more slowly.
Step-by-Step Build Guide
Step 1: Choose the Site
Pick a level, well-drained spot with enough room to work around the bin. Clear away rocks, trash, weeds, and anything that prevents the pallets from sitting flat.
A soil contact base is useful because it allows worms and soil organisms to enter the pile naturally. However, if pests are a major concern, you can add hardware cloth under or around the bin.
Step 2: Stand the Pallets
Set one pallet as the back wall and two pallets as the side walls. Arrange them into a three-sided bin shape.
Make sure the pallet slats run in a way that helps contain the compost while still allowing air movement. The structure should feel stable before you fasten anything.
If the ground is uneven, level the pallets before attaching them.
Step 3: Fasten the Corners
Secure the side pallets to the back pallet using exterior screws, carriage bolts, corner brackets, or heavy-duty zip ties.
Screws or bolts create a stronger, longer-lasting bin. Zip ties can work for a quick temporary setup, but they may weaken outdoors over time.
Check that the bin does not wobble. Compost becomes heavy, especially when wet, so the frame needs to be sturdy.
Step 4: Add Front Slats
Install removable front slats, boards, or guides across the front. These help keep material inside the bin while still allowing access when you need to turn or remove compost.
A removable front is very useful. It lets you open the bin when compost is ready or when you need to turn the pile.
You can make the front with:
- Loose boards that slide into side guides
- Hinged pallet section
- Removable slats
- Wire panel
- Simple front rail
Keep the design easy to open. If the bin is hard to access, you will be less likely to maintain it.
Step 5: Load the Bin
Start with coarse twigs or dry stems at the bottom to improve airflow. Then add alternating layers of browns and greens.
A simple first load might include:
- Dry leaves
- Small twigs
- Grass clippings
- Vegetable scraps
- Coffee grounds
- Shredded cardboard
- Garden trimmings
Moisten the pile as needed. The material should be damp like a wrung-out sponge, not dripping wet.
Avoid packing the pile too tightly. Compost needs air.
What to Put in the Compost Bin
Good compost starts with the right ingredients.
Good Browns
- Dry leaves
- Straw
- Shredded cardboard
- Plain paper
- Small twigs
- Wood chips in small amounts
- Dry garden stems
Good Greens
- Grass clippings
- Vegetable scraps
- Fruit scraps in moderation
- Coffee grounds
- Tea leaves
- Fresh plant trimmings
- Spent garden plants that are not diseased
A balanced mix helps prevent odors and speeds up breakdown. If the pile smells bad, add more browns and turn it.
What Not to Compost
To avoid pests, odors, and health problems, do not add the wrong materials.
Avoid composting:
- Meat
- Fish
- Dairy
- Grease
- Oils
- Cooked fatty food
- Pet waste
- Diseased plants
- Weeds full of mature seeds
- Glossy or plastic-coated paper
- Chemically treated wood
- Charcoal ash from additives
- Materials exposed to pesticides or fuel
Keeping problem materials out of the bin makes the compost easier to manage and more garden-friendly.
Best Practices for Better Compost
A compost bin works best when you manage airflow, moisture, and material balance.
Use these best practices:
- Use more browns if the pile smells bad.
- Add water if the pile is too dry.
- Turn the pile for faster composting.
- Chop bulky materials for quicker breakdown.
- Keep a second pile for curing if possible.
- Cover the top during heavy rain if needed.
- Keep the bin away from house foundations and wooden walls.
- Avoid attracting pests with meat, dairy, oils, or pet waste.
- Mix fresh greens with dry browns instead of dumping one layer only.
Composting does not need to be perfect. If the pile is too slow, adjust moisture, add greens, and turn it. If it smells, add browns and improve airflow.
Common Compost Problems and Fixes
Problem 1: The Pile Smells Bad
A rotten smell usually means the pile is too wet, too compacted, or too heavy in greens.
Fix it by adding dry browns such as leaves, straw, or shredded cardboard. Turn the pile to add air.
Problem 2: The Pile Is Not Breaking Down
A dry pile can sit for months without much change.
Fix it by adding water and mixing in fresh greens. The pile should feel damp but not soaked.
Problem 3: The Bin Attracts Pests
Pests are often attracted by meat, dairy, greasy food, or exposed kitchen scraps.
Fix it by removing problem materials, burying vegetable scraps deeper in the pile, and using wire mesh if needed.
Problem 4: The Pile Is Too Wet
Too much rain or too many wet greens can make the pile soggy.
Fix it by adding dry browns and covering the top during heavy rain.
Problem 5: The Bin Is Falling Apart
Weak pallets, loose screws, or rotting boards can fail under compost weight.
Fix it by reinforcing corners, replacing damaged pallets, and keeping the bin level.
Safety Notes
This is a simple garden project, but there are still a few safety points.
Follow these safety rules:
- Wear gloves when handling compost.
- Watch for nails, splinters, and broken pallet boards.
- Use clean pallets only.
- Keep the bin away from foundations and wooden walls.
- Do not compost meat, grease, dairy, or pet waste.
- Wash hands after handling raw compost.
- Use eye protection when cutting or drilling wood.
- Keep children away from sharp hardware and unstable pallets.
- Check the bin regularly for loose boards or exposed nails.
If a pallet has chemical stains, strong odors, or questionable markings, do not use it for a garden compost bin.
How to Know When Compost Is Ready
Finished compost usually looks dark, crumbly, and earthy. It should not smell sour, rotten, or like fresh garbage.
Signs compost may be ready:
- Dark brown or black color
- Crumbly texture
- Earthy smell
- Few recognizable food scraps
- Cooler pile temperature
- Material looks soil-like
If you still see large chunks, sticks, or fresh scraps, let it continue breaking down or sift out the unfinished pieces and return them to the bin.
Before using compost around food crops, let it fully mature. Immature compost can temporarily tie up nutrients or smell unpleasant.
How to Use Finished Compost
Finished compost can be used in several helpful ways.
Good uses include:
- Mixing into garden beds
- Adding to raised beds
- Top-dressing around plants
- Improving poor soil
- Supporting mulch layers
- Refreshing container soil in small amounts
- Building healthier garden structure
Do not use unfinished compost directly against delicate seedlings. Let it cure first for better results.
Output and Uses
A DIY pallet compost bin can help produce:
- Garden bed compost
- Raised-bed soil amendment
- Mulch support
- Soil improvement material
- Homestead garden fertility
- Backyard food-growing support
- Reduced garden waste
For preppers and gardeners, composting is useful because it turns waste into long-term soil value.
Simple Upgrades You Can Add
Once the basic bin is working, you can improve it over time.
Useful upgrades include:
- Wire mesh liner to contain loose material
- Hinged front panel
- Removable slat system
- Lid or rain cover
- Second bin for curing compost
- Third bin for finished compost
- Compost thermometer
- Better corner brackets
- Hardware cloth under the bin for pest resistance
- Sign labels for browns, greens, and finished compost
A two-bin or three-bin setup is especially useful if you compost regularly. One bin can hold fresh material, while another cures.
Final Thoughts
A DIY pallet compost bin is one of the most practical low-cost garden projects you can build. It turns leaves, garden waste, grass clippings, coffee grounds, and vegetable scraps into useful compost that can improve your soil over time.
The build is simple: choose a good site, stand three pallets, fasten the corners, add removable front slats, and load the bin with a balanced mix of browns and greens.
The success comes from managing the pile. Keep airflow open, balance moisture, turn the pile when needed, and avoid materials that attract pests. With time, your bin can produce dark, crumbly compost for garden beds, raised beds, and homestead food-growing systems.
For anyone serious about backyard food production, a compost bin is not just a project. It is part of building better soil year after year.
Frequently Asked Questions
How many pallets do I need for a compost bin?
You can build a basic three-sided compost bin with three pallets. A fourth pallet can be used as a front gate if desired.
What kind of pallets are safe for compost bins?
Use clean, sturdy pallets. Heat-treated pallets are usually preferred. Avoid pallets with chemical stains, strong odors, unknown spills, or unsafe markings.
Should a compost bin sit on soil or concrete?
Soil is useful because worms and microbes can enter the pile. Concrete can work, but drainage and moisture control may be different.
What should I not put in compost?
Avoid meat, dairy, grease, oils, pet waste, diseased plants, and materials exposed to chemicals or fuel.
Why does my compost smell bad?
Bad smells usually mean the pile is too wet, too compacted, or too heavy in greens. Add dry browns and turn the pile.
How often should I turn compost?
Turning every one to two weeks can speed up composting, but slower composting can still work with less turning.
Can I compost kitchen scraps?
Yes, but stick mostly to vegetable scraps, fruit scraps in moderation, coffee grounds, and tea leaves. Bury scraps inside the pile to reduce pests.
How do I know compost is finished?
Finished compost is dark, crumbly, earthy-smelling, and no longer looks like fresh scraps.