In a real emergency, collecting water is only one part of the problem. The next challenge is getting that water to people in a clean, organized, and reliable way. After storms, outages, supply disruptions, or disaster events, a shared water point can save time, reduce confusion, and help a group manage limited resources more fairly.
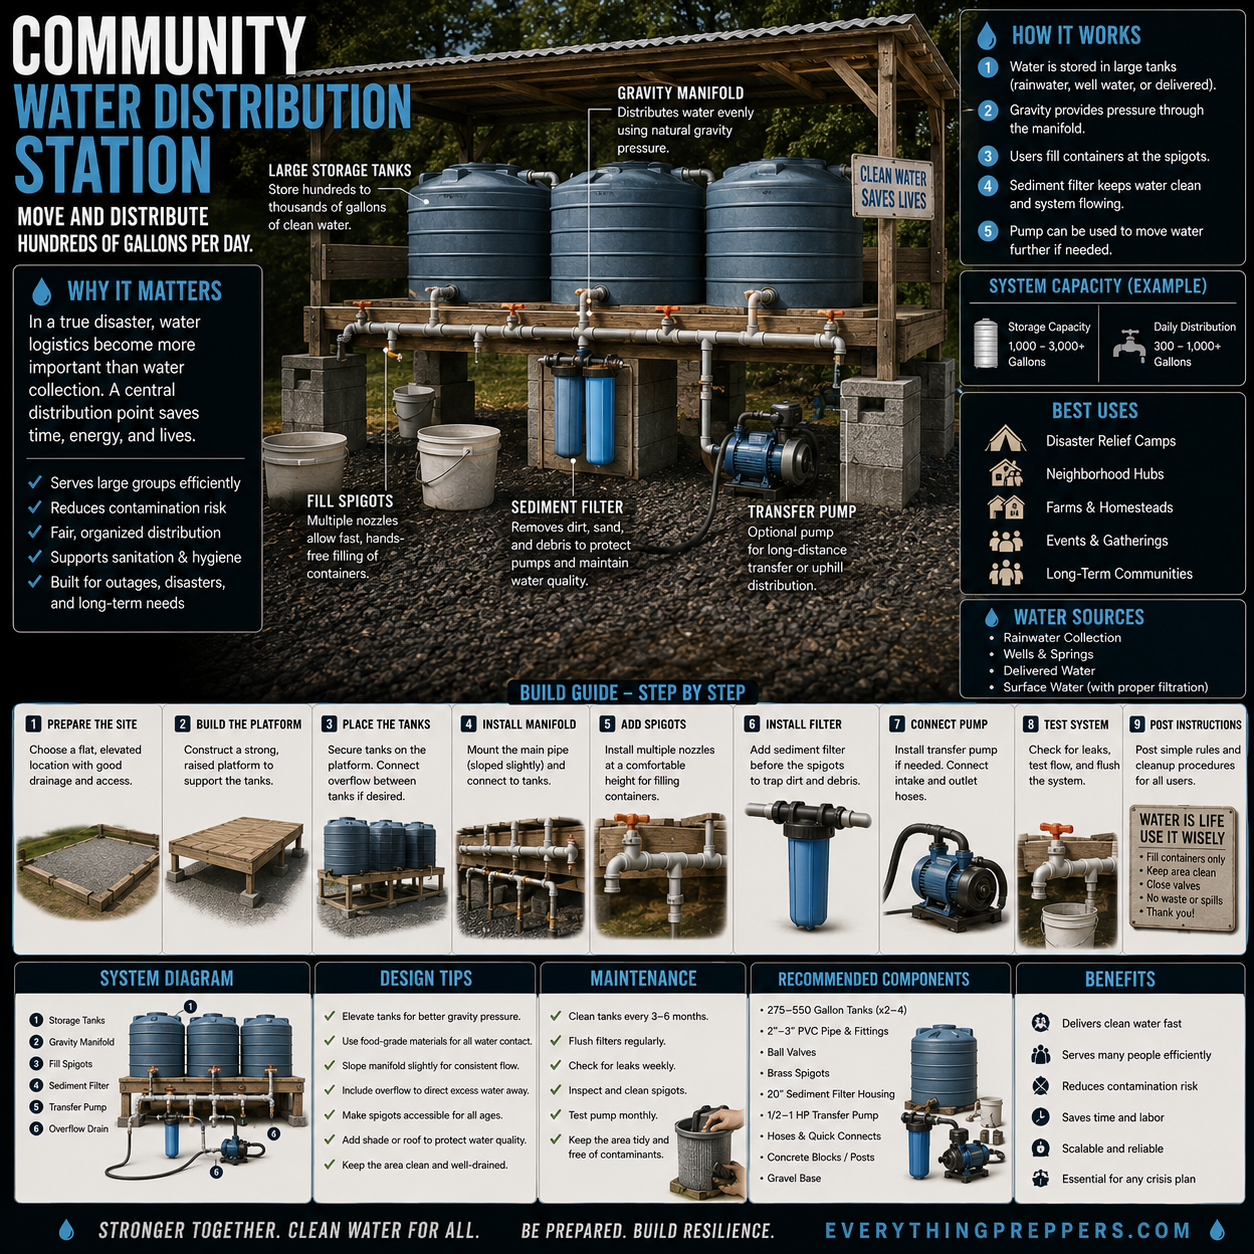
A community water distribution station is a simple system built around large storage tanks, an elevated platform, a gravity-fed manifold, fill spigots, basic sediment filtration, and an optional transfer pump. It is designed to help move and distribute larger amounts of water for households, farms, camps, neighborhood hubs, events, or long-term preparedness setups.
This guide explains how the system works, what parts are needed, how to build it, and the safety rules to follow. Most importantly, remember this: stored water should be properly treated, tested, and handled before drinking. A sediment filter alone does not make unsafe water safe.

What Is a Community Water Distribution Station?
A community water distribution station is a central water point where water is stored in large tanks and dispensed through multiple spigots. Instead of everyone carrying water from separate barrels, wells, or rain tanks, the station organizes storage and filling in one place.
A basic station can include:
- Large storage tanks
- Raised platform
- Gravity manifold
- Multiple fill spigots
- Sediment filter
- Overflow drain
- Optional transfer pump
- Posted instructions
- Clean filling area
This type of setup can be useful for disaster relief camps, farms, homesteads, neighborhood preparedness hubs, outdoor events, and long-term community planning.
The goal is not just storage. The goal is organized distribution.
Why Water Distribution Matters
During a crisis, water logistics can become more difficult than people expect. Even if water is available, it may be heavy to carry, hard to share, or difficult to keep clean.
A central distribution point helps by:
- Serving more people efficiently
- Reducing repeated trips to water sources
- Keeping filling containers organized
- Reducing contamination risk
- Supporting sanitation and hygiene
- Saving time and labor
- Creating a fairer distribution process
When people know where to fill containers, how much to take, and how to keep the area clean, the entire system works better.
How the System Works
The water distribution station uses simple gravity and plumbing.
1. Water Is Stored in Large Tanks
Water may come from rainwater collection, a well, a spring, delivered water, or another approved source. The tanks hold water until it is needed.
2. Gravity Provides Pressure
When tanks are raised above the fill spigots, gravity helps move water through the manifold. The higher the tank, the better the gravity pressure.
3. The Manifold Distributes Water
A horizontal pipe manifold connects the tanks to multiple spigots. This allows more than one person to fill a container at the same time.
4. Spigots Allow Controlled Filling
Spigots or hose bibs make it easier to fill buckets, jugs, and containers without wasting water.
5. Sediment Filtration Helps Protect Flow
A sediment filter can remove dirt, sand, and debris that might clog pipes or spigots. However, it does not remove all pathogens, chemicals, or unsafe contaminants.
6. Optional Pump Moves Water Farther
A transfer pump can help move water uphill, over longer distances, or from a source into the tanks.
The system can be simple or scaled up depending on the number of users and the amount of water needed.
Important Water Safety Warning
A community water station should be built with safety in mind. Water can look clear and still contain bacteria, viruses, parasites, chemicals, or other contaminants.
Follow these rules:
- Use food-grade tanks and pipes for water contact.
- Do not assume rainwater, surface water, or well water is safe without treatment or testing.
- A sediment filter is not enough for drinking-water safety.
- Treat drinking water using appropriate methods.
- Keep tank lids closed.
- Keep animals, trash, and dirty containers away from the fill area.
- Label non-potable water clearly if it is not safe to drink.
- Clean and disinfect tanks on a regular schedule.
- Follow local water safety guidance during emergencies.
For drinking water, use proper filtration, disinfection, boiling, or certified treatment methods depending on the source and risk.
Materials and Components Needed
The exact setup depends on the size of your station, but a practical build may include the following.
Main Components
- 275–550 gallon storage tanks, usually 2 to 4 tanks
- Strong raised platform
- Concrete blocks, posts, or treated structural supports
- Food-grade plumbing pipe and fittings
- Ball valves
- Brass or food-safe spigots
- Sediment filter housing
- Filter cartridges
- Overflow drain
- Flexible hose or quick-connect fittings
- Optional 1/2 HP transfer pump
- Gravel base
- Signage with user instructions
Helpful Tools
- Drill
- Pipe cutter
- Wrenches
- Measuring tape
- Level
- PVC cement or fittings appropriate for your pipe type
- Gloves
- Safety glasses
- Bucket for testing flow
Choose food-safe materials for anything that touches water intended for drinking, cooking, or hygiene.
Step-by-Step Build Guide
Step 1: Prepare the Site
Choose a flat, elevated, well-drained location with good access. The site should be easy for people to reach with buckets or containers, but far enough from trash, septic areas, fuel storage, livestock waste, and standing water.
A good site should be:
- Level
- Well-drained
- Easy to access
- Away from contaminants
- Strong enough to support heavy tanks
- Easy to clean
- Close to the water source if possible
Water is extremely heavy. A full 275-gallon tank can weigh over 2,000 pounds. The platform and ground must be strong enough for the load.
Step 2: Build the Platform
Build a strong raised platform using properly supported lumber, posts, blocks, or a structural frame. The platform must safely support the full weight of the tanks, water, pipes, and people working nearby.
Do not guess on structural strength. If you are unsure, get help from someone experienced with construction.
The platform should be:
- Level
- Stable
- Braced against movement
- Built on solid ground
- Protected from tipping
- High enough for gravity flow
- Easy to inspect
The tanks should not wobble, lean, or sit on weak boards.
Step 3: Place the Tanks
Set the tanks on the platform and secure them. If using multiple tanks, connect overflow or equalizing lines if desired so water can balance between tanks.
Make sure each tank has:
- A secure lid
- A drain or outlet
- Access for cleaning
- Overflow control
- Protection from sunlight if needed
- Stable support underneath
Dark or opaque tanks are often better for reducing algae growth because they block sunlight. Shade or roofing can also help protect the water quality and extend tank life.
Step 4: Install the Manifold
Install the main pipe manifold along the front or lower outlet area of the tanks. This pipe carries water from the tanks to the spigots.
A slight slope can help drainage and consistent flow. Add shutoff valves so sections can be isolated for maintenance.
Good manifold design includes:
- Main shutoff valve
- Tank isolation valves
- Accessible fittings
- Drain point
- Enough pipe size for expected flow
- Secure pipe supports
- No sharp stress points
Keep the plumbing simple and easy to repair.
Step 5: Add Fill Spigots
Install multiple spigots at a comfortable height for filling buckets, jugs, or containers. Space the spigots so several people can fill containers without crowding.
Good spigot placement should allow:
- Hands-free bucket placement
- Easy access for older users
- Minimal splashing
- Clear walking space
- Good drainage below
- Easy cleaning
If possible, place gravel or a drainage pad under the spigots to reduce mud.
Step 6: Install the Sediment Filter
A sediment filter can help remove dirt, sand, rust particles, and debris that may clog the station. Place it before the spigots so the manifold and outlets stay cleaner.
Remember: sediment filters improve clarity and protect the system, but they do not make contaminated water safe to drink.
Flush the filter before first use if required by the filter instructions, and replace cartridges regularly.
Step 7: Connect the Optional Pump
If you need to move water from a well, rain tank, delivery tank, or lower source into the main storage tanks, a transfer pump can help.
Use the pump only according to its rating and instructions. Keep electrical connections dry and safe. If the pump is not designed for potable water, do not use it for drinking-water systems.
Pump setup tips:
- Use clean intake hoses.
- Keep suction lines free of debris.
- Use a screen or pre-filter where appropriate.
- Do not run the pump dry.
- Keep power cords away from standing water.
- Test the pump before emergency use.
A pump is helpful, but gravity should still handle basic dispensing whenever possible.
Step 8: Test the System
Before relying on the station, test everything.
Check for:
- Leaks
- Weak flow
- Loose fittings
- Dirty water
- Clogged filters
- Tank movement
- Platform shifting
- Drainage problems
- Spigot height issues
- Confusing user flow
Flush the system before regular use. Test each spigot and make sure containers can be filled without excessive splashing or waste.
Step 9: Post Instructions
Clear instructions make the station safer and more organized.
Post simple rules such as:
- Fill clean containers only.
- Keep the area clean.
- Close valves after use.
- Do not waste water.
- Report leaks.
- Do not touch spigot tips to dirty containers.
- Use treated water only for drinking if required.
- Thank you for sharing responsibly.
If water is not safe to drink, post a clear non-potable water sign.
Best Water Sources
A water distribution station can be filled from different sources, but each source has different risks.
Possible sources include:
- Rainwater collection
- Well water
- Spring water
- Delivered potable water
- Treated surface water
- Stored municipal water
Rainwater and surface water may require filtration and disinfection before drinking. Wells may need testing. Delivered water should come from a reliable source.
Do not assume a water source is safe just because it looks clean.
Design Tips for a Better Station
A good station should be simple, durable, and easy to maintain.
Use these design tips:
- Elevate tanks for better gravity pressure.
- Use food-grade materials for all water-contact parts.
- Slope the manifold slightly for consistent flow.
- Include overflow drainage away from the platform.
- Make spigots accessible for all ages.
- Add shade or roofing to protect tanks.
- Keep the area clean and well-drained.
- Use labels for valves and flow direction.
- Keep spare washers, filters, and fittings nearby.
- Plan space for people to line up safely.
The easier the station is to use, the more likely people will use it correctly.
Maintenance Checklist
Maintenance is what keeps a water station useful.
Regular tasks include:
- Clean tanks every 3–6 months or as needed.
- Flush filters regularly.
- Replace filter cartridges as required.
- Check for leaks weekly.
- Inspect spigots and valves.
- Test pump monthly.
- Keep the fill area tidy.
- Remove trash and standing water.
- Check for algae or odors.
- Inspect the platform for movement or rot.
During active emergency use, inspect the station daily.
Common Mistakes to Avoid
Mistake 1: Building on Weak Support
Water is heavy. A weak platform can fail. Build the structure strong enough for full tanks.
Mistake 2: Using Non-Food Materials
Not all pipes, tanks, hoses, or fittings are safe for drinking-water contact. Use food-grade or potable-water-rated materials where needed.
Mistake 3: Treating Sediment Filtration as Purification
A sediment filter does not remove all pathogens or chemicals. Drinking water may still require treatment.
Mistake 4: Letting Dirty Containers Touch Spigots
If contaminated containers touch the spigot, they can spread germs. Keep spigot tips clean.
Mistake 5: Ignoring Drainage
Spilled water can create mud, mosquitoes, and slip hazards. Build on a well-drained surface.
Mistake 6: Not Posting Rules
A shared station needs clear instructions. Confusion leads to waste, crowding, and contamination risk.
Safety Notes
Water storage and distribution should be handled carefully.
Follow these safety rules:
- Use food-grade tanks and fittings for drinking water.
- Treat and test water as needed.
- Label non-potable water clearly.
- Keep children away from tanks and pumps.
- Do not climb on tanks or platforms.
- Keep electrical pump connections dry.
- Keep the station away from sewage, fuel, chemicals, and livestock waste.
- Clean and disinfect tanks regularly.
- Keep lids closed to prevent insects and debris.
- Follow local emergency and public health guidance.
If water smells strange, looks contaminated, or has an unknown source, do not drink it until properly treated and verified.
Output and Uses
A community water distribution station can help with:
- Disaster relief camps
- Neighborhood water hubs
- Farms and homesteads
- Outdoor events
- Long-term community planning
- Emergency sanitation support
- Efficient container filling
- Shared water logistics
A well-designed station can deliver water faster, serve more people, and reduce confusion during stressful events.
Final Thoughts
A community water distribution station is one of the most practical projects for group preparedness. It turns stored water into an organized system that people can actually use.
The basic design is simple: prepare the site, build a strong platform, place large tanks, install a gravity manifold, add spigots, include sediment filtration, connect a transfer pump if needed, test the system, and post clear instructions.
The most important part is water safety. Use food-grade materials, protect the tanks, maintain the system, and treat water properly before drinking. A station like this can support households, farms, camps, and neighborhoods when normal water access is delayed.
Clean water saves time, protects health, and strengthens communities.
Frequently Asked Questions
Can a sediment filter make water safe to drink?
No. A sediment filter removes particles like dirt and sand, but it does not reliably remove all bacteria, viruses, parasites, or chemicals. Drinking water may need additional treatment.
How much water can a station like this store?
It depends on tank size. A small community station might use two to four tanks of 275 to 550 gallons each, giving hundreds to thousands of gallons of storage.
Does the system need electricity?
Basic gravity dispensing does not need electricity. A transfer pump may need electricity or another power source.
Why should the tanks be elevated?
Elevation helps create gravity pressure so water can flow through the manifold and spigots without a pump.
What kind of tanks should I use?
Use food-grade or potable-water-rated storage tanks for water intended for drinking, cooking, or hygiene.
How often should tanks be cleaned?
A common schedule is every 3–6 months or as needed, depending on water source, use, climate, and local guidance.
Can rainwater be used?
Rainwater can be stored, but it may need filtration and disinfection before drinking. Check local rules and water safety guidance.
What should be posted at the station?
Post instructions for filling clean containers, closing valves, avoiding waste, keeping the area clean, and whether the water is potable or non-potable.