How to Reinforce a Weak Exterior Door With a Removable Security Bar
A strong lock cannot provide much protection when it is attached to a weak door frame.
Many exterior doors are secured with a deadbolt and a small strike plate fastened by short screws. Those screws may hold the hardware neatly against the jamb, but they might penetrate only the thin finish wood rather than the structural framing behind it.
A removable interior reinforcement bar provides a second layer of resistance by spreading force across both sides of the doorway.
The basic idea is simple:
- Mount one heavy steel bracket on each side of the door.
- Anchor both brackets into structural wall framing.
- Cut a solid board to span the doorway.
- Drop the board into the brackets after closing and locking the door.
- Lift it out immediately whenever the doorway must be used.
This type of reinforcement can help delay forced entry through an inward-opening door, but it is not a substitute for a sound door, properly installed deadbolt, reinforced strike plate, working smoke alarms, or a safe escape plan.
Most importantly, no security device should make it difficult for occupants to escape during a fire or other emergency.
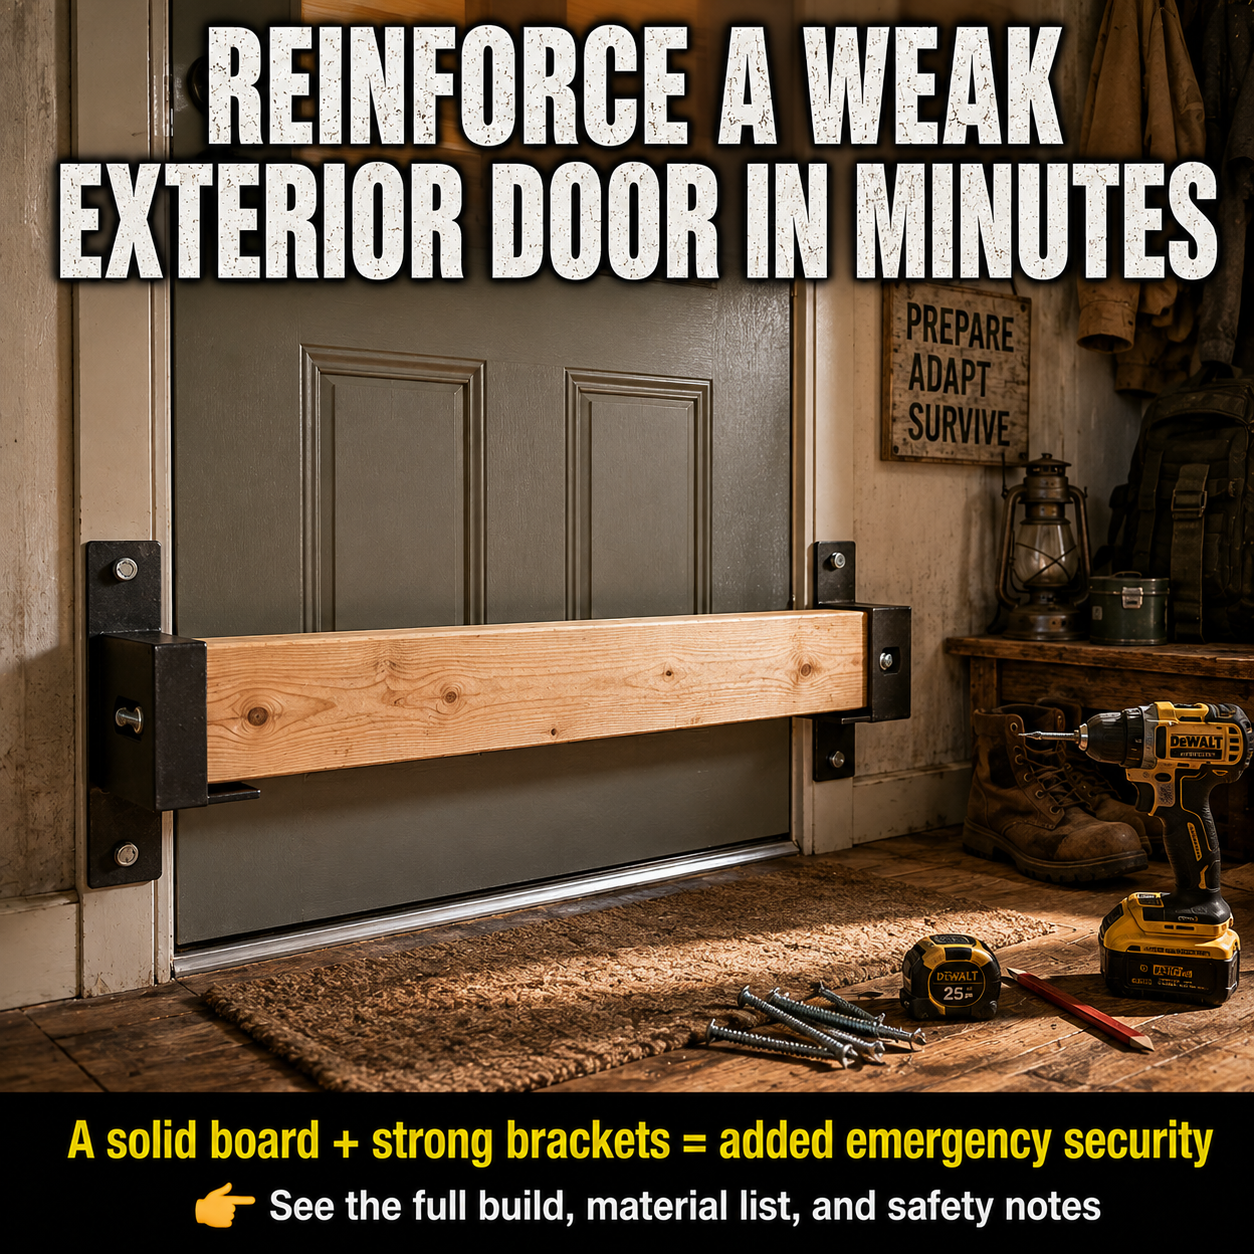
Important Correction to the Featured Design
The featured image clearly communicates the basic concept, but it should not be copied without inspecting the wall and door construction first.
The visible brackets appear to be positioned near the door trim. Door trim and the thin jamb underneath it are not necessarily strong enough to carry a heavy impact.
For the bar to provide meaningful reinforcement:
- The brackets must transfer force into solid structural framing.
- The screws must penetrate the framing—not merely drywall, trim, or the door jamb.
- The bracket openings must allow the bar to be removed quickly without tools.
- The board must sit close enough to the door to limit movement.
- The installation must not block the normal operation of the lock when the bar is removed.
Decorative shelf brackets, thin utility hooks, drywall anchors, and small wood screws are not suitable for this job.
The image also shows a surface-mounted crossbar on an inward-opening door. This design generally does not solve the same problem on an outward-opening door because the door moves away from an interior bar when opened. Outward-opening doors require a different reinforcement strategy, especially around their exposed hinges.
How the Reinforcement Bar Works
When force is applied to an ordinary locked door, much of that force is concentrated near the latch and deadbolt.
Common weak points include:
- Short strike-plate screws
- Split or damaged jamb wood
- Loose hinges
- Small hinge screws
- Hollow or deteriorated doors
- Poorly fitted frames
- Large gaps around the latch
- Weak sidelights or glass panels
- Rot or water damage around the opening
A crossbar changes the load path.
Instead of asking the lock area to resist the entire force, the board presses against both sides of the framed opening. Properly installed brackets transfer that load into the wall framing.
The improvement depends on the strength of the complete system:
Door → wooden bar → steel brackets → structural screws → wall framing
If any one part is weak, the whole assembly becomes less effective.
A thick board in brackets attached only to trim is mostly an impressive-looking decoration.
Start With a Complete Door Inspection
Before buying materials, inspect the existing door from both sides.
Confirm the opening direction
Stand inside the home and open the door.
- If it swings toward you and into the room, it is inward-opening.
- If it moves away from you toward the outside, it is outward-opening.
The removable crossbar described in this guide is intended primarily for an inward-opening exterior door.
Inspect the door slab
Look for:
- Cracks near the lock
- Separation between panels
- Soft or rotten wood
- Rust on a metal door
- Delamination
- Previous forced-entry damage
- Loose glass
- A hollow interior door incorrectly used as an exterior door
A reinforcement bar cannot turn a badly deteriorated or hollow interior door into a strong exterior door.
Replace a severely damaged door before adding secondary hardware.
Inspect the jamb and frame
Remove nothing yet. Press gently along the jamb and surrounding trim while watching for movement.
Check for:
- Split wood around the strike plate
- Loose trim
- Gaps between the jamb and wall
- Missing shims
- Water damage
- Rot near the threshold
- Old screw holes
- A frame that moves when the door closes
If the frame is weak, repair it before installing the bar.
Inspect the hinges
Open the door and check every hinge.
Look for:
- Loose screws
- Bent hinge leaves
- Missing screws
- Rust
- Movement between the hinge and jamb
- Cracks in the surrounding wood
Official police security guidance recommends sturdy hinges secured with strong, long screws. It also recommends hinge bolts or security hinges for outward-opening doors, where the hinge side requires special attention. (West Yorkshire Police)
Test the existing lock
The deadbolt should:
- Extend fully
- Enter the strike opening without rubbing
- Operate smoothly
- Remain aligned in hot, cold, and humid weather
- Be easy to unlock from inside
Correct lock and alignment problems before adding a bar.
Choose the Correct Reinforcement Method
Option 1: Horizontal 2×4 crossbar
This is the design shown in the featured image.
It uses a solid wooden board spanning the doorway and two steel receiver brackets mounted beside the door.
It is best suited to:
- Inward-opening doors
- Solid framing on both sides
- Locations where permanent bracket installation is allowed
- Doors that still serve as exits when the bar is removed
Option 2: Purpose-made door security bar
A commercial adjustable bar may brace the doorknob against the floor.
Advantages include:
- No wall drilling
- Quick installation
- Portability
- Easier use in rentals
However, its effectiveness depends on the floor surface, angle, construction quality, and correct placement. A bar that slides on smooth tile provides little benefit.
Option 3: Floor-mounted door brace
Some products connect the lower part of the door to a floor-mounted receiver.
These can be compact and strong when correctly installed, but drilling into floors can damage:
- Tile
- Waterproof membranes
- Radiant heating
- Electrical wiring
- Plumbing
- Historic flooring
Use a purpose-made system and follow its installation instructions.
Option 4: Reinforced strike and hinge hardware
For many homes, strengthening the existing lock area may be more practical than installing a full crossbar.
Improvements may include:
- A heavy-duty deadbolt
- An extended strike plate
- Structural screws into framing
- Reinforced hinge screws
- A continuous jamb-reinforcement kit
- Hinge bolts for outward-opening doors
These upgrades remain in place without requiring occupants to install a bar every night.
Materials for a Wooden Crossbar
Wooden bar
Use a straight, sound piece of construction lumber.
A common choice is:
- One straight 2×4
- Long enough to extend securely into both brackets
- Free from major cracks, decay, deep cuts, and large loose knots
Select the board carefully.
Avoid lumber that is:
- Warped
- Twisted
- Split
- Wet
- Rotten
- Severely knotted near either bracket
- Joined from several short scraps
- Weakened by unnecessary holes
Do not substitute thin plywood, particleboard, fiberboard, pallet wood of unknown condition, or decorative trim.
Receiver brackets
Use two heavy steel brackets designed to hold a security bar or structural crossbar.
Look for:
- Thick steel construction
- Multiple fastener holes
- A channel sized for the selected board
- Smooth edges
- Enough depth to retain the board
- An open-top design for fast removal
- Manufacturer-provided load or installation information when available
One bracket may be fully enclosed on three sides while the other has a more open shape that lets the board be inserted at an angle. Confirm that the bar cannot bounce or slide out during impact.
Do not use:
- Plastic brackets
- Drywall hooks
- Thin shelf supports
- Decorative hardware
- Small picture-hanging hardware
- Brackets with visible cracks or severe rust
Fasteners
Use manufacturer-specified structural or construction screws suitable for the bracket, lumber, and framing.
The screws must be long enough to pass through:
- The bracket
- The wall finish or trim
- Any gap or jamb material
- A useful depth of solid structural framing
In many houses this may require screws substantially longer than the small screws supplied with decorative hardware. However, the correct length depends on the wall assembly.
Do not blindly install very long screws. Electrical wiring, plumbing, low-voltage cables, and other concealed services may be present near the doorway.
Use an appropriate detector and determine what is behind the wall before drilling.
Avoid drywall screws. They are intended for fastening drywall and can be brittle under demanding structural loads.
Tools
You may need:
- Tape measure
- Pencil
- Stud finder with electrical detection
- Drill or driver
- Appropriate drill bits
- Screw bit
- Level
- Framing square
- Handsaw, circular saw, or miter saw
- Clamps
- Sandpaper
- Eye protection
- Hearing protection
- Work gloves
- Flashlight
- Vacuum
If you cannot confidently locate the framing and concealed utilities, ask a qualified carpenter or contractor to perform the installation.
Step 1: Locate the Structural Framing
Do not assume the visible trim marks the center of a framing member.
A framed doorway normally includes structural members beside the opening, but their exact arrangement can vary with:
- Construction method
- Wall thickness
- Renovations
- Masonry versus wood framing
- Metal-stud construction
- Sidelights
- Electrical switches
- Plumbing
- Previous repairs
Use a stud finder from several directions and compare the readings.
Also inspect nearby electrical outlets and switches. Wiring frequently runs vertically or horizontally from these boxes.
Mark the probable framing areas lightly with a pencil.
If the wall is masonry, concrete, metal-framed, or constructed with insulated panels, do not use ordinary wood-framing instructions. Select fasteners and hardware specifically engineered for that substrate.
Step 2: Choose the Bar Height
A practical position is generally near the lock area or slightly below it because that is where an inward-opening door commonly needs support.
The ideal location depends on:
- Door construction
- Lock position
- Glass panels
- Mail slots
- Pet doors
- Accessibility requirements
- Furniture placement
- The height and reach of household members
Avoid mounting the bar so high that a shorter adult, older resident, or person with limited mobility cannot remove it quickly.
Also avoid placing it so low that:
- Children can operate it unsupervised
- It becomes a trip hazard when stored
- The door flexes significantly above the bar
- It interferes with shoes, rugs, or weather seals
Every capable household member should be able to remove the bar in darkness with one simple lifting motion.
Step 3: Mark the Bracket Positions
Close and lock the door.
Hold the board horizontally across the inside surface.
Position it so that:
- It spans the full opening.
- Both ends enter the steel brackets deeply.
- It sits close to the door without binding.
- It does not press against fragile trim.
- It does not contact glass.
- It can be lifted clear without striking shelves or ceilings.
- The door can operate normally after the board is removed.
Use a level to make the board horizontal.
Mark the upper and lower edges of both brackets.
Then mark the fastener holes.
Double-check that the marked screw locations align with structural framing.
Step 4: Cut and Prepare the Board
Measure the required length twice.
The board should be long enough to engage both brackets securely but short enough to be inserted and removed without forcing it.
Cut the board square.
After cutting:
- Sand splinters from the ends.
- Round sharp exposed edges slightly.
- Inspect for cracks caused by cutting.
- Test the fit before mounting everything permanently.
- Mark which side faces the door.
Do not make the board so tight that humidity or wood movement could jam it in place.
A security bar that cannot be removed quickly becomes an escape hazard.
Avoid handles made from loose rope or cord. A securely mounted, low-profile handle may help some users lift the bar, but it must not weaken the center of the board or catch on clothing.
Step 5: Drill Pilot Holes
Hold the first bracket against the marked location.
Use the bracket holes as a guide and mark the center of each pilot hole.
Before drilling:
- Confirm the framing location again.
- Scan for electrical wiring.
- Check both sides of the wall.
- Verify the planned depth.
- Confirm that the drill will remain level.
- Put on eye protection.
Drill pilot holes sized for the selected structural screws and framing material.
Pilot holes can reduce splitting and make it easier to keep the screws aligned. Follow the fastener manufacturer’s recommendations because an oversized pilot hole can reduce holding strength.
Do not drill deeper than necessary.
Step 6: Install the First Bracket
Position the bracket and begin each screw by hand or at low driver speed.
Tighten the screws evenly.
The bracket should sit firmly without:
- Rocking
- Bending
- Crushing soft trim
- Pulling through drywall
- Distorting around the fastener holes
Do not overtighten until the steel bends or the screw strips the framing.
If the screw spins without tightening, stop. It may have missed the framing or entered a damaged hole.
Do not “fix” a missed structural connection with a plastic drywall anchor.
Move the bracket to a verified framing location or repair the mounting area properly.
Step 7: Align and Install the Second Bracket
Place the board into the installed bracket and hold the second bracket at the opposite end.
Use the level again.
Check that:
- The board remains horizontal.
- Both ends have adequate engagement.
- The board sits close to the door.
- The second bracket aligns with framing.
- The board can be lifted out easily.
- No one must use a tool to remove it.
Mark, drill, and fasten the second bracket using the same procedure.
Insert the board and test the complete fit.
Step 8: Reinforce the Existing Door Hardware
The bar should be a secondary layer—not an excuse to ignore the lock and hinges.
Inspect the strike plate first.
If its screws are short and do not reach framing, consider installing a reinforced strike system using compatible structural screws.
Inspect every hinge and replace loose or inadequate fasteners as appropriate for the door and frame.
Do not replace every screw with the longest screw available without checking:
- Screw-head compatibility
- Hinge clearance
- Framing location
- Hidden wiring and plumbing
- Manufacturer instructions
- Door alignment
Tightening one hinge incorrectly can pull the door out of alignment and prevent the deadbolt from extending fully.
If the jamb is split, repair or replace it before relying on new screws.
Step 9: Test the Bar Without Striking the Door
Do not test a residential door by kicking it, hitting it with a heavy object, or repeatedly ramming it.
Destructive testing can:
- Split the frame
- Damage the hinges
- Crack drywall
- Break glass
- Loosen wiring
- Injure the person performing the test
- Create hidden structural damage
Instead, perform a controlled functional inspection.
With the door closed and locked:
- Insert the bar.
- Press gradually against the door from inside.
- Watch both brackets.
- Listen for cracking.
- Check for movement around the screws.
- Confirm that the board remains seated.
- Stop immediately if the wall, frame, or bracket moves.
- Remove the bar and inspect every component.
Then confirm that the bar can be removed quickly.
Perform the removal test:
- In daylight
- In darkness
- While wearing gloves
- With the weaker hand
- By every adult occupant
- Without tools
- Without moving furniture
If anyone cannot remove it immediately, redesign the system.
Fire-Egress Safety Is Not Optional
Security hardware can become dangerous when it prevents people from leaving during a fire.
The U.S. Fire Administration advises households to maintain clear exit paths, know two ways out when possible, and ensure that security bars have quick-release devices. (U.S. Fire Administration)
A removable door bar should therefore:
- Release from inside without a key
- Require no special tool
- Be removable in one obvious motion
- Remain operable in darkness
- Be reachable by household adults
- Never be blocked by furniture
- Never be screwed permanently across an occupied doorway
- Never be used on the only exit unless it can be removed instantly
- Never be installed in a way that violates local fire or building requirements
Do not add a padlock, chain, pin, hidden latch, or complicated release mechanism merely to prevent someone from lifting the board.
During a fire, smoke can reduce visibility and impair judgment very quickly. A clever security mechanism may become confusing when the room is dark and occupants are frightened.
Keep a flashlight near sleeping areas, maintain working smoke alarms, and practice removing the bar as part of the household escape drill.
CPSC home-safety guidance similarly recommends ensuring that security barriers can be released from inside so occupants can escape. (U.S. Consumer Product Safety Commission)
Inward-Opening Versus Outward-Opening Doors
Inward-opening doors
A horizontal interior bar can resist inward movement because the door presses into the bar.
The bar then transfers force to the brackets and framing.
This is the most suitable configuration for the project described here.
Outward-opening doors
An outward-opening door moves away from an interior crossbar.
A bar simply resting against its inside surface may not stop that movement.
Outward-opening doors should instead be evaluated for:
- Exposed hinge pins
- Security hinges
- Hinge bolts
- Interlocking hinge-side protection
- Frame strength
- Lock compatibility
- Purpose-made outward-opening-door hardware
Do not improvise cables or chains that could delay emergency escape.
A locksmith or qualified door installer can recommend hardware appropriate for the particular door set.
Double and French doors
Double doors introduce additional weak points, including:
- The meeting stile
- Flush bolts
- Inactive-door anchoring
- Upper and lower receivers
- Glass panels
- Flexible door leaves
A single board may not correct these weaknesses.
Use hardware designed for the specific double-door assembly.
Sliding doors
A swinging-door crossbar is not suitable for a sliding glass door.
Sliding doors require their own track, anti-lift, lock, and glazing considerations. Use a purpose-made sliding-door bar placed correctly in the track while preserving emergency operation.
Renter-Friendly Alternatives
Renters should not drill into walls, doors, frames, floors, or trim without written permission.
Unauthorized installation could:
- Violate the lease
- Damage concealed utilities
- Compromise a fire-rated assembly
- Create liability
- Lead to repair charges
- Interfere with property-management access
- Violate local egress requirements
Possible removable alternatives include:
Adjustable door-security bar
Choose a purpose-made product that braces against the floor.
Check that:
- The rubber foot grips the floor.
- The bar fits the doorknob or door correctly.
- It does not slide on tile or polished concrete.
- It releases easily from inside.
- It does not damage the flooring.
- The manufacturer permits use on that door type.
Portable door brace
Some portable devices engage the strike area or bottom of the door.
Confirm compatibility before depending on one. Hotel-style travel devices do not fit every latch, frame, or door gap.
Longer strike screws—with permission
A landlord may approve a simple hardware upgrade, especially when installed by maintenance personnel.
Request the modification in writing.
Professional lock inspection
Ask the property manager to address:
- Loose locks
- Split jambs
- Misaligned deadbolts
- Missing hinge screws
- Damaged doors
- Insecure exterior hardware
A property owner should repair basic defects rather than expecting a renter to compensate with improvised devices.
Accessibility Considerations
A reinforcement device must work for the people who actually live in the home.
Consider whether it can be removed by someone who has:
- Limited upper-body strength
- Arthritis
- Reduced grip
- Restricted shoulder movement
- Low vision
- Balance problems
- Limited reach
- Cognitive impairment
A heavy wooden bar mounted at shoulder height may be difficult for some residents.
Possible improvements include:
- Choosing straight, dry lumber without unnecessary weight
- Mounting the bar at a reachable height
- Adding a securely attached ergonomic grip
- Keeping the removal path unobstructed
- Using high-contrast markings
- Practicing removal regularly
- Selecting a commercially engineered alternative
Do not leave a heavy bar leaning loosely beside the doorway. It can fall, injure someone, or block the exit.
Provide a secure storage location close to the door but outside the walking path.
Common Installation Mistakes
Fastening brackets only to trim
Trim is decorative and may be attached with small finish nails.
Locate and fasten into structural framing.
Using drywall anchors
Drywall anchors are not a substitute for a structural connection in this application.
Using ordinary shelf brackets
Shelf hardware may bend, tear, or release the board under sideways loading.
Use brackets intended for a crossbar or comparable structural duty.
Using drywall screws
Drywall screws can be brittle.
Use compatible structural fasteners specified for the bracket and framing.
Missing the studs
A long screw is not useful when it passes beside the framing.
Verify the framing before drilling.
Ignoring concealed utilities
Doorways may have wiring for switches, lights, doorbells, alarms, or smart-home devices.
Scan and inspect before drilling.
Making the board too tight
Wood expands with changes in moisture.
Leave enough clearance for quick removal.
Making the board too short
Both ends must remain securely engaged in the brackets.
Placing it against glass
Pressure against a glazed panel can break the glass.
The system should transfer load through strong portions of the door and frame.
Blocking the only exit
The bar must be removable immediately from inside.
Adding a lock to the bar
A keyed or complicated release can trap occupants.
Forgetting the hinge side
The lock side is only part of the door system. Inspect the hinges and their framing as well.
Depending on the bar alone
Use the deadbolt, repair the frame, maintain exterior lighting, and keep the doorway visible.
Maintenance Checklist
Inspect the installation every three months and after any unusual impact.
Check:
- Bracket movement
- Loose screws
- Bent steel
- Cracked welds
- Rust
- Split lumber
- New wall cracks
- Jamb movement
- Door alignment
- Deadbolt operation
- Hinge tightness
- Bar fit
- Emergency removal speed
Replace the board when it becomes:
- Split
- Warped
- Rotten
- Deeply gouged
- Oil-soaked
- Fire-damaged
- Too tight to remove easily
Replace a bracket that becomes:
- Bent
- Cracked
- Loose
- Heavily corroded
- Distorted around its screw holes
Do not simply tighten a loose screw repeatedly. Determine why it loosened and inspect the framing for damage.
Additional Ways to Improve Door Security
A reinforcement bar works best as part of a layered approach.
Consider:
- Repairing damaged jambs
- Installing a quality deadbolt
- Reinforcing the strike area
- Securing hinges correctly
- Replacing hollow or deteriorated exterior doors
- Improving exterior lighting
- Trimming vegetation that conceals the entry
- Using a door viewer or camera
- Keeping doors locked consistently
- Protecting nearby glass
- Maintaining visible house numbers for emergency responders
- Testing smoke alarms
- Practicing the household escape plan
Avoid creating an entrance that is difficult for firefighters or other emergency responders to recognize and access.
The goal is to improve resistance while preserving safe everyday use.
Is a DIY Door Bar Worth Building?
A properly mounted bar can add a useful second layer of resistance to a suitable inward-opening door.
It is most worthwhile when:
- The door and frame are structurally sound.
- Solid framing exists on both sides.
- The brackets are engineered for the job.
- Structural screws can be installed safely.
- Every occupant can remove the bar immediately.
- The installation is permitted by the property owner and local rules.
It is not the right solution when:
- The door opens outward.
- The door or frame is rotten.
- Large glass panels remain the main weak point.
- The brackets can attach only to drywall or trim.
- Concealed utilities prevent safe fastening.
- The device would obstruct the only practical exit.
- Occupants cannot lift or operate it easily.
- The lease prohibits permanent modifications.
In those situations, repair the door system or consult a qualified locksmith, carpenter, or door installer.
Final Safety Note
A solid board and strong brackets can add resistance only when the complete assembly is anchored into sound structural framing.
Do not attach the brackets solely to trim, drywall, or a thin jamb. Do not use decorative shelf hardware, plastic anchors, drywall screws, split lumber, or a complicated locking mechanism.
Confirm the door’s opening direction before choosing this design. A surface-mounted interior crossbar is primarily intended for an inward-opening door; outward-opening, sliding, double, glass-paneled, metal-framed, and fire-rated doors require different solutions.
Never install security hardware that can trap occupants. The bar must lift out quickly from inside without a key or tool, even in darkness. Keep all exit routes clear, maintain working smoke alarms, and include bar removal in your household fire-escape practice.
When the framing, utilities, door construction, or legal requirements are uncertain, use a qualified professional.