How to Build a Long-Term Seed Storage Box for Emergency Food Gardens
Seeds take up almost no room, but they can preserve access to dozens of future garden crops.
Unfortunately, simply throwing packets into a wooden box does not make them suitable for long-term storage. Seeds are living material. As they age, their ability to germinate gradually declines—and heat, humidity, insects, poor labeling, and frequent temperature changes can accelerate that decline.
A practical seed reserve therefore needs more than an attractive container.
The complete system should provide:
- Thoroughly dried seeds
- Clearly labeled packets
- Airtight inner containers
- Moisture control
- Cool, stable temperatures
- Protection from light and pests
- Planting and germination records
- Regular inspection and rotation
This project organizes those elements inside one rugged, portable storage box.
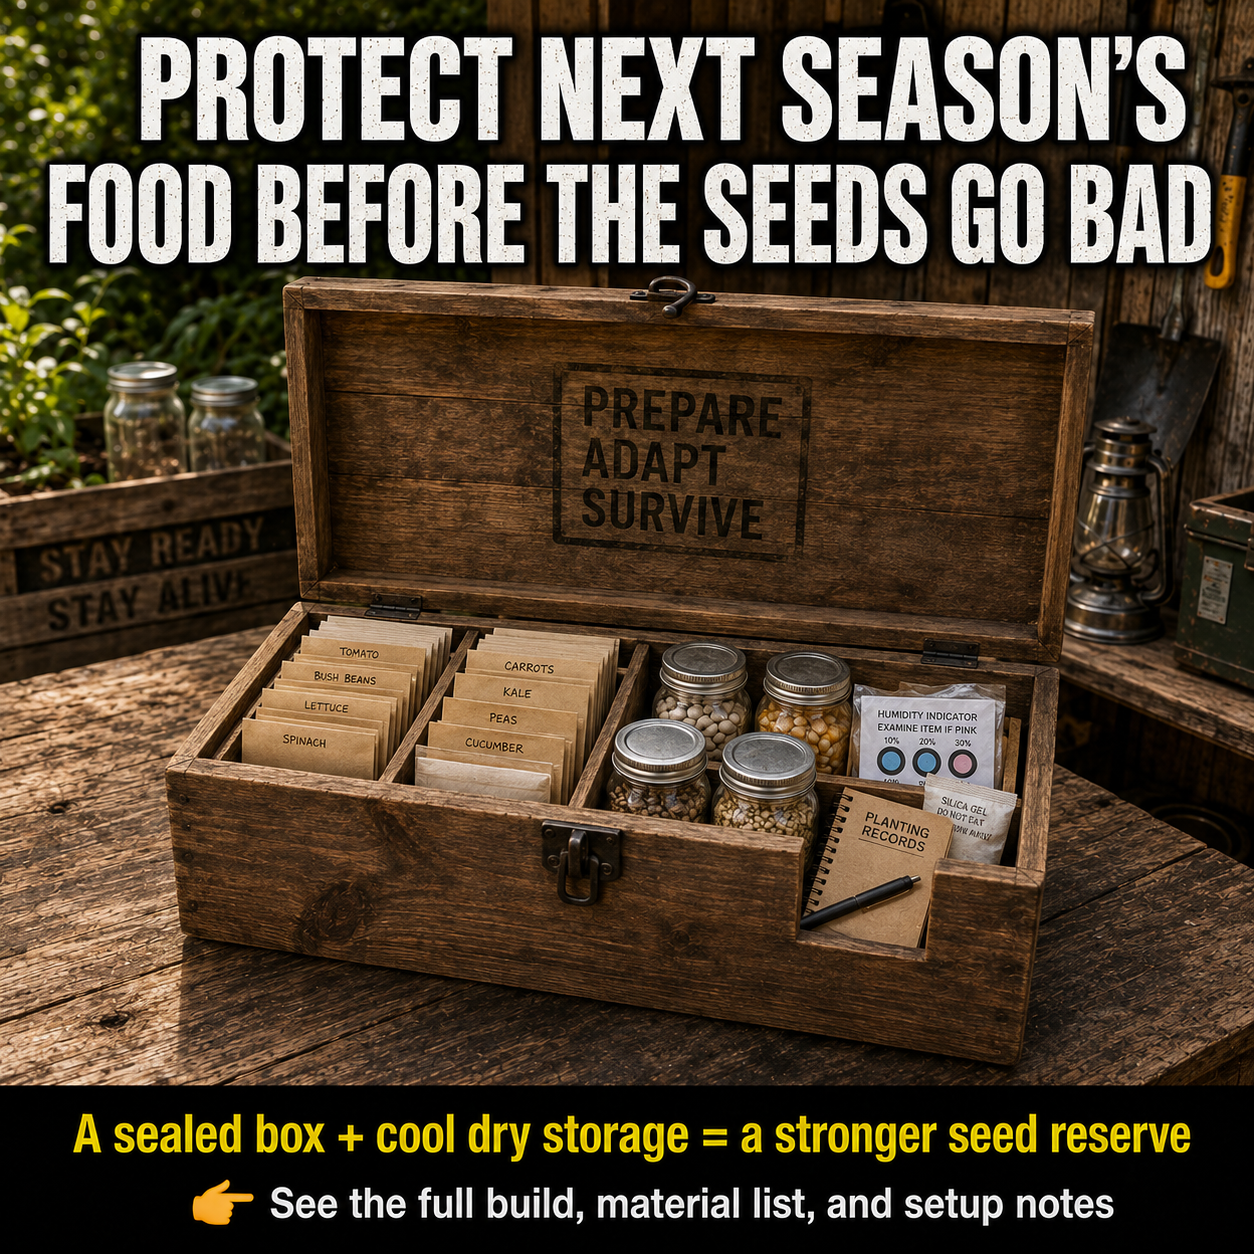
The wooden chest shown in the featured image is useful for protection and organization, but the sealed jars or containers inside it—not the wood itself—provide the moisture barrier.
The basic principle is:
Dry seeds + airtight packaging + cool, stable storage + accurate records = a more dependable seed reserve
What This Seed Box Can and Cannot Do
A well-designed seed box can help protect seeds from:
- Humid household air
- Accidental spills
- Sunlight
- Insects
- Rodents
- Crushed packets
- Missing labels
- Disorganized planting
- Rapid temperature swings
- Repeated handling
It cannot:
- Make every seed last indefinitely
- Restore seeds that were stored while damp
- Guarantee that saved hybrid seeds will resemble their parent plants
- Protect seeds left in a hot shed or vehicle
- Replace periodic germination testing
- Correct improper seed-saving techniques
- Preserve diseased or immature seeds
Some species naturally remain viable much longer than others. Storage conditions can slow deterioration, but they cannot stop it completely.
Important Correction to the Featured Design
The image shows paper envelopes arranged directly inside a divided wooden box. That is excellent for organization, but paper is not airtight.
In a humid climate, seed packets can absorb moisture from the surrounding air—even while the wooden lid remains closed.
For better protection:
- Place labeled paper packets inside airtight glass jars, gasketed containers, or high-quality moisture-barrier bags.
- Add a suitable desiccant when needed.
- Put the sealed containers inside the wooden organizer.
- Store the entire box in a cool interior location.
The wooden chest becomes the protective outer shell. The sealed containers create the controlled storage environment.
Do not scatter loose silica-gel beads among the seeds. Keep desiccant in intact, clearly marked packets so it cannot become mixed with planting material.
Why Seeds Lose Their Ability to Germinate
Seeds remain alive while dormant. They continue extremely slow biological processes even when they appear dry and inactive.
Their usable life is affected by several factors.
Moisture
Excess moisture can encourage:
- Mold
- Premature germination
- Insect activity
- Faster biological deterioration
- Damage during freezing
Seeds should be fully dry before they are sealed.
A desiccant can help maintain a dry environment, but it should not be expected to dry freshly harvested, moist seeds instantly inside a closed jar.
Temperature
Warm temperatures generally shorten storage life.
A seed box should not be kept in:
- An attic
- A greenhouse
- A hot garage
- A vehicle
- A metal shed
- A cabinet beside an oven
- Direct sunlight
- A room with large daily temperature swings
A cool interior closet is better for ordinary storage. Properly packaged seeds may also be refrigerated or frozen for longer storage.
Oregon State University Extension recommends placing seed packets in tightly sealed jars before refrigerating or freezing them for long-term storage. OSU Extension
Light
Light is not always the fastest cause of seed deterioration, but dark storage helps reduce unnecessary heat exposure and protects light-sensitive materials.
An opaque wooden box provides useful secondary protection.
Oxygen
Seeds continue to age in storage. Airtight packaging reduces exchanges with humid air and helps stabilize the internal environment.
Vacuum sealing may be used for very dry seeds, but it is not essential for an effective home system.
Seed quality
Storage cannot improve seeds that were:
- Collected before maturity
- Damaged during processing
- Exposed to disease
- Crushed
- Stored while damp
- Taken from unhealthy plants
- Already very old
Begin with clean, mature, high-quality seed.
Materials and Tools
Outer-box materials
You will need:
- One wooden box with a close-fitting lid
- Thin plywood or solid-wood strips for dividers
- Small wood screws, brads, or suitable wood glue
- Two hinges
- One simple exterior latch
- Optional carrying handles
- Optional weatherstripping or thin closed-cell gasket
- Sandpaper
- A non-toxic interior finish, if desired
- Labels
The box does not need to be extremely heavy. It needs to protect its contents and remain easy to move.
Avoid wood that is:
- Wet
- Moldy
- Rotten
- Strongly scented
- Chemically contaminated
- Recently treated with unknown preservatives
- Infested with insects
Do not use an old chemical, ammunition, fuel, or pesticide box unless you know it is clean and safe.
Storage supplies
Include:
- Paper coin envelopes or seed envelopes
- Permanent marker or archival-quality pen
- Airtight glass jars or gasketed food-storage containers
- Moisture-barrier pouches, if preferred
- Silica-gel desiccant packets
- Humidity-indicator card
- Small notebook or printed inventory sheets
- Adhesive labels
- Waterproof backup labels
- Small resealable bags for grouping varieties
- Optional digital thermometer and hygrometer
Tools
You may need:
- Tape measure
- Pencil
- Framing square
- Saw
- Drill or screwdriver
- Clamps
- Sandpaper
- Safety glasses
- Hearing protection
- Dust mask
- Small paintbrush
- Vacuum
Step 1: Decide What the Box Must Hold
Before cutting dividers, gather the containers and seed packets you plan to store.
Separate the collection into useful categories, such as:
- Beans and peas
- Leafy greens
- Root crops
- Tomatoes and peppers
- Cucumbers and squash
- Corn and grains
- Herbs
- Flowers for pollinators
- Cover crops
- Recently harvested seed
- Seeds awaiting germination tests
Leave room for future additions.
Do not design every compartment so tightly that one larger envelope makes the system unusable.
A practical layout might contain:
- Two long rows for envelopes
- Two or three spaces for sealed jars
- One narrow compartment for records
- One small compartment for desiccant and indicator cards
The notebook should remain accessible without emptying the box.
Step 2: Select or Build the Outer Box
A ready-made wooden tool chest, craft box, or sturdy drawer can be adapted for this project.
If building from scratch, a manageable home-garden box might be approximately:
- 18 to 24 inches wide
- 10 to 14 inches deep
- 6 to 10 inches high
These are only starting dimensions. Measure your actual containers first.
The lid should:
- Close evenly
- Protect the packets from light
- Resist dust
- Remain securely attached
- Open without pulling the box over
- Avoid crushing tall jars
A gasket around the lid can reduce dust and humid-air exchange, but do not treat a homemade wooden box as perfectly airtight. Wood moves with changes in humidity, and small gaps will remain.
That is why the seeds still need sealed inner containers.
Step 3: Construct the Dividers
Measure the interior length, width, and height.
Cut divider strips from thin plywood or straight solid wood. Make them tall enough to support envelopes but low enough that labels remain visible.
Dry-fit every divider before attaching it.
Confirm that:
- Envelopes can be removed easily.
- Jars do not tip over.
- The lid closes without contact.
- The notebook fits flat or upright.
- Desiccant is separated from loose supplies.
- No sharp edge can tear a packet.
Secure the dividers with glue, small fasteners, or fitted slots.
Avoid large beads of adhesive inside the box. Some products release a strong odor while curing. Allow all finishes and adhesives to cure completely before adding seeds.
Sand all exposed edges.
Step 4: Prepare Seeds Before Storage
Never seal freshly collected seeds immediately after harvest.
Seeds from dry pods—such as many beans, peas, and herbs—should finish drying in a shaded, well-ventilated location.
Seeds from fleshy fruit may require cleaning, fermentation, rinsing, and drying according to the crop.
General preparation includes:
- Harvest seed only when it is fully mature.
- Remove pulp, pods, chaff, and damaged material.
- Discard visibly moldy, insect-damaged, or diseased seeds.
- Spread seeds in a single layer.
- Dry them in a protected place with good airflow.
- Avoid high heat.
- Confirm they are thoroughly dry before packaging.
Do not dry garden seeds in a hot oven. Excessive heat can damage the embryo even when the seed looks normal afterward.
OSU Extension advises cleaning and drying seeds before packaging them with silica gel, then keeping the labeled envelopes in glass jars in a cool, dry location. OSU Extension seed-saving guide
If you are uncertain about the correct harvesting process for a particular crop, use crop-specific guidance from a university extension service.
Step 5: Label Every Seed Packet
Memory is not a storage system.
Every packet should include:
- Crop
- Variety
- Year harvested or purchased
- Source
- Open-pollinated, heirloom, or hybrid status
- Approximate quantity
- Notes about disease or growing performance
- Germination-test date
- Germination result
For saved seeds, also record:
- Location grown
- Which plants were selected
- Isolation or hand-pollination method
- Harvest date
- Drying date
Write the information on the packet before filling it. Writing on a packet full of small seeds can crush them or puncture the paper.
Use both a written packet label and an inventory entry. If one becomes unreadable, the other remains.
Be careful with hybrid seeds
Seeds saved from an F1 hybrid may germinate but produce plants that differ significantly from the original crop.
They may vary in:
- Size
- Flavor
- Yield
- Color
- Disease resistance
- Maturity time
- Plant shape
OSU Extension notes that saved hybrid seed is not dependable for reproducing the qualities of the parent plant. OSU Extension
For a seed reserve intended to reproduce consistent crops, prioritize properly maintained open-pollinated varieties and learn the isolation requirements for each species.
Step 6: Package Seeds in Small Portions
Avoid keeping the entire supply of one important crop in a single packet.
Divide larger quantities into several smaller packets.
This provides several advantages:
- Only one packet is exposed during planting.
- A spill does not destroy the entire supply.
- Moisture introduced into one packet does not affect everything.
- Older and newer seed lots can be rotated separately.
- Seeds can be shared without opening the main reserve.
A useful arrangement is:
- Working packet: Used during the current planting season
- Reserve packet: Kept sealed as backup
- Renewal packet: Held until the crop is grown for fresh seed
Label all three with the same lot information.
Do not place unlabeled loose seeds directly into a jar. Several vegetable seeds look nearly identical once separated from their packaging.
Step 7: Add Airtight Inner Containers
Place the labeled paper packets inside clean, completely dry jars or moisture-resistant containers.
Good options include:
- Canning jars with sound lids
- Gasketed food-storage containers
- Heat-sealed moisture-barrier bags
- Purpose-made seed-storage containers
Inspect jars for cracks and lids for corrosion or damaged seals.
Do not use containers that previously held:
- Fuel
- Solvents
- Pesticides
- Pool chemicals
- Strong cleaning products
- Unknown substances
Group seeds logically so the container does not need to remain open for long.
For example:
- Jar 1: leafy greens
- Jar 2: beans and peas
- Jar 3: tomatoes and peppers
- Jar 4: squash and cucumbers
- Jar 5: herbs and flowers
Place a category label on both the lid and side of each container.
Step 8: Use Desiccant Correctly
Silica gel can help maintain a dry atmosphere inside a sealed container.
Use intact, clearly marked packets. Do not allow beads to mix with seeds.
Follow the desiccant manufacturer’s instructions for:
- Quantity
- Food-contact suitability
- Reactivation
- Replacement
- Indicator colors
- Safe handling
Keep “do not eat” markings visible, especially if children may access the box.
Desiccant should not be considered a substitute for proper drying. Sealing noticeably moist seeds with silica gel can still result in damage, mold, or uneven drying.
A humidity-indicator card may help reveal moisture entering the container. Remember that the card measures conditions inside the sealed container—not the entire room—when it is placed correctly.
Open the container only as long as necessary.
Step 9: Create a Seed Inventory
The notebook shown in the image is one of the most valuable parts of the system.
Create one line for every seed lot.
| ID | Crop and variety | Source | Year | Quantity | Germination | Storage location |
|---|---|---|---|---|---|---|
| T-01 | Tomato, open-pollinated variety | Home garden | 2026 | 80 | 90% | Jar 3 |
| B-02 | Bush bean | Purchased | 2025 | 120 | 85% | Jar 2 |
| L-04 | Lettuce | Seed exchange | 2026 | 200 | Not tested | Jar 1 |
Assign each packet a short identification code and repeat that code in the notebook.
Your records can also include:
- Planting dates
- Days to germination
- Harvest dates
- Yield
- Flavor
- Drought performance
- Pest problems
- Seed-saving notes
- Amount used
- Amount remaining
Store a digital photograph or spreadsheet copy of the inventory somewhere separate from the physical box.
If the box is lost or damaged, the record still shows what must be replaced.
Step 10: Choose the Storage Location
For ordinary household storage, choose the coolest dry location with the most stable temperature.
Possible locations include:
- An interior closet
- A conditioned basement shelf
- A climate-controlled pantry
- A refrigerator
- A freezer, when seeds are prepared and packaged correctly
Avoid:
- Outdoor sheds
- Vehicles
- Attics
- Damp basements
- Laundry rooms
- Boiler rooms
- Cabinets over appliances
- Floors vulnerable to flooding
- Shelves beside household chemicals
Keep the box above floor level to reduce the risk of water damage.
If refrigeration or freezing is used, the seeds must be sealed against moisture.
Prevent condensation
Cold containers can collect condensation when opened in warm, humid air.
When removing a sealed seed jar from a refrigerator or freezer:
- Leave the jar closed.
- Allow the entire container to reach room temperature.
- Open it only after it has warmed.
- Remove the needed packet.
- Reseal it promptly.
Opening a cold jar immediately can introduce moisture that later becomes trapped inside.
Avoid repeated warming and cooling of the main reserve. Keep a smaller working supply separate when seeds will be used frequently.
Step 11: Test Germination Before Planting Season
A packet can look perfect while containing seeds that no longer germinate well.
Test important seed lots before depending on them.
Simple paper-towel germination test
You will need:
- Ten seeds
- A clean paper towel
- Water
- A resealable bag or covered container
- A label
- A suitable warm location
Instructions
- Moisten the paper towel.
- It should be damp but not dripping.
- Place ten seeds on one half.
- Fold the towel over the seeds.
- Place it in the bag or container.
- Label it with the crop, variety, and date.
- Keep it at a suitable germination temperature for that crop.
- Check regularly.
- Keep the towel moist without flooding it.
- Count the normally germinated seeds.
With a ten-seed sample:
- 10 germinated = approximately 100%
- 9 germinated = approximately 90%
- 8 germinated = approximately 80%
- 6 germinated = approximately 60%
A small test gives only an estimate, but it is useful for household planning.
If germination is lower than expected:
- Sow more seeds
- Replace the lot
- Grow it soon for seed renewal
- Do not treat it as the only reserve for that crop
Record the result and test date on both the packet and inventory.
Step 12: Rotate and Renew the Collection
A reliable seed reserve is active, not forgotten.
Use older seeds while they still have reasonable germination, then replace them with:
- Fresh purchased seed
- Properly saved garden seed
- Seed from a reputable exchange
- A newer lot from the same variety
A simple rotation schedule is:
- Review the inventory before each planting season.
- Test older or important seed lots.
- Plant from the oldest viable lot.
- Grow selected plants to maturity for seed.
- Dry and label the new seed.
- Add it as a separate lot.
- Remove failed or contaminated seed.
- Update the inventory.
Do not mix new seeds into an old packet. Keeping lots separate preserves their dates and test results.
Which Seeds Should a Preparedness Collection Include?
Build the collection around crops your household will actually grow and eat.
Useful characteristics include:
- Suitability for the local climate
- Familiarity
- Reliable productivity
- Reasonable storage life
- High nutritional value
- Ability to mature within the local growing season
- Open-pollinated genetics for future seed saving
- Resistance to common local diseases
- More than one variety of important crops
Possible categories include:
Fast-growing crops
- Radishes
- Lettuce
- Spinach
- Mustard greens
- Bush beans
- Turnips
Calorie-producing crops
- Dry beans
- Corn appropriate for drying
- Winter squash
- Peas
- Grain crops suited to the region
Nutrient-dense crops
- Kale
- Chard
- Carrots
- Tomatoes
- Peppers
- Dark leafy greens
Flavor and medicinal-garden crops
- Basil
- Cilantro
- Dill
- Parsley
- Thyme
- Other herbs suited to the local climate
Do not fill the box entirely with novelty varieties while neglecting dependable staples.
Seeds are only one input. Productive gardening also requires soil, water, tools, suitable weather, pest management, knowledge, time, and practice.
Common Seed-Storage Mistakes
Storing damp seeds
This is the most serious mistake.
Dry seeds thoroughly before sealing them.
Depending on the wooden box alone
Wood is not a dependable vapor barrier.
Use airtight inner containers.
Leaving the box in a hot garage
Darkness does not cancel heat.
Choose a cool, stable location.
Forgetting to label varieties
“Tomato” is not enough information when the collection contains several varieties.
Record the exact variety and year.
Mixing different seed years
Separate lots so older seeds can be tested and used first.
Saving seeds from unknown hybrids
The resulting plants may not reproduce the characteristics you expect.
Opening cold jars immediately
Allow sealed containers to reach room temperature before opening to reduce condensation risk.
Using loose desiccant
Keep desiccant contained and clearly identified.
Never testing germination
Appearance alone does not prove viability.
Storing only one variety of essential crops
A disease, climate problem, or poor local adaptation could affect the entire supply.
Saving seeds without learning pollination
Squash, cucumbers, corn, brassicas, and several other crops can cross-pollinate. Correct isolation or controlled pollination may be necessary if genetic consistency matters.
Treating seeds as an instant food supply
Seeds require time, water, suitable soil, and gardening skill before producing food.
Practice growing the varieties now—not for the first time during an emergency.
Maintenance Checklist
Inspect the system every three to six months.
Check:
- Box for moisture or insect damage
- Jar lids and container gaskets
- Humidity-indicator cards
- Desiccant condition
- Packets for stains or mold
- Labels for fading
- Seeds for insect activity
- Inventory accuracy
- Storage temperature
- Upcoming germination tests
- Varieties that need replacement
If one packet shows mold or insects:
- Isolate it immediately.
- Inspect everything stored in the same container.
- Clean and dry the container.
- Replace affected desiccant.
- Determine how moisture or pests entered.
- Do not plant visibly diseased seed merely to avoid wasting it.
Is a Wooden Seed Storage Box Worth Building?
Yes—if it is treated as an organized outer container rather than the entire preservation system.
Its main advantages are:
- Physical protection
- Easy organization
- Portability
- Darkness
- Room for records
- Separation of seed categories
- Protection for glass jars
- A visible reminder to inspect and rotate supplies
The project is less useful when:
- Seeds are stored loose in paper packets
- The box remains in a hot or damp location
- Harvested seeds are sealed before drying
- No inventory is maintained
- Germination is never tested
- The collection contains crops unsuited to the local climate
- The owner has no experience growing them
The best seed reserve is not the largest collection. It is the collection you can identify, test, plant, grow, harvest, and renew.
Final Takeaway
A wooden chest can organize and protect a seed collection, but successful long-term storage depends on what happens inside it.
Dry the seeds completely. Label every packet. Separate different years and varieties. Place the packets inside airtight containers with appropriate moisture control. Keep the box in a cool, stable location. Test older seeds before planting season and rotate the collection by actually growing it.
Most importantly, practice gardening before an emergency.
A box full of unfamiliar seeds is only potential. A tested collection supported by real growing experience is a practical food-resilience tool.