A pantry full of food can create a comforting sense of preparedness—until you discover that the oldest cans are buried in the back, three bags of rice were purchased unnecessarily, and the ingredient needed for dinner disappeared months ago.
The problem is rarely a lack of storage space.
It is usually a lack of rotation.
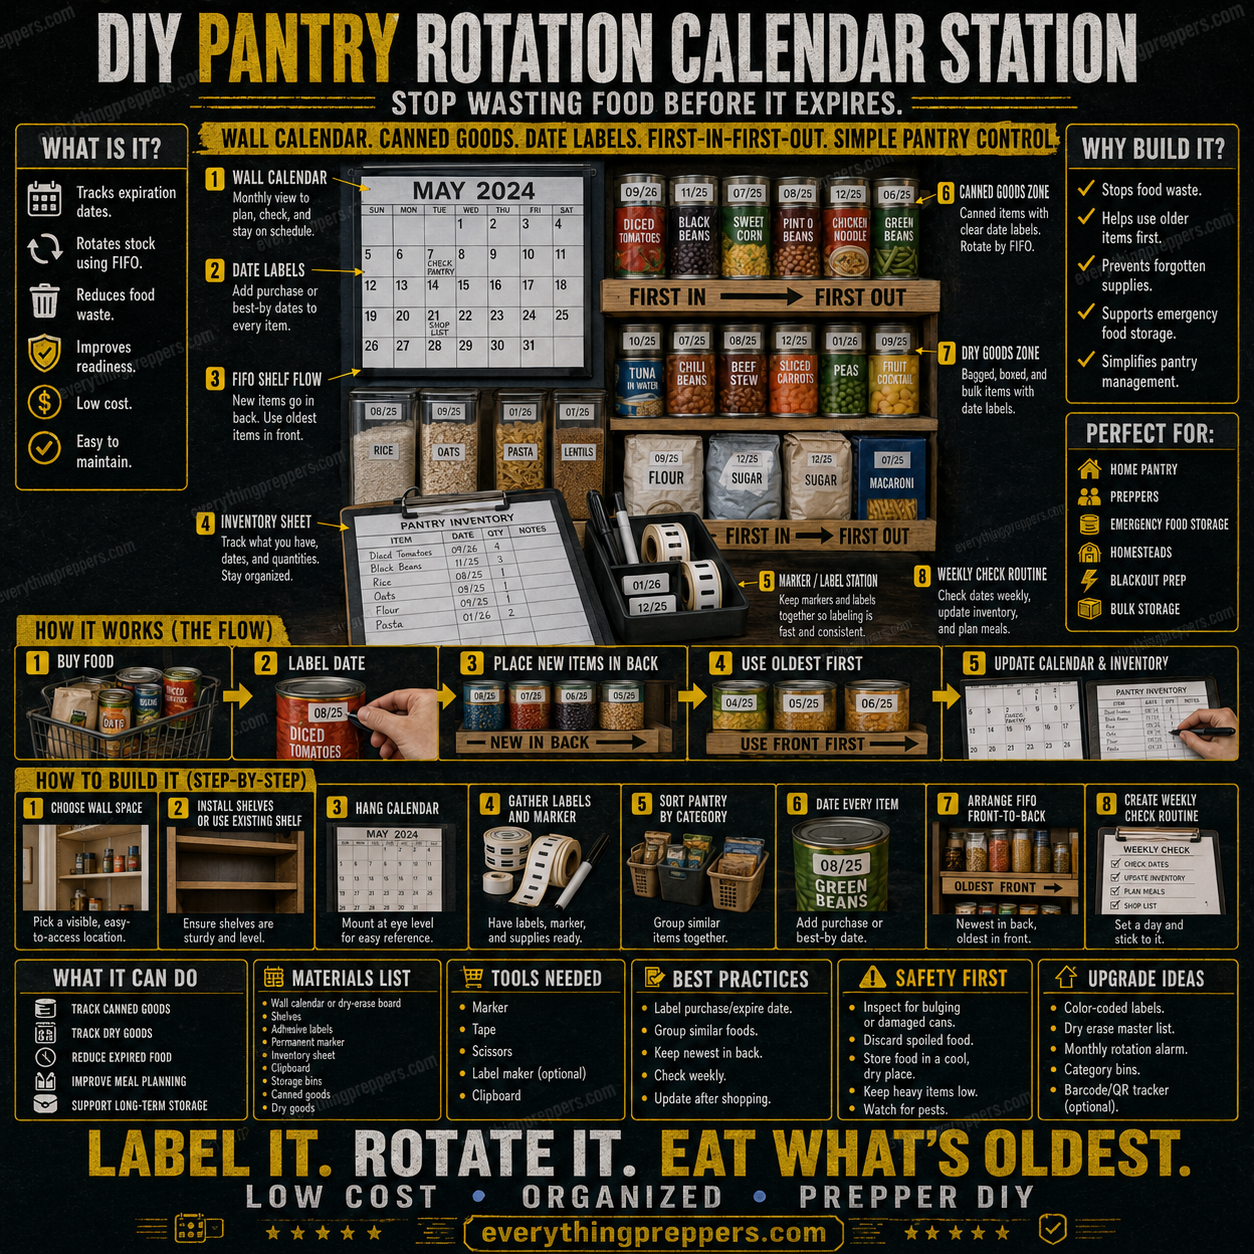
A DIY pantry rotation calendar station combines four simple systems:
- Clear date labels
- First-in, first-out shelf organization
- A written inventory
- A regular inspection schedule
Together, they help you see what you own, use older products first, notice shortages, and replace emergency food before its quality declines.
The basic principle is:
Label it + rotate it + record it = a pantry you can actually depend on
This system can be used for:
- Everyday household groceries
- Emergency food supplies
- Homestead pantries
- Bulk dry goods
- Canned food
- Camping provisions
- Blackout meal supplies
- Community or church food cupboards
It is inexpensive, requires no electricity, and can be adapted to almost any pantry.
However, a date label is only one part of food safety. It does not make damaged, contaminated, or improperly stored food safe. Every pantry inspection should also include checking packaging condition, storage temperature, moisture, pests, and product-specific instructions.
What Is a Pantry Rotation Calendar Station?
A pantry rotation station is a dedicated area where food dates, quantities, locations, and replacement needs are recorded.
A basic station includes:
- A calendar or dry-erase planning board
- A labeling area with tape, labels, and markers
- Shelves arranged for first-in, first-out rotation
- Separate zones for canned and dry food
- A paper or digital inventory
- A shopping or replacement list
- A scheduled inspection routine
The calendar does not need to display every date printed on every package. That would quickly become difficult to maintain.
Instead, use it for important actions such as:
- Monthly pantry inspections
- Older-food use-up weeks
- Emergency-kit reviews
- Bulk-food inspection dates
- Germ, moisture, or pest checks
- Replacement deadlines
- Inventory reconciliation
- Donation reminders
- Seasonal restocking
Individual items should still carry their own readable labels.
Why Build One?
Reduce forgotten food
Without a rotation system, newer groceries are often placed directly in front of older supplies. The older food slowly disappears behind them.
FIFO organization keeps the oldest suitable item in the easiest position to reach.
Prevent unnecessary purchases
An inventory helps prevent buying another case of beans when twelve cans are already hidden on a lower shelf.
It also identifies real shortages before the next emergency or shopping trip.
Make emergency meals easier
During a blackout or evacuation warning, you may not have time to search through an unorganized pantry.
Clearly defined zones make it easier to find:
- Ready-to-eat meals
- Manual can openers
- Drinking water
- Infant or medical-diet food
- Pet food
- Foods requiring little water
- Foods requiring no refrigeration
- Items that should be used first
Save money
The system encourages you to eat what you already own before purchasing replacements.
It also helps reveal which “preparedness foods” your household never eats. There is little value in repeatedly storing products that everyone avoids.
Improve planning
A working inventory connects food storage to actual meals.
Instead of simply counting cans, you can determine whether the pantry contains complete combinations such as:
- Beans, rice, tomatoes, and seasoning
- Pasta, sauce, vegetables, and protein
- Oats, shelf-stable milk, fruit, and sweetener
- Soup, crackers, canned meat, and vegetables
Calories matter, but so do water requirements, cooking fuel, nutritional variety, dietary needs, and household preferences.
Understanding FIFO
FIFO means first in, first out.
The oldest appropriate product is positioned at the front and used first. Newer products are added behind it.
For example:
- You already own four cans of beans.
- You purchase two more.
- The four older cans remain at the front.
- The two newer cans go behind them.
- You cook with the front can.
- You record or replace it as needed.
FIFO does not mean blindly eating damaged food merely because it is old.
Any package that is leaking, badly swollen, rusted through, punctured, contaminated, or otherwise questionable should be isolated and discarded according to appropriate safety guidance.
Best-By Dates Are Not All the Same
The date printed on a package may be labeled:
- Best if used by
- Best before
- Use by
- Sell by
- Freeze by
- Packed on
- Manufactured on
These phrases do not always have the same meaning.
In the United States, USDA guidance explains that, except for infant formula, food date labels generally indicate expected quality rather than automatically determining food safety. A product may lose flavor, color, or texture after a quality date without immediately becoming unsafe—provided it was handled correctly and shows no spoilage. USDA Food Product Dating
That does not mean every old product should be kept indefinitely.
Always consider:
- The manufacturer’s instructions
- Whether refrigeration is required
- Whether the package has been opened
- Storage temperature and humidity
- Package integrity
- Evidence of insects or rodents
- Flood, smoke, chemical, or heat exposure
- Product-specific safety advice
- Local regulations and date-label terminology
Infant formula is an important exception. Follow its use-by date and storage instructions exactly.
For product-specific storage estimates, consult the FoodKeeper resource from FoodSafety.gov.
Materials List
A basic pantry station can be assembled with inexpensive supplies.
Organization materials
- Existing pantry shelves or sturdy freestanding shelves
- Wall calendar or dry-erase board
- Clipboard
- Printed inventory sheets
- Shopping-list pad
- Adhesive labels
- Painter’s tape or removable labeling tape
- Permanent marker
- Dry-erase marker
- Small bins or baskets
- Shelf-category signs
- Can rack, if desired
- Airtight food-storage containers for vulnerable dry goods
- Binder or notebook
- Manual can opener
Optional upgrades
- Label maker
- Color-coded labels
- Shelf risers
- Battery-powered cabinet light
- Digital spreadsheet
- Barcode or QR inventory system
- Hygrometer
- Thermometer
- Moisture alarms
- Water-resistant document sleeve
- Clear shelf-edge label holders
Basic tools
- Tape measure
- Pencil
- Level
- Drill or screwdriver
- Appropriate wall anchors
- Shelf brackets, if installing shelves
- Scissors
- Safety glasses
- Stud finder
- Cleaning supplies
Step 1: Choose the Right Location
Select a pantry or storage area that is:
- Cool
- Dry
- Dark or protected from direct sunlight
- Clean
- Easy to inspect
- Away from household chemicals
- Above potential floodwater
- Protected from insects and rodents
- Structurally capable of supporting the food
FoodSafety.gov recommends keeping emergency food in a cool, dry, dark location and away from heat sources such as ranges and refrigerator exhausts. It also advises storing food away from gasoline, oils, paints, and solvents. Food Safety in an Emergency
Avoid storing a primary food reserve in:
- Hot attics
- Damp crawl spaces
- Vehicles
- Unconditioned sheds
- Cabinets directly over a stove
- Areas beside a water heater
- Flood-prone floors
- Garages with fuel or chemicals
- Locations with large temperature swings
Heat, moisture, pests, and damaged packaging can shorten useful storage life.
If no perfect location exists, choose the most stable indoor area available and keep the most vulnerable food there.
Step 2: Inspect and Strengthen the Shelves
Canned goods, water containers, and bulk staples become extremely heavy when stored together.
Before loading the pantry:
- Empty the shelves.
- Inspect them for sagging, cracks, moisture, rust, or loose fasteners.
- Confirm that wall-mounted shelves are properly secured.
- Tighten loose hardware.
- Replace damaged boards or brackets.
- Clean and dry every surface.
- Confirm that the unit is level.
- Anchor tall freestanding shelves when appropriate.
Place heavier products on lower shelves, but keep them above expected floodwater.
Do not overload a shelf simply because more cans will physically fit. Follow the shelving manufacturer’s weight rating.
Glass jars should not be stored where they can easily fall during an earthquake, storm, or accidental impact. Use shelf lips, stable bins, or other restraints appropriate for local hazards.
Step 3: Divide the Pantry Into Zones
Create a logical home for every product category.
Possible zones include:
Ready-to-eat emergency food
- Canned meat
- Canned fish
- Nut or seed butter
- Crackers
- Shelf-stable meals
- Canned fruit
- Foods requiring no heating
Canned meal ingredients
- Beans
- Tomatoes
- Vegetables
- Soup
- Chili
- Pasta sauce
- Broth
Dry staples
- Rice
- Oats
- Pasta
- Lentils
- Flour
- Sugar
- Dry beans
Breakfast supplies
- Cereal
- Oats
- Shelf-stable milk
- Dried fruit
- Coffee
- Tea
Special-needs supplies
- Infant food
- Medical-diet products
- Allergen-free food
- Oral rehydration supplies
- Senior-friendly foods
Pet supplies
- Pet food
- Treats
- Feeding accessories
- Backup water
Cooking support
- Manual can opener
- Matches or lighters stored safely
- Safe emergency-cooking instructions
- Disposable utensils
- Paper plates
- Trash bags
Do not create so many categories that the system becomes difficult to maintain. Most homes can start with five to eight clearly marked zones.
Step 4: Create a Labeling Station
Keep labeling supplies together in one small bin or tray.
Include:
- Permanent marker
- Removable tape
- Precut labels
- Scissors
- Replacement inventory sheets
- Shopping list
- Spare pens
- Label maker, if used
Place the station close to the pantry entrance or stocking surface.
The goal is to label new groceries before they disappear onto the shelves.
If the marker is in another room and the labels are hidden in a drawer, the system will eventually be skipped.
Step 5: Decide Which Date to Record
Choose one consistent labeling method.
Useful dates include:
- Purchase date
- Best-quality date printed by the manufacturer
- Opened date
- Home-preservation date
- Rotation target
- Manufacturer lot code, when useful
For ordinary shelf-stable groceries, a practical label may show:
Purchased: 08/2026
Best if used by: 05/2028
If the manufacturer’s printed date is already clear and easy to see, adding only the purchase month may be enough.
For opened products, write:
Opened: 08/05/2026
Never cover:
- Original product name
- Ingredient list
- Allergen information
- Nutrition information
- Preparation instructions
- Lot or recall codes
- Manufacturer contact information
- Required storage instructions
Write on the top or front where the label remains visible after the item is shelved.
Step 6: Label Every New Item
Process new groceries before placing them into the pantry.
For each product:
- Inspect the package.
- Confirm that it is unopened.
- Locate the manufacturer’s date and instructions.
- Add your chosen rotation label.
- Record the item if it is part of the tracked inventory.
- Place it behind the older matching products.
Do not store cans that are:
- Leaking
- Swollen
- Punctured
- Severely rusted
- Badly damaged at the seams
- Contaminated with chemicals
- Exposed to floodwater
Ready.gov advises against eating food from swollen, dented, or corroded cans and recommends keeping canned food in a cool, dry location. Ready.gov Emergency Food Guidance
Minor cosmetic dents away from seams may not create the same risk as deep dents or seam damage, but when the integrity of a can is uncertain, the safest option is to discard it or seek product-specific guidance.
Never taste questionable food to determine whether it is safe.
Step 7: Arrange Shelves Front-to-Back
Place the oldest acceptable product at the front and the newest at the back.
A simple arrangement looks like this:
Front of shelf → oldest lot → middle lot → newest lot → back of shelf
When adding groceries:
- Remove or slide forward the existing products.
- Place the new items at the back.
- Return the older items to the front.
- Confirm that dates are visible.
- Update the inventory.
For deep shelves, use:
- Long narrow bins
- Pull-out baskets
- Gravity-fed can racks
- Shelf risers
- Dividers
- Turntables for appropriate lightweight products
Avoid stacking cans so high that they become unstable or hide damage.
Do not depend completely on a gravity-fed rack. Inspect cans before loading them, ensure the rack does not damage labels or seams, and check that the oldest product is actually being dispensed first.
Step 8: Create a Pantry Inventory
The inventory should be simple enough to update after every shopping trip.
A useful paper layout includes:
| Category | Item | Quantity | Oldest date | Target quantity | Location | Notes |
|---|---|---|---|---|---|---|
| Canned protein | Tuna | 8 | 09/2027 | 10 | Shelf A | Buy 2 |
| Vegetables | Green beans | 6 | 04/2027 | 6 | Shelf B | Full |
| Dry staple | Rice | 12 lb | Purchased 07/2026 | 15 lb | Bin D | Check monthly |
| Breakfast | Oats | 3 containers | 01/2027 | 4 | Shelf C | Buy 1 |
| Pet food | Dry dog food | 18 lb | 11/2026 | 25 lb | Lower shelf | Rotate soon |
Your inventory may also record:
- Brand
- Package size
- Lot number
- Purchase price
- Dietary category
- Allergens
- Meal purpose
- Water required
- Cooking fuel required
- Date opened
- Date inspected
- Replacement priority
Do not attempt to track every grain of rice.
Choose a consistent unit such as:
- Number of cans
- Number of packages
- Pounds or kilograms
- Number of meals
- Days of supply
A perfect inventory that is never updated is less useful than a simple one that remains accurate.
Step 9: Establish Minimum and Target Quantities
Instead of purchasing random amounts, assign a target quantity to frequently used items.
For example:
| Item | Minimum | Target | Action |
|---|---|---|---|
| Canned beans | 6 | 12 | Restock when fewer than 6 remain |
| Rice | 5 lb | 15 lb | Buy enough to return to 15 lb |
| Canned fish | 4 | 10 | Rotate oldest monthly |
| Oats | 2 containers | 4 | Add to next shopping list |
| Pet food | 7 days | 21 days | Replace before opening final reserve |
The minimum is the point at which replenishment begins.
The target is the normal amount you want after restocking.
Set quantities according to:
- Household size
- Budget
- Available space
- Dietary requirements
- Local hazards
- Cooking options
- Water availability
- How quickly the household normally consumes the item
Do not build a large reserve through debt or by neglecting immediate household needs. A reliable pantry can be built gradually by purchasing one or two extra frequently used items during normal shopping.
Step 10: Hang the Rotation Calendar
Mount the calendar where it is visible.
Use it for recurring tasks rather than writing hundreds of individual product dates.
A simple schedule might include:
Every week
- Check the use-first basket.
- Update the shopping list.
- Return misplaced products to the correct zone.
- Confirm that opened dry goods are sealed.
Every month
- Inspect cans and packages.
- Move older products forward.
- Compare shelves with the inventory.
- Plan meals around products approaching their quality dates.
- Check for insects, moisture, and rodent activity.
- Inspect special-diet and pet food.
Every three months
- Review target quantities.
- Clean shelf surfaces.
- Check bulk containers and seals.
- Inspect emergency cooking supplies.
- Confirm that the manual can opener works.
- Review dietary or medication-related changes.
Every six months
- Conduct a full inventory.
- Review the household emergency plan.
- Replace unsuitable products.
- Check emergency food for family members and pets.
- Review water and cooking-fuel needs.
- Photograph or back up the inventory.
Ready.gov recommends reviewing emergency kits regularly as household needs change. A six-month full review is an easy schedule to remember.
Step 11: Build a “Use First” Basket
Create a basket or small shelf for products that should be included in upcoming meals.
This may contain:
- Older but acceptable canned food
- Open packages
- Products nearing their best-quality dates
- Partial boxes
- Foods the household has been ignoring
- Seasonal ingredients
- Items that need evaluation
Do not use the basket as a place to keep damaged or questionable products.
Anything with possible spoilage, contamination, leakage, pest damage, or a broken seal should be isolated from the usable food supply.
Plan one or two “pantry meals” each week using the basket.
Examples include:
- Bean-and-tomato soup
- Tuna pasta
- Lentil curry
- Vegetable rice
- Oatmeal with dried fruit
- Chili over stored grains
This transforms rotation from an administrative task into normal meal planning.
Step 12: Protect Dry Goods
Paper bags and cardboard boxes provide limited protection against humidity, insects, and rodents.
Depending on the food and expected storage period, place vulnerable dry goods in appropriate food-safe containers.
Possible options include:
- Gasketed food-storage containers
- Clean glass jars
- Food-grade buckets with suitable lids
- Manufacturer-approved storage systems
- Properly sealed moisture-resistant packaging
Label the outer container with:
- Product name
- Original date
- Purchase date
- Lot information
- Allergen warning
- Preparation instructions
- Date opened
Keep the original package information when possible.
Do not put food into containers that previously held:
- Paint
- Fuel
- Pesticides
- Cleaning chemicals
- Pool chemicals
- Industrial products
- Unknown substances
A container that looks clean may still retain unsafe residues or odors.
Step 13: Keep Food Away From Water and Chemicals
Store food above the floor, especially in areas that may flood.
Do not store food:
- Under leaking pipes
- Beside gasoline
- Near paint or solvents
- Under household cleaners
- Next to pesticides
- In cabinets containing strong chemicals
- Directly against damp walls
Food exposed to floodwater should be handled according to official emergency guidance. Do not assume that wiping the outside of ordinary packaging makes the contents safe.
Chemical fumes and smoke may also contaminate food, including some products inside packaging. When exposure is significant or uncertain, follow local public-health instructions.
A Simple Weekly Rotation Workflow
The entire system can be maintained in ten to fifteen minutes.
1. Check the front row
Look at the oldest products first.
2. Inspect packaging
Check for leaks, swelling, rust, moisture, pests, and damaged seals.
3. Review the use-first basket
Choose products for meals during the coming week.
4. Count important staples
You do not need to count every seasoning packet. Focus on essential or expensive products.
5. Update the shopping list
Restock only what is below its chosen minimum.
6. Update the inventory
Record meaningful changes immediately.
7. Check the calendar
Complete any monthly or seasonal tasks.
The routine should be short. If it requires an hour every week, simplify it.
Sample Monthly Pantry Inspection
Use the following checklist:
- Shelves are dry and stable.
- No evidence of insects or rodents is present.
- No cans are leaking or swollen.
- No packages have broken seals.
- No food has been exposed to chemicals.
- Oldest products are at the front.
- New products are at the back.
- Labels remain readable.
- Opened products show opening dates.
- Dry goods are properly sealed.
- The inventory roughly matches the shelves.
- Low-stock items are on the shopping list.
- Use-first foods are included in the meal plan.
- Infant, medical-diet, and pet supplies are current.
- The manual can opener is present.
- Stored food still matches household needs.
Sign and date the checklist when finished.
Handling Home-Canned Food
Home-canned food requires different attention from commercially canned food.
Every jar should be labeled with:
- Product name
- Processing date
- Recipe source
- Batch number
- Processing method
- Relevant notes
Use only current, tested home-canning recipes from trusted sources such as:
- USDA
- National Center for Home Food Preservation
- University extension services
Do not use this rotation station to justify keeping improperly processed jars.
Discard or seek expert guidance for jars showing:
- Broken seals
- Leakage
- Bulging lids
- Rising bubbles
- Spurting liquid
- Mold
- Unnatural odors
- Unexplained discoloration
Never taste food from a questionable home-canning jar.
Store home-canned foods separately enough that their dates and condition can be inspected easily.
What About “Expired” Food?
The word “expired” is often used too broadly.
Ask four separate questions:
- What type of date is printed?
- Was the product stored according to instructions?
- Is the package intact?
- Does official product-specific guidance support keeping it?
A best-quality date does not always mean the food becomes unsafe at midnight.
At the same time, an unexpired date does not protect food that has been:
- Improperly refrigerated
- Flooded
- Punctured
- Opened
- Chemically contaminated
- Stored in excessive heat
- Infested by insects
- Damaged at a can seam
When safety is uncertain, do not taste the product. Contact the manufacturer, a qualified food-safety authority, or discard it.
Common Pantry-Rotation Mistakes
Adding new food to the front
This buries the oldest products.
Place new purchases behind existing matching items.
Labeling only the storage bin
A bin label identifies the category but not the age of each product.
Keep the original package date visible and label individual items when necessary.
Recording only the best-by date
The purchase date and opening date may be equally useful.
Choose a system that shows the information your household actually needs.
Buying food nobody eats
A preparedness pantry should be based primarily on familiar, useful products.
Test new emergency foods before purchasing them in bulk.
Tracking too much information
An overly complicated spreadsheet can discourage updates.
Start with item, quantity, oldest date, location, and shopping need.
Ignoring storage conditions
A calendar cannot compensate for heat, dampness, insects, rodents, or chemical exposure.
Treating every quality date as a safety deadline
Understand the label and consult reliable product-specific guidance.
Ignoring damaged packaging because the date looks good
Package condition matters regardless of the printed date.
Storing everything in deep rows
If products cannot be seen or reached, they are likely to be forgotten.
Use bins, risers, or shallower rows.
Failing to rotate water and pet supplies
Preparedness planning includes drinking water, special diets, and animals—not only canned food for adults.
Forgetting cooking requirements
A large supply of dry beans is less useful during an outage if there is insufficient water or fuel to prepare them.
Balance long-cooking staples with ready-to-eat options.
Pantry Rotation During a Power Outage
A shelf-stable pantry is especially valuable during an outage because unopened shelf-stable products do not depend on the refrigerator.
Prioritize foods that:
- Require no refrigeration before opening
- Need little or no cooking
- Require limited water
- Can be eaten in one sitting after opening
- Match household dietary needs
- Do not create excessive thirst
- Can be opened manually
During an outage, write opening times on perishable products and follow current food-safety guidance.
FoodSafety.gov advises that an unopened refrigerator generally keeps food safe for about four hours. Refrigerated perishable food held above 40°F or 4°C for too long may need to be discarded. Food Safety During a Power Outage
Do not taste food to decide whether it survived an outage safely.
The pantry calendar can include an outage checklist covering:
- Refrigerator opening time
- Power-loss time
- Cooler temperature
- Generator or cooking-fuel status
- Food used
- Food discarded
- Supplies requiring replacement
Useful Upgrades
Once the basic system works, consider adding:
Color-coded labels
For example:
- Green: recently purchased
- Yellow: use during the next several months
- Red: inspect and prioritize
Color should supplement written dates, not replace them.
Gravity-fed can racks
These can make FIFO rotation easier when they fit the can sizes and remain stable.
Digital inventory
A spreadsheet can calculate:
- Current totals
- Items below minimum
- Replacement cost
- Oldest lots
- Calories or meal estimates
- Food grouped by storage location
Keep a printed copy in case power or internet service is unavailable.
QR codes
A QR code can link a shelf or bin to a digital inventory, but the pantry should remain understandable without a phone.
Pantry thermometer and hygrometer
These tools can help reveal damaging heat or humidity.
They do not directly prove that every product remains safe, but they can identify poor storage conditions.
Monthly phone reminder
Set a recurring reminder titled:
Check pantry dates, damage, inventory, and use-first basket
Emergency menu cards
Create several meal cards using only stored ingredients.
Each card should list:
- Ingredients
- Water required
- Fuel required
- Cooking time
- Number of servings
- Allergens
- Required utensils
Is a Pantry Rotation Station Worth Building?
Yes, particularly when the household stores more food than can be easily seen at a glance.
Its main benefits are:
- Reduced waste
- Better inventory awareness
- Easier emergency meal planning
- More consistent FIFO rotation
- Faster shopping
- Earlier detection of damage
- Better control of special-diet supplies
- Lower risk of forgotten bulk food
- A visible maintenance schedule
The project becomes less useful when:
- Labels are inconsistent
- New food is still placed at the front
- The inventory is never updated
- Damaged packages are ignored
- Food remains in a hot or damp location
- The household stores products it never eats
- Dates are treated as the only measure of safety
- The system is too complicated to maintain
The best pantry is not necessarily the largest pantry.
It is the one that accurately reflects what your household eats, what you can prepare during an outage, and what you can inspect and rotate before it is forgotten.
Final Takeaway
A DIY pantry rotation calendar station does not require expensive shelving or complicated software.
Start with a visible calendar, a permanent marker, simple inventory sheets, and one reliable rule:
Oldest suitable food in front. Newest food in back.
Label new purchases before shelving them. Organize food into practical categories. Set minimum quantities for important staples. Inspect packaging regularly. Store everything in a cool, dry location away from chemicals and floodwater.
Most importantly, use the reserve.
A preparedness pantry should not become a museum of untouched cans. Build normal meals around stored food, replace what your household consumes, and continually adjust the supply to match real needs.
When rotation becomes part of everyday cooking, the pantry stays fresher, the inventory becomes more accurate, and the emergency reserve becomes far more dependable.
Suggested Facebook Hook
Your pantry may look fully stocked—but how much of that food is quietly getting buried behind newer groceries?
This simple calendar-and-label system helps you rotate the oldest food first, track what you actually have, and spot damaged or forgotten supplies before they become waste.