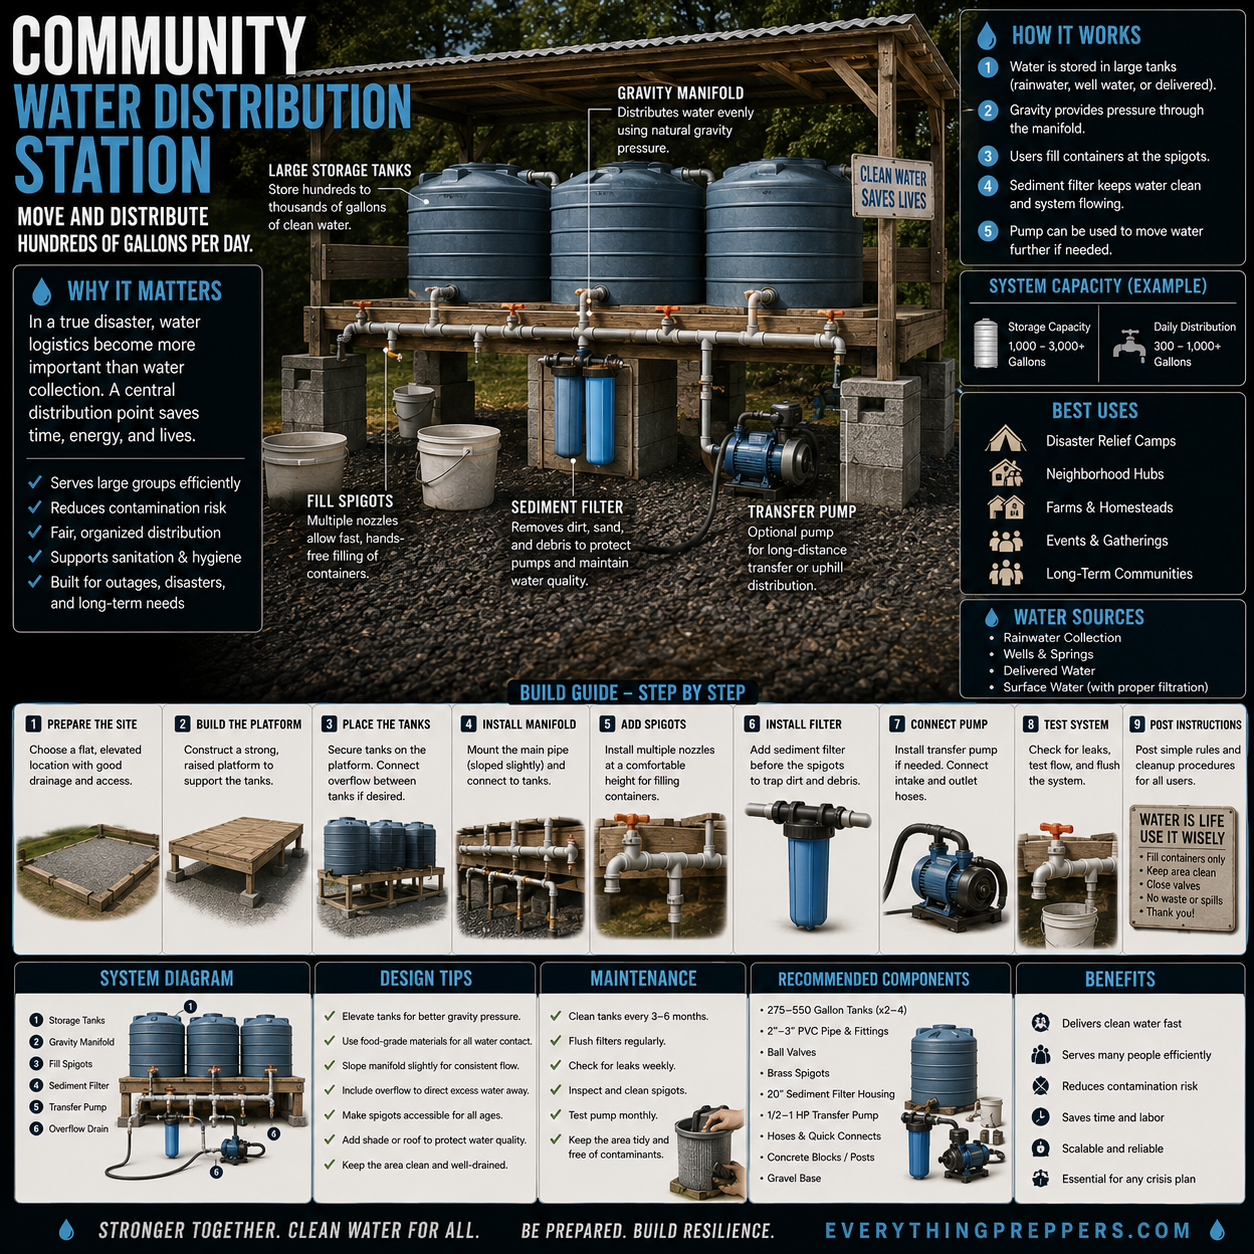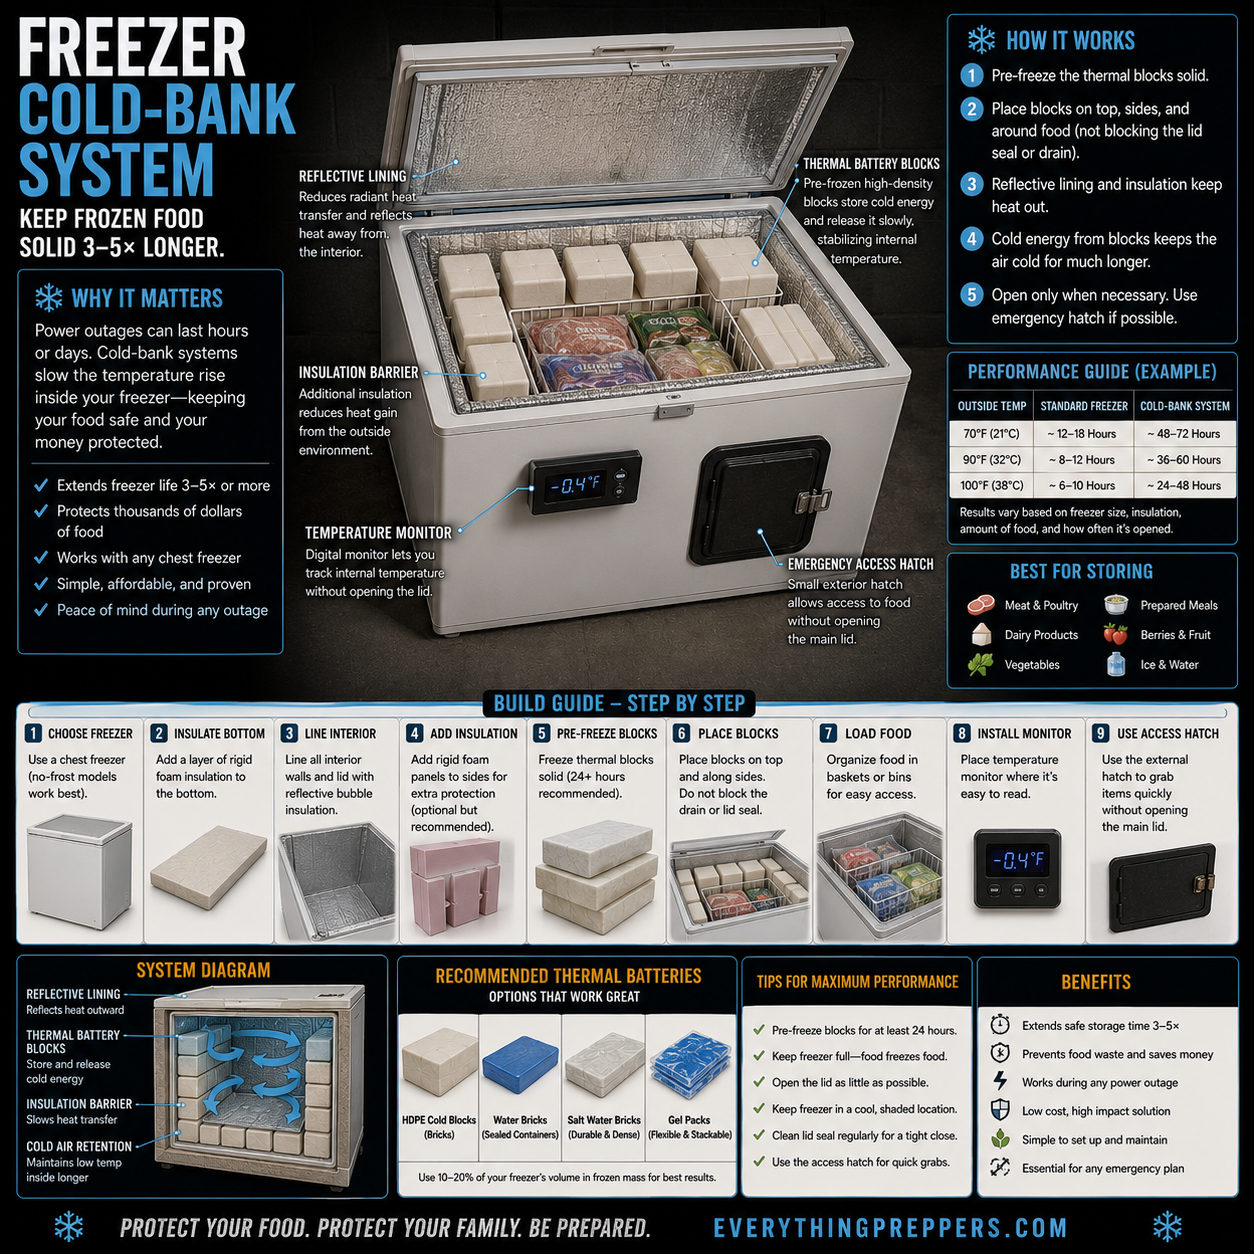
A freezer full of food is valuable, but during a power outage it can quickly become a source of stress. Meat, vegetables, fruit, prepared meals, and dairy can represent hundreds or even thousands of dollars in stored food. If the power stays off too long, that food can begin to thaw and may become unsafe.
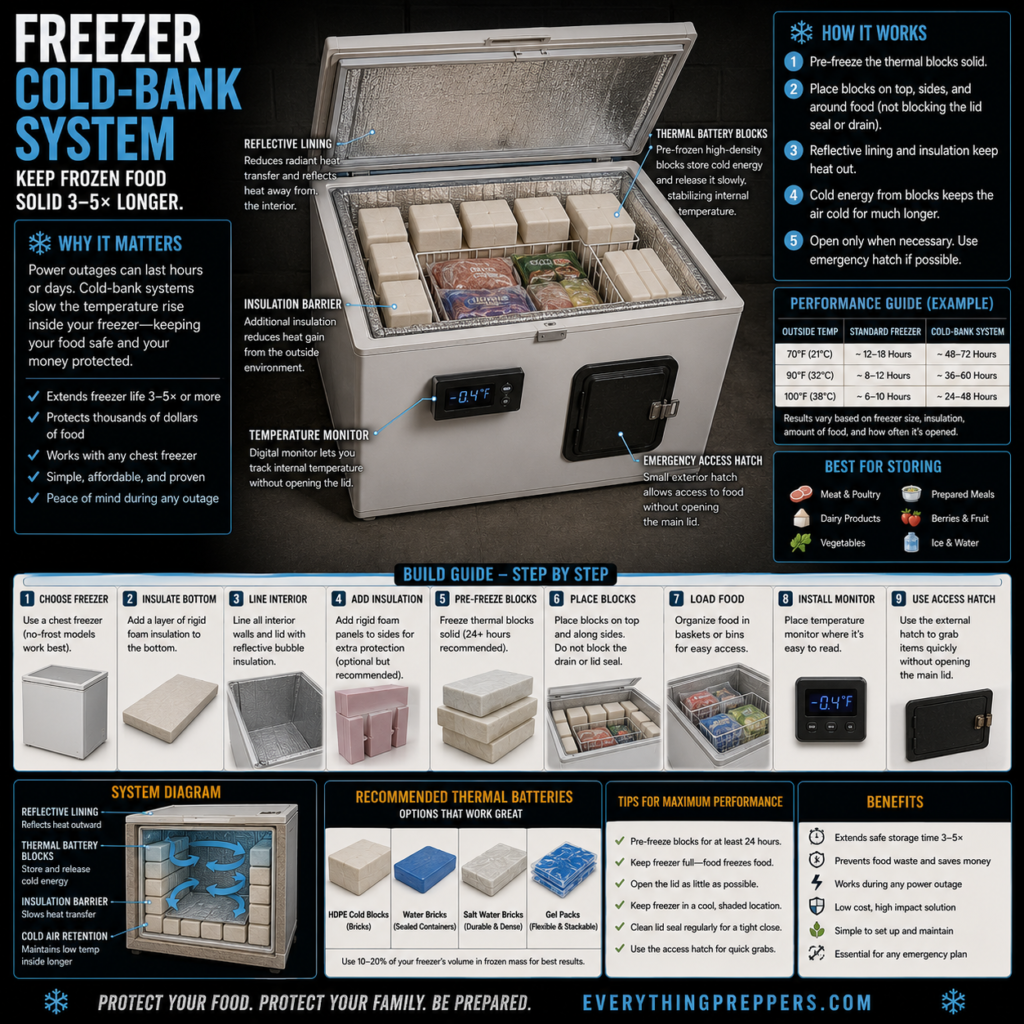
A freezer cold-bank system is a simple way to help your freezer stay cold longer during an outage. It uses pre-frozen thermal blocks, extra insulation, reflective lining, a temperature monitor, and smart freezer organization to slow temperature rise.
This system does not make a freezer run without electricity, and it cannot guarantee food safety forever. But when built and used correctly, it can help extend cold retention, reduce food waste, and give you more time to respond during a blackout.
What Is a Freezer Cold-Bank System?
A freezer cold-bank system is a passive cold-retention setup for a chest freezer. It adds extra frozen mass inside the freezer so the temperature rises more slowly when power is lost.
The basic idea is simple: frozen blocks act like a “thermal battery.” When the power goes out, the frozen blocks slowly release stored cold energy, helping stabilize the freezer temperature for longer.
A cold-bank system can be useful for:
- Power outages
- Storm preparation
- Food storage protection
- Backup freezer planning
- Homestead food storage
- Meat and poultry storage
- Frozen garden produce
- Prepared meal storage
- Emergency preparedness
This works best in a chest freezer because cold air stays low when the lid is opened. Upright freezers lose cold air faster when the door opens.
Why a Cold Bank Matters
During an outage, the goal is to keep frozen food solid for as long as possible. The more frozen mass inside the freezer, the slower the temperature usually rises.
A freezer that is half-empty warms faster than a freezer packed with frozen food or frozen water blocks. Empty air space does not store cold well. Dense frozen blocks do.
A cold-bank system helps by:
- Increasing frozen thermal mass
- Reducing empty air space
- Slowing temperature rise
- Reducing warm air movement inside the freezer
- Helping protect expensive frozen food
- Giving you more time before food begins thawing
- Reducing the need to open the lid and check
This is especially useful before storms, planned outages, or unstable grid conditions.
How the System Works
A freezer cold-bank system uses several simple parts working together.
1. Pre-Frozen Thermal Blocks
Thermal blocks are frozen solid before an outage. They store cold energy and release it slowly when power is lost.
2. Strategic Placement
Blocks are placed on top, along the sides, and around food. They should not block the lid seal, drain, vents, or baskets that need to move.
3. Reflective Lining
A reflective liner can help reduce radiant heat transfer and protect the interior from warming faster.
4. Extra Insulation
Insulation around the freezer can reduce heat gain from the outside environment. This works best when it does not block ventilation or create moisture problems.
5. Temperature Monitor
A digital temperature monitor lets you track internal temperature without opening the lid repeatedly.
6. Emergency Access Hatch
An optional small access hatch or organized quick-grab section can reduce how often you open the main lid.
The system works best when the freezer is already cold, the blocks are frozen solid, and the lid stays closed.
Important Food Safety Warning
A cold-bank system helps slow warming, but it does not replace food safety rules.
Use a freezer thermometer and follow safe food-handling guidelines. Food that has thawed, warmed too much, or stayed at unsafe temperatures may need to be cooked, used immediately, or discarded.
General safety reminders:
- Keep the freezer closed as much as possible.
- Use a thermometer instead of guessing.
- Do not taste food to decide if it is safe.
- Discard food with strange smells, textures, or signs of spoilage.
- Keep raw meat separate from ready-to-eat foods.
- If food still contains ice crystals and has stayed cold, it may often be safer than food that fully thawed.
- When unsure, follow official food safety guidance.
The goal is to protect food, but health comes first.
Materials Needed
You can build a basic cold-bank system with simple materials.
Basic Materials
- Chest freezer
- HDPE cold blocks or freezer bricks
- Sealed water containers
- Saltwater bricks if safely sealed
- Gel packs
- Reflective bubble insulation or freezer-safe reflective liner
- Rigid foam insulation panels
- Freezer baskets or bins
- Digital freezer thermometer or temperature monitor
- Labels
- Optional external access hatch kit or organized quick-access bin
Helpful Tools
- Tape measure
- Utility knife
- Marker
- Straightedge
- Gloves
- Cleaning cloth
- Waterproof labels
Use materials that are safe for cold temperatures and food-storage areas. Avoid anything that sheds fibers, crumbles, smells strongly, or could contaminate food.
Best Thermal Blocks to Use
Thermal blocks are the heart of the system. They add frozen mass and help stabilize temperature.
Good options include:
HDPE Cold Blocks
These are durable freezer bricks designed to be frozen and reused. They are neat, stackable, and less messy than loose ice.
Sealed Water Containers
Clean sealed containers filled with water can work well. Leave space for expansion when freezing.
Saltwater Bricks
Saltwater freezes differently than plain water and may be useful in some setups, but containers must be sealed well and clearly labeled.
Gel Packs
Gel packs are flexible and stackable. They work well around irregular spaces but may be less dense than solid blocks.
For best results, use frozen mass equal to about 10–20% of your freezer’s usable volume, if space allows.
Step-by-Step Build Guide
Step 1: Choose the Freezer
A chest freezer is usually the best choice for a cold-bank system. Chest freezers retain cold better than upright freezers because cold air stays inside when the lid is opened.
No-frost upright models can warm faster because they have more air movement and door exposure.
If possible, choose a freezer that:
- Has a tight lid seal
- Is placed in a cool location
- Has enough space for thermal blocks
- Has baskets or dividers
- Is easy to monitor
- Is not overloaded beyond safe use
A freezer in a shaded, cool room will usually perform better than one in a hot garage.
Step 2: Insulate the Bottom
Add a layer of rigid foam insulation under the freezer if the freezer design allows it and the manufacturer’s guidelines do not prohibit it.
The goal is to reduce heat transfer from warm floors. This can be helpful in garages, sheds, or storage rooms.
Do not block airflow, drain points, compressor ventilation, or any required clearance. Some freezers need space around them to release heat while running.
Step 3: Line the Interior
Line interior walls and the lid area with reflective bubble insulation or a freezer-safe reflective liner. This can help reduce radiant heat transfer and keep the interior more stable.
Keep the liner neat and secure. Do not cover sensors, drains, vents, hinges, or the lid seal.
The lid must still close fully. A poor lid seal will cancel out much of the benefit.
Step 4: Add Extra Insulation
Optional rigid foam panels can be placed along the sides or around baskets for extra protection. Use this carefully.
Do not place insulation where it prevents the freezer from cooling properly during normal operation. The outside of a freezer needs airflow to release heat.
Interior insulation should not crush food, block drains, trap moisture, or interfere with baskets.
Keep the setup simple and easy to remove for cleaning.
Step 5: Pre-Freeze the Blocks
Freeze your thermal blocks solid before you need them. This usually takes at least 24 hours, and large blocks may need longer.
Do not wait until the outage starts. The cold bank only works if the blocks are already frozen.
Good preparation habits:
- Keep blocks frozen year-round if space allows.
- Rotate blocks if you need the space.
- Label saltwater blocks clearly.
- Check containers for cracks.
- Leave expansion space in water bottles.
- Do not use leaking gel packs.
Frozen blocks should be ready before storm season or planned outages.
Step 6: Place the Blocks
Place frozen blocks around the food, especially on top and along the sides. Cold air naturally sinks, so top placement can help slow warming when the lid is opened briefly.
Do not block:
- Lid seal
- Drain
- Baskets
- Thermometer probe
- Air pathways needed by your freezer model
- Emergency access area
Use baskets or bins to organize food so you can reach important items quickly.
Step 7: Load Food Properly
Organize frozen food in baskets or bins. Group similar foods together so you do not waste time searching.
Helpful categories include:
- Meat and poultry
- Prepared meals
- Vegetables
- Fruit and berries
- Dairy products
- Ice and water
- Quick-use items
Keep quick-use items near the top or near an access area. Keep expensive or long-term items deeper where they stay coldest.
Label bins so you do not need to dig around during an outage.
Step 8: Install a Temperature Monitor
Place a freezer temperature monitor where it is easy to read. A probe-style monitor lets you check the inside temperature without opening the lid.
This is one of the best upgrades because it reduces unnecessary lid opening.
A monitor helps you know:
- Whether the freezer is still cold
- How fast temperature is rising
- When to move food
- When to add backup cooling
- Whether the lid seal is working
Do not rely only on how cold the outside of the freezer feels.
Step 9: Use an Access Hatch or Quick-Grab Zone
An optional external access hatch can allow quick access to a small section without opening the entire lid. If you do not want to modify the freezer, create a quick-grab basket near the top instead.
The goal is to avoid opening the main lid repeatedly.
Quick-grab items may include:
- One meal pack
- Ice packs
- Daily-use frozen items
- Small food portions
- Items you plan to use first
Every lid opening lets warm air in. Plan before opening.
Tips for Maximum Performance
Use these tips to keep food frozen longer:
- Pre-freeze blocks for at least 24 hours.
- Keep the freezer full of frozen food.
- Open the lid as little as possible.
- Use a temperature monitor.
- Keep the freezer in a cool, shaded location.
- Clean the lid seal regularly.
- Organize food in labeled bins.
- Keep thermal blocks on top and along sides.
- Avoid storing the freezer in direct sun.
- Do not place hot food into the freezer during an outage.
The best emergency strategy is preparation before the outage begins.
What to Store in a Cold-Bank Freezer
This system is useful for foods that are expensive, important, or difficult to replace.
Good storage categories include:
- Meat and poultry
- Prepared meals
- Dairy products
- Berries and fruit
- Vegetables
- Ice
- Frozen water bottles
- Garden harvests
- Bulk freezer meals
Try to separate raw meat from ready-to-eat foods to reduce contamination risk if thawing occurs.
Common Mistakes to Avoid
Mistake 1: Opening the Lid Too Often
This is the biggest mistake. Every opening releases cold air and brings in warm air. Use a temperature monitor and open only when necessary.
Mistake 2: Waiting Until the Outage Starts
Thermal blocks must be frozen before the outage. Freeze them ahead of time.
Mistake 3: Blocking the Lid Seal
If blocks, liners, or insulation interfere with the lid seal, cold air will escape faster.
Mistake 4: Using Leaking Containers
Water and gel leaks can create mess, odors, and contamination risk. Inspect blocks regularly.
Mistake 5: Covering Compressor Ventilation
Do not wrap the outside of a freezer in a way that blocks heat release during normal operation. This can damage the freezer.
Mistake 6: Guessing Food Safety
Use a thermometer. Do not rely on smell, touch, or guesswork alone.
Safety Notes
Food safety and appliance safety both matter.
Follow these safety rules:
- Use a freezer thermometer.
- Keep raw meat separated from other foods.
- Do not eat food that has spoiled or smells strange.
- Do not block freezer ventilation while it is running.
- Do not modify electrical parts unless qualified.
- Keep water containers sealed.
- Do not overload baskets beyond safe limits.
- Clean spills quickly.
- Follow official food safety guidance after outages.
- When in doubt, throw unsafe food out.
Protecting food is important, but preventing illness is more important.
Maintenance Checklist
Check your cold-bank system regularly.
Monthly checks:
- Confirm freezer temperature is normal.
- Inspect thermal blocks for leaks.
- Check lid seal.
- Make sure temperature monitor works.
- Clean frost or spills if needed.
- Confirm baskets are organized.
- Rotate older food forward.
- Keep a freezer inventory list.
Before storm season:
- Freeze extra blocks.
- Add ice or sealed water bottles if space allows.
- Move freezer to coldest safe setting if appropriate before expected outage.
- Avoid opening the freezer unnecessarily.
- Plan meals that use quick-grab items first.
After an outage:
- Check temperature history if your monitor records it.
- Inspect food condition.
- Use, cook, or discard food according to safety guidance.
- Refreeze blocks once power returns.
- Update your freezer inventory.
Output and Uses
A freezer cold-bank system can help with:
- Extending frozen food storage during outages
- Reducing food waste
- Protecting expensive meat and prepared meals
- Supporting homestead food storage
- Keeping garden harvests frozen longer
- Reducing panic during blackouts
- Improving freezer organization
- Giving more time to respond
This is a low-cost, high-impact system for anyone who stores important food in a freezer.
Final Thoughts
A freezer cold-bank system is a smart way to help your freezer stay cold longer when the power goes out. It uses pre-frozen thermal blocks, reflective lining, insulation, organization, and temperature monitoring to slow temperature rise.
The build is simple: choose a chest freezer, add safe insulation where appropriate, line the interior, pre-freeze thermal blocks, place them around the food, organize with baskets, install a temperature monitor, and open the lid only when necessary.
This system cannot replace electricity, and it does not guarantee food safety forever. But it can buy valuable time, reduce food loss, and make your emergency food storage more resilient.
Protect your food. Protect your family. Be prepared before the lights go out.
Frequently Asked Questions
How long can a cold-bank freezer keep food frozen?
It depends on freezer size, insulation, amount of food, number of frozen blocks, room temperature, and how often the lid is opened. A good setup can often extend cold retention, but results vary.
What are the best thermal blocks to use?
HDPE cold blocks, sealed water containers, saltwater bricks, and gel packs can all work. The best choice depends on space, durability, and how easy they are to stack.
Should I use a chest freezer or upright freezer?
A chest freezer usually retains cold better because cold air stays inside when the lid opens. Upright freezers lose cold air faster.
Can I wrap insulation around the outside of the freezer?
Be careful. Do not block compressor ventilation or heat-release areas while the freezer is running. Interior organization and frozen blocks are usually safer first steps.
Is reflective lining necessary?
It is optional, but it may help reduce radiant heat transfer. The biggest improvements usually come from frozen mass, a good lid seal, and not opening the freezer.
Can I use frozen water bottles?
Yes. Use sealed containers and leave room for expansion. Check for cracks or leaks.
How do I know if food is still safe?
Use a freezer thermometer and follow food safety guidance. Food that still has ice crystals and stayed cold is usually more promising than food that fully thawed, but do not guess if safety is uncertain.
What is the most important rule during an outage?
Keep the lid closed as much as possible. Every opening brings in warm air and reduces cold retention.