Hot water is one of those comforts people only notice when it disappears. During an extended outage, off-grid cabin stay, homestead project, or emergency situation, hot water can make cleaning, washing dishes, laundry, and basic hygiene much easier.
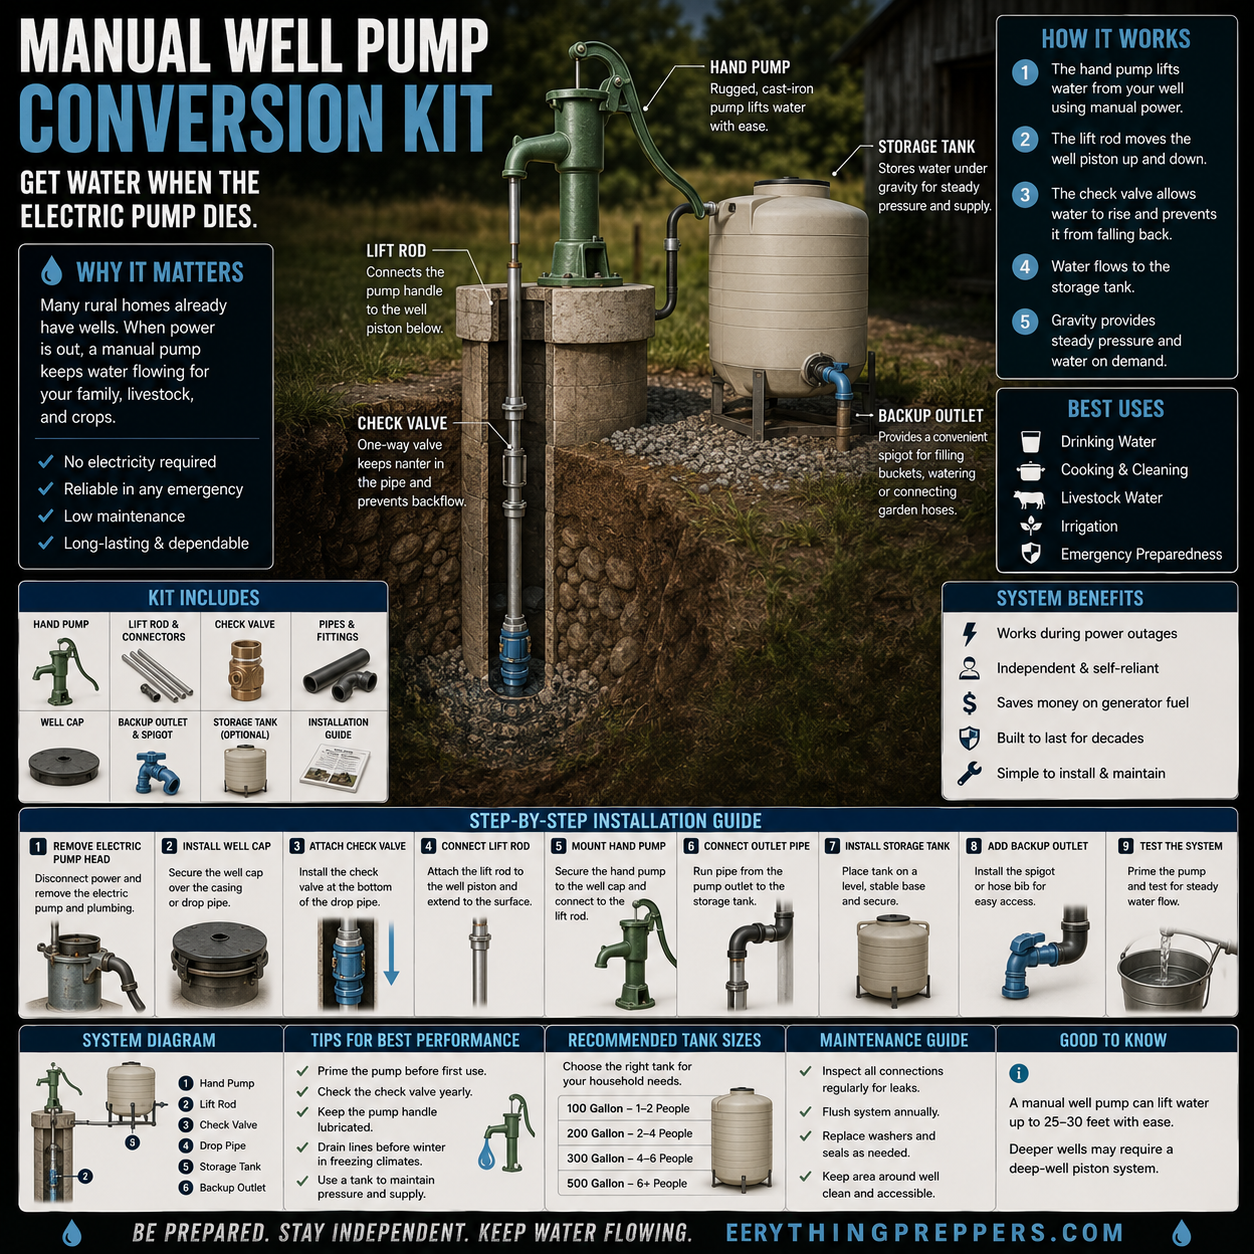
A wood-fired water heater is a non-electric system that uses a wood fire to heat water through a metal heat exchanger and storage tank. The basic idea is simple: fire heats a copper coil or heat exchanger, cold water circulates through it, and hot water rises into an insulated tank for later use.
This kind of setup can be useful for cabins, outdoor wash stations, homesteads, workshops, and emergency preparedness. However, it must be built with serious safety in mind. Hot water systems can create pressure, scalding hazards, steam risks, fire danger, and carbon monoxide concerns if designed incorrectly.
This guide explains how a wood-fired water heater works, what parts are involved, how the build is generally assembled, and the most important safety rules to follow.

What Is a Wood-Fired Water Heater?
A wood-fired water heater is a water-heating system powered by burning wood instead of electricity, propane, or natural gas. It typically uses a firebox, a heat exchanger, a water tank, plumbing lines, a pressure relief valve, a mixing valve, and a safe base or hearth.
The fire heats a metal coil or heat exchanger. Water moves through the coil, absorbs heat, and then collects in a tank. With the right design, this can provide hot water for practical household or homestead tasks.
A wood-fired water heater can be useful for:
- Outdoor showers
- Washing dishes
- Cleaning tools
- Laundry support
- Livestock or farm use
- Cabin hot water
- Off-grid homestead use
- Emergency hygiene
It is not a casual project. Any system that heats water in a closed or semi-closed container must be designed to manage pressure safely.
How a Wood-Fired Water Heater Works
The system works by transferring heat from a wood fire into water.
1. Firebox Burns Dry Wood
A fire is built in a firebox using dry, seasoned hardwood. The fire creates heat that warms the heat exchanger.
2. Heat Passes Through the Copper Coil
A copper coil or heat exchanger sits where it can absorb heat from the fire chamber. Copper transfers heat efficiently, helping warm the water as it moves through the coil.
3. Cold Water Enters the System
Cold water enters through a lower inlet. The water source might be a well, rain tank, storage tank, or pressurized household line, depending on the design.
4. Hot Water Rises Into the Tank
As water heats, it becomes less dense and rises toward the top of the storage tank. This is why hot water is usually drawn from the upper part of the tank.
5. A Mixing Valve Reduces Scalding Risk
A thermostatic mixing valve blends hot water with cold water before it reaches the tap. This helps reduce the risk of dangerously hot water causing burns.
6. Pressure Relief Protects the System
A pressure relief valve releases pressure if the system gets too hot or pressure rises too high. This is a critical safety part and should never be skipped.
The basic system is simple in theory, but safe execution matters more than appearance.
Important Safety Warning
A wood-fired water heater can be dangerous if built incorrectly. Water expands when heated. If pressure cannot escape, a tank or pipe can fail violently. Hot water and steam can cause serious burns.
Before building or using one:
- Use a properly rated pressure relief valve.
- Never seal a system without pressure protection.
- Install a mixing valve to reduce scalding risk.
- Keep fire away from walls, wood framing, and flammable materials.
- Use non-combustible shielding and a safe hearth.
- Keep the system outdoors or in a properly vented structure.
- Do not use indoors without professional design and carbon monoxide safety planning.
- Test carefully before regular use.
- Inspect fittings, tank, and coil for leaks.
- Check local building, plumbing, and fire codes.
For any connected household plumbing system, professional guidance is strongly recommended.
Main Components
A practical wood-fired water heater may include these core parts.
Firebox
The firebox holds the wood fire and directs heat toward the heat exchanger. It should be built from heat-resistant materials such as steel plate, firebrick, or a purpose-built stove body.
Copper Heat Exchanger
The copper coil transfers heat from the fire chamber into the water. It must be installed securely and rated for the pressure and temperature of the system.
Water Tank
The insulated tank stores hot water. A tank should be safe, clean, and appropriate for hot-water use.
Cold Water Inlet
The cold water inlet brings water into the system from a safe source.
Hot Water Outlet
The hot water outlet draws water from the upper part of the tank.
Pressure Relief Valve
This valve protects the system if pressure gets too high. It must be properly rated and installed correctly.
Mixing Valve
A mixing valve blends hot and cold water so water at the tap is not dangerously hot.
Drain Valve
A drain valve allows the system to be emptied for maintenance, cleaning, or freeze protection.
Materials Needed
The exact parts depend on the size and design, but a basic system may require:
- Steel firebox or heat-safe stove body
- Firebrick or heat-resistant liner
- Copper coil or rated heat exchanger
- Insulated hot-water tank
- Pressure relief valve
- Mixing valve
- Cold water inlet line
- Hot water outlet line
- Shut-off valves
- Drain valve
- Pipe fittings rated for hot water
- Non-combustible base or hearth
- Heat shielding for nearby walls
- Temperature gauge
- Pressure gauge
- Dry seasoned hardwood
Use parts rated for hot water, pressure, and heat exposure. Do not improvise with containers or fittings that are not designed for hot-water systems.
Step-by-Step Build Guide
Step 1: Build the Firebox
Start with a sturdy firebox made from steel plate, a rated stove body, or another heat-safe design. Line it with firebrick if needed to improve heat retention and protect the outer shell.
The firebox should sit on a non-combustible base such as concrete, stone, brick, or metal. Keep it away from walls, wood framing, dry leaves, fuel storage, and other flammable materials.
A safe firebox should be:
- Stable
- Heat-resistant
- Easy to clean
- Properly vented
- Built away from combustibles
- Sized for a small controlled fire
Do not build a large uncontrolled fire. Steady heat is safer and more useful.
Step 2: Attach the Heat Exchanger
Install the copper coil or heat exchanger where it can absorb heat from the fire chamber. The coil should be secure, supported, and protected from direct damage.
The inlet and outlet should exit the firebox safely through heat-resistant fittings or protected pass-through points.
Avoid sharp bends, weak joints, and unsupported pipe runs. Copper expands and contracts with heat, so the design should allow for safe movement.
This is a critical part of the system. Leaks, pressure problems, or poor installation can create serious hazards.
Step 3: Install the Tank
Place the water tank above or near the firebox according to your design. In thermosiphon-style systems, the tank is often positioned higher than the heat exchanger so hot water can naturally rise.
All connections should be sealed securely with fittings rated for hot water.
The tank should be insulated to reduce heat loss and supported by a strong base. Water is heavy, so the tank stand or frame must be strong enough when full.
Step 4: Insulate the Tank
Wrap the tank with high-temperature-safe insulation where appropriate. Insulation helps the water stay warm longer and improves efficiency.
Do not cover safety valves, pressure relief outlets, gauges, inspection ports, or fittings that need to remain accessible.
Keep insulation away from open flames and hot surfaces unless the material is rated for that use.
Step 5: Install the Pressure Relief Valve
Install a pressure relief valve on the hot side or top connection where it can protect the system. The relief valve must be properly rated for the system.
This is not optional.
A relief valve should:
- Match system pressure and temperature needs
- Be installed in the correct location
- Discharge safely away from people
- Never be capped or blocked
- Be tested according to manufacturer guidance
- Be replaced if damaged or unreliable
A blocked or missing relief valve can make a hot-water system extremely dangerous.
Step 6: Add the Mixing Valve
Install a thermostatic mixing valve on the hot water outlet line before distribution. This valve blends hot water with cold water to reduce scalding risk.
Water heated by fire can become much hotter than expected. A mixing valve helps deliver safer usable water at taps, shower points, or wash stations.
Even with a mixing valve, always test water temperature before use.
Step 7: Connect the Cold Water Inlet
Connect the cold water inlet with a shut-off valve and, if needed, a filter or screen. The water source should be clean enough for the intended use.
If using rainwater, well water, or stored water, treat or filter according to how the water will be used. Water for washing tools has different safety needs than water for bathing or dishes.
Use backflow prevention where appropriate so heated water cannot contaminate the source.
Step 8: Test the System
Before building a full fire, fill the system with water and check for leaks. Test valves, fittings, and gauges.
Then run a very small test fire while monitoring:
- Water temperature
- Pressure gauge
- Relief valve function
- Pipe joints
- Tank stability
- Smoke and exhaust path
- Nearby heat exposure
- Leaks or steam
- Unusual sounds
Do not leave the system unattended during testing. Shut it down immediately if pressure rises unexpectedly, fittings leak, or anything behaves abnormally.
Step 9: Build the Hearth and Shielding
Add non-combustible hearth material and wall shielding around the firebox. This helps reduce fire risk and protects nearby surfaces.
Use materials such as:
- Brick
- Stone
- Concrete board
- Sheet metal with air gap
- Firebrick
- Concrete blocks
Keep clearance around the firebox. Do not store wood, fuel, towels, plastic containers, or cleaning supplies close to hot surfaces.
Best Uses
A wood-fired water heater can support several practical needs.
Good uses include:
- Outdoor shower support
- Dish washing
- General cleaning
- Laundry support
- Livestock water warming where appropriate
- Cabin hot water
- Off-grid wash station
- Emergency hygiene
The water should be safe for the intended use. If water may touch skin, dishes, or food-contact surfaces, quality and temperature matter.
Efficiency Tips
To get better performance:
- Use dry seasoned hardwood.
- Keep the firebox hot but controlled.
- Use an insulated tank and insulated piping.
- Draw hot water from the top of the tank.
- Keep the heat exchanger clean.
- Reduce heat loss around exposed piping.
- Burn small steady fires instead of smoky wet wood.
- Keep the system protected from wind where safe.
- Flush sediment from the tank periodically.
Efficiency comes from steady heat, good insulation, and smart plumbing layout.
Common Mistakes to Avoid
Mistake 1: Skipping the Relief Valve
This is the most dangerous mistake. Heated water can create pressure. A relief valve is essential.
Mistake 2: No Mixing Valve
Water heated by fire can become dangerously hot. A mixing valve helps reduce scald risk.
Mistake 3: Using Unsafe Tanks or Pipes
Do not use containers or fittings that are not rated for hot water and pressure.
Mistake 4: Building Too Close to Combustibles
A firebox must be kept away from walls, dry wood, fuel, and flammable materials.
Mistake 5: Leaving the Fire Unattended
Wood fires require attention. Monitor the system while heating.
Mistake 6: Ignoring Freezing Weather
Water left inside pipes or coils can freeze and split components. Drain or winterize the system when needed.
Safety Notes
This project requires careful planning.
Follow these safety rules:
- Use a properly rated pressure relief valve.
- Never cap or block the relief discharge.
- Use a thermostatic mixing valve.
- Test water temperature before use.
- Keep children away from hot surfaces.
- Use heat shielding and a non-combustible hearth.
- Keep the firebox outdoors or properly vented.
- Keep carbon monoxide safety in mind.
- Inspect copper coil and fittings for leaks.
- Do not run the system dry.
- Drain or protect the system from freezing.
- Follow local building, fire, and plumbing codes.
If you are connecting this to household plumbing, get professional help.
Maintenance Checklist
Regular maintenance keeps the system safer and more useful.
Check:
- Firebox ash buildup
- Copper coil condition
- Pipe fittings
- Tank leaks
- Pressure relief valve
- Mixing valve
- Drain valve
- Temperature gauge
- Pressure gauge
- Heat shielding
- Chimney or smoke path
- Insulation condition
Suggested maintenance:
- Clean ashes regularly.
- Flush the tank once or twice a year.
- Test the relief valve every 6 months if recommended by the manufacturer.
- Inspect for leaks before each use.
- Use dry wood for cleaner burning.
- Drain the system before freezing weather.
Do not ignore leaks, pressure spikes, or unusual noises.
Output and Benefits
A properly designed wood-fired water heater can provide:
- Hot water without electricity or gas
- Lower fuel cost if wood is available
- Useful off-grid hygiene support
- Cabin and homestead hot water
- Emergency cleaning support
- Durable long-term utility
- Backup water heating during outages
The biggest benefit is practical comfort: staying clean, washing dishes, and maintaining hygiene when normal utilities are unavailable.
Final Thoughts
A wood-fired water heater can be one of the most valuable off-grid comfort systems for a cabin, homestead, or emergency wash station. It uses simple principles: wood fire, heat transfer, hot-water storage, pressure protection, and safe temperature control.
The build requires a firebox, copper heat exchanger, insulated tank, relief valve, mixing valve, plumbing, and a safe hearth. Every part matters, especially the safety valves and heat shielding.
This is not a project to rush. Plan carefully, use rated components, test slowly, and follow local safety rules. When built correctly, a wood-fired water heater can provide reliable hot water when electricity or gas is not available.
Be prepared. Stay comfortable. Stay clean.
Frequently Asked Questions
Can a wood-fired water heater be used indoors?
Only with proper professional design, safe venting, carbon monoxide protection, code compliance, and fire-rated installation. For most DIY users, an outdoor or detached setup is safer.
Do I need a pressure relief valve?
Yes. Any heated water system that can build pressure needs a properly rated pressure relief valve. It should never be blocked or capped.
Why is a mixing valve important?
A mixing valve blends hot water with cold water to reduce scalding risk. Fire-heated water can become dangerously hot.
Can I connect this to my home plumbing?
It may be possible, but household plumbing connections should follow local codes and should usually be reviewed by a qualified professional.
What wood should I burn?
Dry seasoned hardwood is usually best. Avoid treated wood, painted wood, trash, plastics, and wet wood.
Can the copper coil run dry?
No. Heating a dry coil can damage the system and create safety risks. Make sure water is in the system before heating.
What happens in freezing weather?
Water left in pipes, coils, or tanks can freeze and split components. Drain or winterize the system when freezing is possible.
Is this safe for drinking water?
Only if all water-contact parts are potable-water-safe and the source water is safe. Otherwise, use it for washing or non-drinking purposes as appropriate.