When the electricity fails, a small lantern often wastes part of its light.
Some illumination travels toward the wall. Some shines into an unused corner. Some creates uncomfortable glare without helping you see the table, floor, doorway, or supplies in front of you.
A simple curved reflector can redirect more of that existing light toward the area where it is needed.
It does not generate electricity.
It does not increase the lamp’s actual brightness.
It simply captures light traveling backward and redirects part of it forward.
The reflector itself requires no batteries, wiring, switches, or charging. It can be paired with:
- An LED lantern
- A flashlight
- A hand-crank emergency light
- A solar-rechargeable lantern
- A battery-operated flameless candle
- A phone flashlight for brief use
That makes it a useful low-cost project for blackouts, camping, emergency kits, closets, workshops, and rooms with poor lighting.
However, the project shown in the featured image needs one major safety correction:
Do not place an open-flame candle inside a reflector made from foam board, cardboard, plastic, foil tape, rubber bands, or other combustible craft materials.
Emergency agencies recommend flashlights, lanterns, and battery-operated lights instead of candles during outages because open flames add a serious fire risk when a home is dark and people are moving around unfamiliar obstacles. (U.S. Consumer Product Safety Commission)
The safer project below is designed primarily for cool-running LED light sources.
What This Reflector Actually Does
A lantern normally sends light in several directions.
When the lamp is placed near a wall, much of the rear-facing light strikes that wall. A reflector positioned behind the lamp intercepts some of that light and sends it toward the room.
A curved reflector can help:
- Direct more light toward a table
- Reduce wasted rear-facing illumination
- Brighten a work surface
- Make a low setting more useful
- Reduce harsh glare from a visible LED
- Create a wider forward-facing beam
- Improve visibility without modifying the lamp
The word amplify is sometimes used in viral posts, but it is not technically accurate.
The reflector does not create additional lumens. It redistributes the light already produced.
A more trustworthy description is:
A passive reflector that makes better use of a small emergency light.
The Safest Version to Build
This guide uses a lightweight curved panel with a broad reflective surface.
The lamp sits in front of the reflector rather than inside a narrow enclosed chamber. This leaves room for ventilation and reduces heat buildup.
The completed reflector should have:
- A wide stable base
- A gently curved reflective panel
- No exposed sharp foil edges
- No narrow enclosure around the lamp
- Enough space for air circulation
- A restraint preventing the lamp from tipping
- A quick-release design so the light can be removed immediately
Use it only with a light source whose manufacturer permits operation near surrounding objects.
Materials
Main panel
Choose one:
- Foil-faced rigid insulation board
- Corrugated plastic sign board
- Heavy poster board
- Thin flexible plastic sheet
- Clean cardboard covered with reflective film
- A lightweight emergency blanket attached to a rigid backing
Foil-faced insulation is lightweight and naturally reflective, but exposed foam can burn or melt. Use it only with cool LED lights and keep it far from flames, heaters, stoves, and hot lamps.
Reflective surface
Choose one:
- The factory foil facing on insulation board
- Aluminum foil tape
- Heavy-duty aluminum foil
- Reflective emergency-blanket material
- Reflective automotive sunshade material
- White matte poster board
A smooth mirror-like finish creates a more concentrated reflection and may produce glare.
A lightly textured or gently crumpled surface spreads light more broadly, which may work better for general room illumination.
Base
- Corrugated plastic
- Thin plywood
- Scrap wood
- Heavy cardboard
- A shallow metal tray
- A stable plastic cutting board
Fasteners
- Aluminum foil tape
- Strong cloth tape
- Hook-and-loop straps
- Small bolts and washers
- Binder clips
- Removable cable ties
- Non-elastic fabric strap
Light restraint
- Hook-and-loop strap
- Wide elastic loop
- Removable lantern clip
- Shallow noncombustible tray
- Wooden stop blocks
- Commercial lantern hanger
Do not fasten anything permanently around the lamp’s ventilation openings.
Tools
- Tape measure
- Marker
- Straightedge
- Utility knife
- Scissors
- Drill, optional
- Work gloves
- Safety glasses
- Cutting mat
Suggested Dimensions
For a small tabletop lantern, begin with:
- Panel width: 18 to 24 inches
- Panel height: 16 to 20 inches
- Base depth: 10 to 14 inches
- Distance between lamp and reflector: approximately 4 to 8 inches
For a flashlight aimed toward a ceiling or table:
- Panel width: 12 to 18 inches
- Panel height: 12 to 16 inches
- Flashlight distance: approximately 4 to 6 inches
These dimensions are flexible.
The reflector should be wide enough to catch rear-facing light without surrounding the lamp so closely that heat becomes trapped.
Step 1: Choose the Light Source First
Build the reflector around the lamp you actually intend to use.
The best choices are:
LED lantern
A lantern provides broad illumination and often has multiple brightness settings.
Place the reflector behind it to direct more light into one half of the room.
Flashlight
Aim the flashlight toward the curved reflector or toward a white ceiling.
A reflector can soften the narrow beam and spread it across a larger area.
Hand-crank light
A hand-crank lantern fits the battery-free theme more closely because it can be recharged manually.
Test how long it operates after a realistic amount of cranking.
Solar-rechargeable lantern
Charge it during daylight, then place it in front of the reflector after dark.
Keep a second lighting method available in case cloudy weather limits charging.
Flameless candle
A battery-operated candle produces little light, but a reflector can make it more useful for marking a bathroom entrance, bedside table, or hallway corner.
For actual emergency visibility, a flashlight or lantern is usually more practical.
Ready.gov and the American Red Cross recommend flashlights, lanterns, and other battery-powered lighting during power outages rather than relying on open-flame candles. (Red Cross)
Step 2: Cut the Reflective Panel
Mark a rectangle on the chosen panel material.
A good starting size is 20 inches wide by 18 inches tall.
Cut it carefully using a straightedge.
When cutting foil-faced insulation:
- Wear eye protection.
- Work on a protected surface.
- Make several shallow passes rather than forcing the knife through.
- Keep fingers away from the cutting path.
- Collect loose foam fragments.
- Cover exposed edges with foil tape.
Do not leave exposed metal corners where someone could cut a hand while moving the reflector in darkness.
Step 3: Create the Curved Shape
The panel should form a broad, shallow curve—not a tight cylinder.
There are several ways to create it.
Flexible-panel method
Gently bend corrugated plastic, thin poster board, or reflective sunshade material.
Secure the two lower corners to the base so the center curves backward.
Scored-board method
Make several shallow vertical score lines on the back of a rigid panel.
Do not cut completely through it.
Bend gradually along the score lines until a smooth curve forms.
Three-panel method
Cut three flat rectangular panels.
Join them using foil tape as flexible hinges:
- Left wing
- Center panel
- Right wing
Angle the wings forward approximately 20 to 35 degrees.
This design folds flat and is easier to store than a permanently curved reflector.
Step 4: Cover the Reflective Surface
Skip this step when using clean foil-faced insulation or an intact automotive sunshade.
For plain board:
- Cut reflective material slightly larger than the panel.
- Lay it flat without sharp wrinkles.
- Tape the top edge first.
- Smooth it gently from the center outward.
- Secure the sides and bottom.
- Fold or tape over all sharp edges.
Do not use loose reflective film that can fall onto the lamp.
Avoid creating a perfectly focused concave mirror. A highly concentrated reflection can produce uncomfortable glare and may direct heat toward one point when sunlight reaches it.
This project is intended to spread artificial light—not focus sunlight.
Step 5: Build a Stable Base
Cut a base approximately 12 inches deep and slightly wider than the reflector.
Attach the curved panel to the rear edge using:
- Foil tape
- Small hinges
- Bolts and washers
- Wooden support blocks
- Binder clips
Add two triangular side supports when the reflector cannot stand upright independently.
The base should remain flat when the light is installed.
Test it by gently bumping the table. The reflector and lamp should not tip.
A wide, low structure is safer than a tall narrow one.
Step 6: Add the Lamp Position
Mark the intended lamp location approximately 4 to 8 inches in front of the reflector.
Add a removable restraint such as:
- Two low wooden stop blocks
- A hook-and-loop strap
- A shallow metal tray
- A commercial lantern clip
- A broad nonslip pad
The restraint should prevent sideways movement without covering:
- Air vents
- Battery doors
- Controls
- Charging ports
- Handles
- Manufacturer labels
Do not tape the light permanently to the reflector.
You should be able to remove it immediately when it becomes unusually warm, smells strange, flickers, or shows battery damage.
Step 7: Test the Reflector in Darkness
Wait until the room is dark or close the curtains.
Place the lamp on the base and compare three arrangements:
- Lamp alone
- Lamp directly against a wall
- Lamp in front of the reflector
Evaluate:
- Visibility across the room
- Brightness on the work surface
- Glare
- Shadows
- Ability to see the floor
- Light reaching doorways
- Comfort while sitting nearby
Move the lamp closer to or farther from the reflector.
A wider distance usually spreads the reflection more gently. A smaller distance may create a brighter central area but more glare.
Adjust the side wings until the light reaches the intended area.
Step 8: Check for Heat
Operate the light at its highest setting for at least the period you normally expect to use it.
Check the reflector periodically.
Stop using the setup when:
- The panel becomes hot
- The foil tape softens
- Foam begins to smell
- Plastic warps
- The lamp becomes unusually warm
- Batteries swell or leak
- The base discolors
- Ventilation openings are obstructed
The reflector should remain cool or only mildly warm.
Follow the lamp manufacturer’s operating and clearance instructions. Do not assume every LED lamp produces negligible heat.
Step 9: Mark the Safe Setup
Once the best position has been found, mark:
- Lamp location
- Reflector angle
- Left and right wing positions
- Correct base orientation
- Maximum lamp setting tested
- Approved light sources
Add a label such as:
LED LIGHTS ONLY — NO OPEN FLAME
This prevents another household member from placing a candle inside it later.
Best Ways to Use It
Table lighting
Place the reflector near the rear edge of a table and direct the light toward:
- Meal preparation
- Medication organization
- First-aid supplies
- Board games
- Emergency paperwork
- Radio equipment
Keep it away from the table’s edge.
Wall washing
Aim the reflected light toward a pale wall.
The wall becomes a large secondary surface that spreads light more evenly throughout the room.
Ceiling bounce
Aim a flashlight upward into the reflector so the redirected beam strikes a white ceiling.
This can create softer general illumination than pointing a flashlight directly across the room.
Reading light
Place the reflector behind and slightly above a lantern.
Angle the side panels toward the book or work area while keeping the lamp itself out of the reader’s direct line of sight.
Hallway marker
Use a low setting to illuminate:
- Stairs
- Door thresholds
- Bathroom entrances
- Hallway turns
- Emergency exits
Do not leave cords, tools, or loose supplies in the illuminated walking path.
Closet or pantry light
Place the reflector on a stable shelf with a cool LED light.
Remove it when the door will be closed tightly for long periods, especially when airflow around the light is limited.
A Better Blackout Lighting Strategy
One reflector cannot safely illuminate an entire home.
A more practical plan assigns lighting by task.
One main room lantern
Use the reflector behind the household’s brightest lantern in the room where everyone gathers.
Personal flashlights
Give each household member a flashlight or headlamp.
Headlamps are especially useful because they leave both hands free.
Stair and doorway markers
Use small flameless lights or glow products to identify hazards.
Bathroom light
Keep a dedicated flashlight near the bathroom entrance.
USFA advises using flashlights rather than candles during outages and specifically warns against lit candles in bedrooms, bathrooms, and sleeping areas. (U.S. Fire Administration)
Backup charging method
Store an appropriately sized power bank, solar charger, or hand-crank light.
Test emergency lights periodically rather than discovering failed batteries during an outage.
Why a Candle Should Not Sit Inside This Reflector
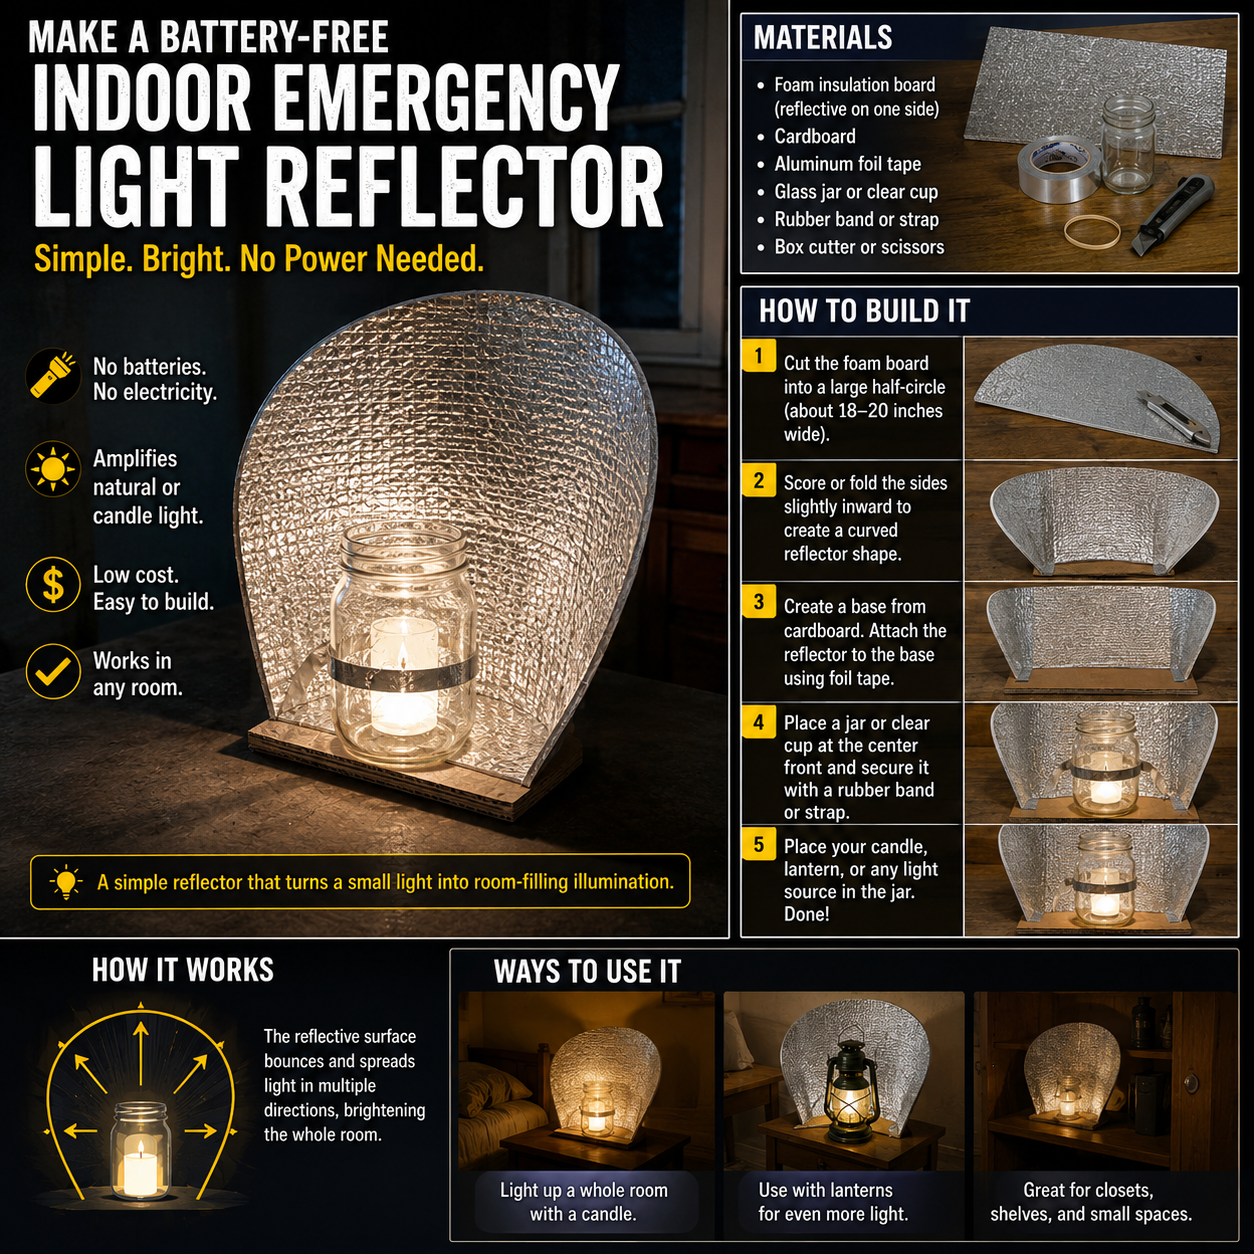
The featured design places a candle in a glass jar directly in front of foil-faced foam board and cardboard.
That arrangement creates several avoidable hazards.
The surrounding materials can burn
Foam board, cardboard, rubber straps, tape, and some reflective films are combustible or can melt.
USFA and NFPA recommend keeping candles at least 12 inches from anything that can burn. The image does not provide that separation. (NFPA)
The reflector traps radiant heat
A curved reflective surface may send heat as well as light back toward the candle holder and nearby materials.
A random jar is not a safety enclosure
A glass container does not make an open flame unattended or fireproof.
The candle must still remain in an appropriate stable holder placed on a heat-resistant surface.
Darkness increases knock-over risk
During an outage, people may move through rooms carrying supplies, checking windows, or searching for equipment.
Children and pets may also approach the light.
CPSC advises using flashlights or battery-operated candles when possible. When candles are used, they should be kept away from combustibles, watched continuously, and extinguished before anyone leaves the room or sleeps. (U.S. Consumer Product Safety Commission)
When an Open Flame Is the Only Available Light
A flashlight or lantern is strongly preferred.
When a candle must be used temporarily, do not place it inside this foam-board reflector.
Use a separate setup:
- Place the candle in a sturdy holder designed for candles.
- Set it on a stable, heat-resistant, noncombustible surface.
- Maintain at least 12 inches of clear space from anything that can burn.
- Keep curtains, bedding, paper, clothing, wood, plastic, and decorations away.
- Keep it out of bedrooms, bathrooms, and sleeping areas.
- Keep children and pets away.
- Remain in the room and maintain continuous supervision.
- Extinguish it before leaving, becoming tired, or going to sleep.
These precautions follow USFA, NFPA, and CPSC candle-safety guidance. (NFPA)
Do not add a homemade reflector unless it is entirely noncombustible and remains outside the required clearance area.
Even then, a flashlight remains the safer emergency choice.
Common Building Mistakes
Claiming the reflector creates more light
It redirects existing light. It does not increase the lamp’s rated output.
Placing the lamp too close
A narrow gap can trap heat and create harsh glare.
Begin with at least several inches of space.
Wrapping the lamp in foil
Do not cover the lamp, its vents, battery compartment, or charging electronics.
The reflector belongs behind it, not around it.
Using an open flame
Foam, cardboard, tape, and plastic must never surround a candle.
Use an LED light.
Creating sharp foil edges
Fold and tape every exposed edge.
Remember that the reflector may be handled in darkness.
Making the base too small
A narrow base can tip when someone adjusts the lamp.
Build the base wider than the curved panel’s center of gravity.
Focusing sunlight
Do not place the reflector where direct sunlight can strike it and become concentrated onto furniture or other objects.
Fold or cover it during daytime storage.
Using a damaged rechargeable light
Stop using a light with:
- Swollen batteries
- Cracked casing
- Heat damage
- Leaking cells
- A burning smell
- Damaged charging cables
Expecting one light to cover every room
Place lights where falls, cuts, medication errors, and other problems are most likely.
Prioritize stairs, food-preparation areas, bathrooms, and exits.
Optional Improvements
Add folding side wings
Use foil tape as hinges so the reflector folds flat.
This makes it easier to store in a closet or emergency tote.
Add a white reverse side
Cover the back with white material.
The white surface creates a softer, more diffuse reflection when the metallic side produces excessive glare.
Add adjustable angles
Use hook-and-loop strips to hold the side wings at different positions.
Add a lantern hanger
Mount a short metal or wooden arm above the base so the lantern can hang in front of the reflector.
Confirm that the complete structure remains stable.
Add a red-light mode label
Red light can be useful when users want to preserve night vision or avoid waking other household members.
Mark the reflector’s best angle for the lantern’s red setting.
Add a carrying handle
A handle makes the folded reflector easier to relocate.
Do not carry it while the lamp remains loose on the base.
Add glow tape
Apply small pieces of photoluminescent tape to:
- Pull tabs
- Base corners
- Lamp controls
- Folding joints
Do not cover ventilation openings.
Storage and Maintenance
Store the reflector:
- Dry
- Flat or gently folded
- Away from direct sunlight
- Away from heaters
- Away from sharp tools
- Away from children’s craft supplies
- With its approved light source
Inspect it every few months.
Check for:
- Loose foil tape
- Exposed sharp edges
- Cracked board
- Warping
- Damaged straps
- Melted areas
- Moisture damage
- Mold
- Pest damage
Test the paired lamp and replace or recharge its batteries according to the manufacturer’s instructions.
A passive reflector is useful only when the light source works.
Is This Project Worth Building?
Yes—but the safest version looks slightly different from the viral image.
The idea of redirecting wasted light is sound. A broad reflective panel can make a modest lantern more useful for reading, cooking, organizing supplies, or illuminating a work surface.
The unsafe part is placing an open flame close to foam board and cardboard.
Build the reflector for an LED lantern, hand-crank light, or flashlight.
Test it in darkness.
Adjust the curve.
Mark the correct lamp position.
Then fold it and store it with your emergency lighting supplies.
The result is inexpensive, reusable, and honest:
It will not magically turn a tiny light into a floodlight, but it can direct more of that light toward the people and tasks that need it.
Final Safety Note
This reflector is intended for cool-running electric emergency lights.
Do not place candles, oil lamps, alcohol burners, fuel lanterns, cooking flames, heaters, or other combustion sources inside or near a reflector made from foam, cardboard, plastic, tape, fabric, or wood.
Emergency officials recommend flashlights, lanterns, and battery-operated lights instead of candles during power outages. When a candle is unavoidable, use a stable candle holder on a noncombustible surface, maintain at least 12 inches of clearance from anything that can burn, supervise it continuously, and extinguish it before leaving the room or sleeping. (U.S. Fire Administration)