Storing fresh food without electricity is one of the most useful skills for anyone interested in emergency preparedness, homesteading, or long-term food storage. A good root cellar setup does not need to be complicated. In many cases, the biggest difference comes from simple airflow, crop separation, and keeping produce off cold or damp floors.
This DIY ventilated root cellar produce rack is designed to help store potatoes, onions, apples, squash, garlic, and other storage crops in a cooler, darker, better-ventilated space. The goal is simple: reduce moisture problems, prevent bruising, improve air movement, and make it easier to inspect your food before spoilage spreads.
This guide explains how the rack works, what materials you need, how to build it, and the common mistakes to avoid.
What Is a Ventilated Root Cellar Produce Rack?
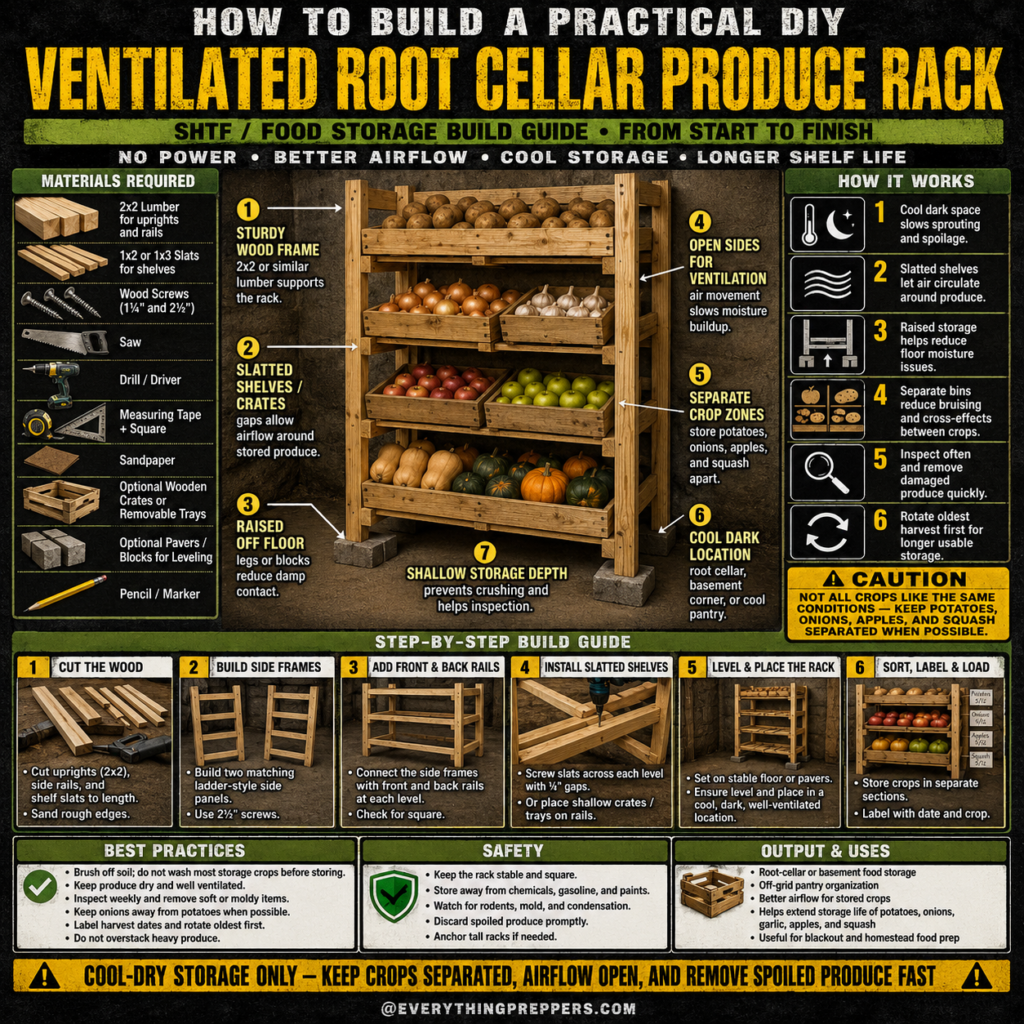
A ventilated root cellar produce rack is a simple wooden storage system built with open sides, slatted shelves, shallow crates, and raised legs. Instead of piling produce in buckets or stacking it directly on the floor, the rack keeps food organized in separate layers with better airflow around each crop.
This is especially useful in a basement, root cellar, cool pantry, garage corner, or other protected storage area where temperatures stay relatively stable.
The rack is not meant to replace proper food preservation methods like canning, dehydrating, freezing, or fermenting. Instead, it helps extend the storage life of whole produce that naturally stores well under cool, dark, and dry-to-moderately-humid conditions.
Common crops that may benefit from this type of setup include:
- Potatoes
- Onions
- Garlic
- Winter squash
- Apples
- Carrots
- Beets
- Turnips
- Pumpkins
The most important rule is this: not every crop should be stored together. Some fruits and vegetables release gases or moisture that can affect nearby produce, so crop separation matters.
Why Ventilation Matters for Food Storage
Many beginners focus only on temperature when storing food, but airflow is just as important.
When produce sits in a closed box, plastic tote, or tightly packed pile, moisture can build up. That trapped moisture encourages mold, soft spots, rot, and unpleasant odors. Once one item begins to spoil, it can quickly affect nearby produce.
A ventilated rack helps solve this by allowing air to move around the stored food. Slatted shelves and open sides reduce stagnant air pockets. Shallow trays also make it easier to see what is happening before one bad onion or potato ruins the rest.
Good ventilation helps with:
- Reducing trapped moisture
- Slowing mold growth
- Making inspection easier
- Preventing crushed produce
- Separating different crops
- Keeping storage areas cleaner
The design is simple, but the benefits are practical.
How This DIY Produce Rack Works
This rack works by combining five simple storage principles.
1. Raised Storage
The bottom shelf sits above the floor using legs or blocks. This helps reduce direct contact with damp concrete, dirt floors, or cold basement surfaces. A raised rack also improves airflow underneath the produce.
2. Slatted Shelves
Instead of using solid boards, the shelves are made with slats and small gaps between them. These gaps allow air to move through each level of the rack.
3. Open Sides
The rack does not have closed walls. Open sides help prevent moisture buildup and allow air to circulate naturally around the produce.
4. Shallow Storage Depth
Deep bins can crush produce and hide spoiled items. Shallow crates or trays make it easier to inspect the food and remove damaged pieces quickly.
5. Separate Crop Zones
Different crops should be stored in separate sections when possible. For example, potatoes, onions, apples, and squash should not all be mixed together in one pile. Separate trays reduce bruising, odor transfer, and unwanted crop interactions.
Materials Needed
You do not need expensive materials to build this rack. Basic lumber and common hand tools are enough.
Basic Materials
- 2×2 lumber or similar supports for the frame
- 1×2 or 1×3 wooden slats for shelves
- Wood screws, around 1¼ inch and 2½ inch
- Optional wooden crates or shallow trays
- Optional pavers or blocks for leveling
- Sandpaper
- Pencil or marker
Tools
- Saw
- Drill or driver
- Measuring tape
- Square
- Safety glasses
- Work gloves
Use untreated wood when possible, especially for parts that may touch food directly. Avoid old boards that may have been exposed to chemicals, fuel, paint, pesticides, or unknown contaminants.
Best Place to Put the Rack
The best location is cool, dark, dry enough to avoid mold, and protected from pests. A basement corner, root cellar, insulated pantry, or enclosed storage room can work well if the conditions are stable.
Look for a location that is:
- Away from direct sunlight
- Away from heat sources
- Away from gasoline, paint, cleaners, or chemicals
- Protected from rodents and insects
- Easy to inspect regularly
- Not exposed to standing water or heavy condensation
If the floor is uneven or damp, set the rack on pavers or blocks. This keeps the wood off the floor and helps improve airflow below the lowest shelf.
Step-by-Step Build Guide
Step 1: Cut the Wood
Start by cutting the upright posts, side rails, back rails, and shelf slats to size. The exact dimensions can be adjusted depending on your space, but keep the rack shallow enough that you can easily reach the back.
A practical depth is around 12 to 18 inches. This gives enough room for produce without making the shelves too deep to inspect.
After cutting, sand the rough edges. This helps prevent splinters and reduces damage to produce bags, trays, or crates.
Step 2: Build the Side Frames
Build two matching side frames first. Each side frame should look like a small ladder, with vertical uprights and horizontal rails.
Use a square to keep the corners straight. If the side frames are not square, the final rack may wobble or lean.
Attach the rails with screws. Pre-drilling the holes can help prevent the wood from splitting, especially when working with thinner slats.
Step 3: Connect the Front and Back Rails
Stand the two side frames upright and connect them with front and back rails. This creates the main body of the rack.
Check the frame again with a square before tightening everything fully. A stable frame is important because produce can become heavy when several shelves are loaded.
Do not rush this step. A slightly crooked rack may still stand, but it will be harder to level and less safe when full.
Step 4: Install the Slatted Shelves
Install the shelf slats across each level of the rack. Leave small, even gaps between slats to allow airflow. The gaps should be wide enough for ventilation but not so wide that produce falls through.
If you plan to use crates or trays, make sure each shelf is strong enough to support the loaded container.
A shallow shelf layout is better than deep storage. It reduces crushing and makes inspection easier.
Step 5: Level and Place the Rack
Move the rack into its final location. If the floor is uneven, use pavers or blocks under the legs to make the rack stable.
Do not place the rack directly against a wet wall. Leave a little space behind it for airflow and inspection.
Before loading produce, gently shake the rack to check for movement. Tighten screws or add bracing if needed.
Step 6: Sort, Label, and Load Produce
Before placing food on the rack, sort everything carefully. Remove any produce with cuts, soft spots, mold, bruising, or signs of rot. Damaged produce should be used quickly, preserved, composted, or discarded depending on its condition.
Group crops by type and label each tray or section. Include the harvest date or storage date if possible.
Good labels can include:
- Crop name
- Storage date
- Variety
- “Use first” note for older produce
Place older produce where it is easier to reach so it gets used first.
What Crops Should Not Be Stored Together?
One of the biggest mistakes in root cellar storage is mixing crops that should be separated.
Potatoes and onions are often stored together by mistake, but they usually do better when kept apart. Apples can also affect nearby produce because they release ethylene gas as they ripen. This can cause some foods to sprout or spoil faster.
As a general rule:
- Keep potatoes away from onions and apples.
- Keep onions and garlic in a well-ventilated area.
- Store squash where it stays dry and does not get bruised.
- Inspect apples often and remove damaged ones quickly.
- Do not store spoiled or cut produce with healthy produce.
Different crops prefer different conditions, so this rack is best used as an organized storage station rather than one big mixed pile.
Common Mistakes to Avoid
Mistake 1: Washing Produce Before Storage
Do not wash most storage crops before putting them away. Extra moisture can encourage mold and spoilage. Instead, gently brush off loose soil and allow produce to cure or dry properly when needed.
Mistake 2: Using Deep Bins
Deep bins may seem efficient, but they can crush produce at the bottom and hide spoiled items. Shallow trays are easier to manage.
Mistake 3: Ignoring Airflow
Closed containers, solid shelves, and tight stacking can trap moisture. Use slats, open sides, and spacing between crops.
Mistake 4: Forgetting Weekly Inspections
Stored produce is not “set it and forget it.” Check it regularly. Remove soft, moldy, sprouting, or damaged items before problems spread.
Mistake 5: Storing Near Chemicals
Never store food near gasoline, pesticides, paint, solvents, or strong-smelling chemicals. Produce can absorb odors, and contamination is a serious concern.
Safety Tips
A produce rack is a simple project, but safety still matters.
- Wear eye protection when cutting or drilling.
- Keep the rack stable and square.
- Do not overload weak shelves.
- Store food away from chemicals, fuel, and paint.
- Watch for rodents, insects, mold, and condensation.
- Discard spoiled produce promptly.
- Anchor tall racks if there is a risk of tipping.
If you notice a strong musty smell, visible mold spreading, water pooling, or heavy condensation, remove the food and fix the storage conditions before reloading the rack.
Best Practices for Longer Storage
To get the best results from this rack, build a simple routine around it.
Inspect your produce once a week. Rotate older items to the front. Keep onions away from potatoes. Keep apples separated when possible. Do not stack heavy squash on top of softer produce. Use damaged items first.
A good storage system is not only about building shelves. It is about creating habits that prevent waste.
Helpful habits include:
- Label every crop section.
- Use oldest harvests first.
- Keep airflow open.
- Remove spoiled items immediately.
- Do not overcrowd shelves.
- Keep the area dark and cool.
- Keep the floor dry.
- Check for pests regularly.
Small habits like these can save a lot of food over a season.
When This Rack Is Most Useful
This type of rack is useful for homesteaders, gardeners, preppers, and anyone who buys produce in bulk.
It can help during:
- Power outages
- Winter food storage
- Harvest season
- Off-grid living
- Basement pantry organization
- Emergency preparedness
- Bulk food storage
- Small homestead food systems
Even if you do not have a traditional underground root cellar, a ventilated rack can still improve storage organization in a cool basement or pantry area.
Final Thoughts
A DIY ventilated root cellar produce rack is one of the simplest ways to make your food storage more practical. It does not require electricity, expensive equipment, or advanced carpentry skills. The main idea is to keep produce raised, separated, ventilated, and easy to inspect.
For preppers and homesteaders, this kind of project is valuable because it solves a real problem: food waste. A strong pantry is not just about how much food you store. It is also about how well you protect it.
With basic lumber, a few screws, and smart storage habits, you can build a rack that helps keep your harvest organized, accessible, and better protected for longer-term use.
Frequently Asked Questions
Can I build this rack without a real root cellar?
Yes. You can use this rack in a cool basement, pantry, garage corner, or storage room if the area is dark, stable, and protected from pests. The closer the space is to proper root cellar conditions, the better the results will be.
Should I wash potatoes before storing them?
Usually, no. Washing adds moisture, which can increase the risk of mold and rot. Brush off loose dirt and store only undamaged potatoes.
Can I store onions and potatoes together?
It is better to keep them separated. Potatoes and onions can affect each other in storage, and both benefit from good airflow.
How often should I inspect stored produce?
Check stored produce at least once a week. Remove anything soft, moldy, bruised, or damaged before it affects nearby food.
What kind of wood should I use?
Basic untreated lumber is usually best. Avoid wood treated with chemicals or boards that may have been exposed to fuel, paint, pesticides, or unknown substances.
Do I need to seal or paint the wood?
It is better to avoid strong-smelling paints or chemical finishes near food storage. If you use any finish, make sure it is fully cured and food-safe for your intended use.
How deep should the shelves be?
A shallow shelf is best. Around 12 to 18 inches deep is practical because it allows easy inspection and reduces the chance of produce being crushed or forgotten in the back.