Cooking over an open fire is one of the most useful off-grid skills to learn. Whether you are camping, building a simple outdoor cooking setup, or preparing for a power outage, a stable pot hanger can make fire cooking much easier and safer.
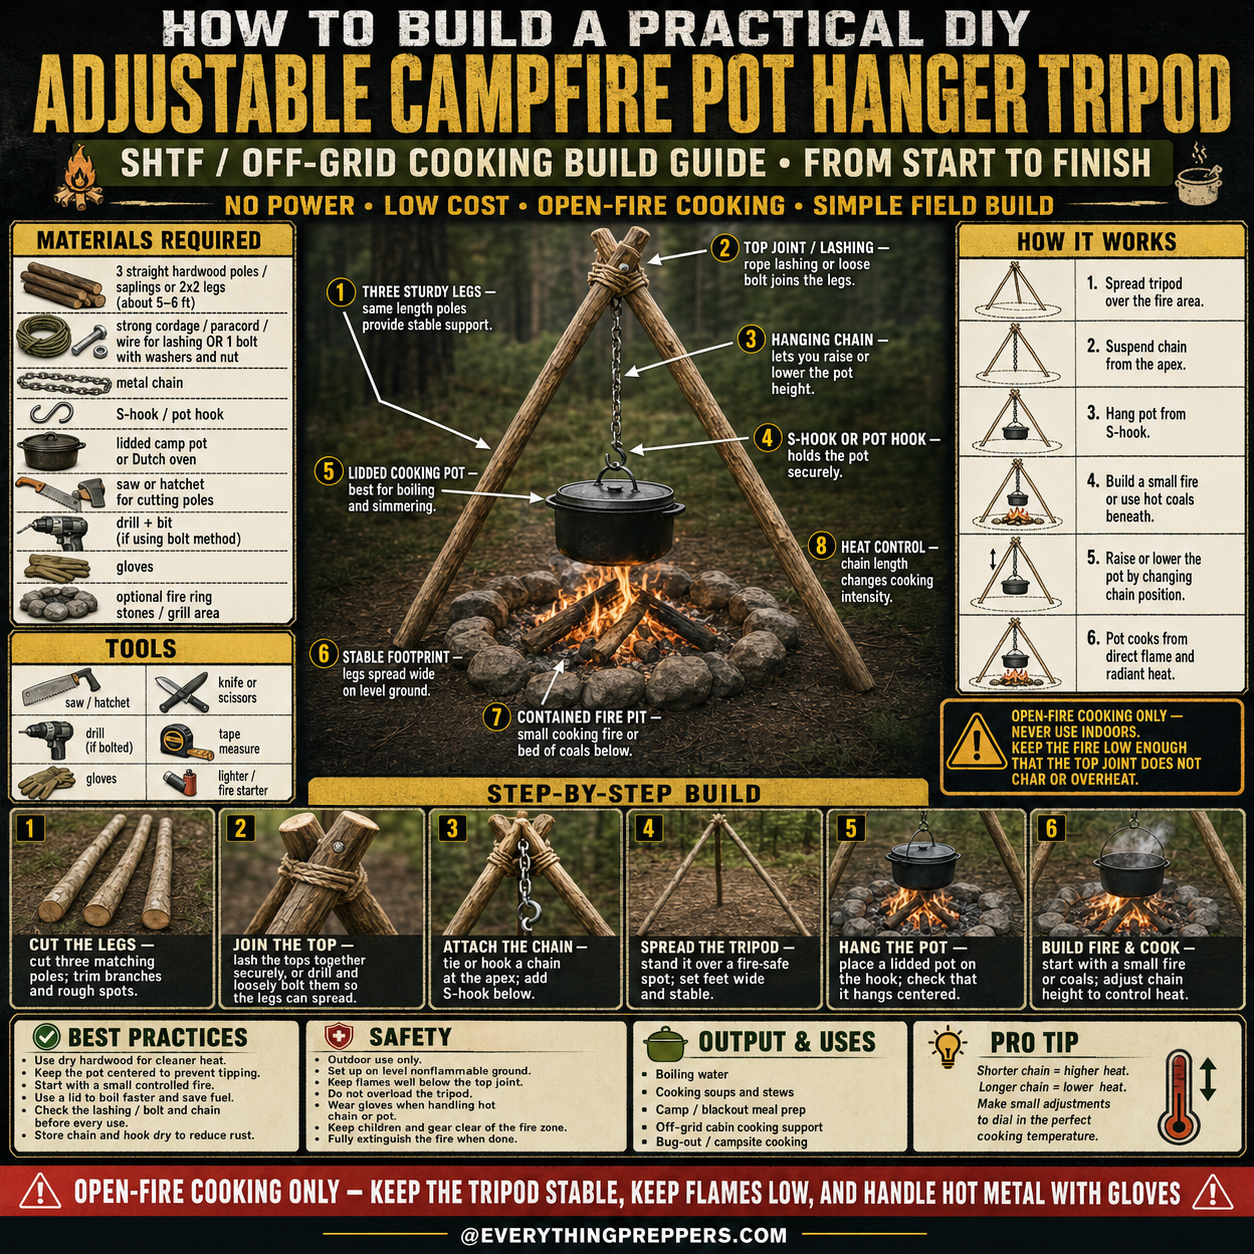
A DIY adjustable campfire pot hanger tripod is a simple field-built cooking stand made from three wooden poles, a top joint, a chain, and a pot hook. The design lets you hang a cooking pot over a small fire and raise or lower the pot to control heat.
This project does not require electricity, expensive materials, or advanced tools. With a few straight poles and basic hardware, you can build a practical campfire cooking tripod for boiling water, simmering soup, cooking stew, or supporting a Dutch oven over hot coals.
What Is a Campfire Pot Hanger Tripod?
A campfire pot hanger tripod is a three-legged support frame used to suspend a cooking pot over a fire. The three legs spread out over the fire area, and a chain hangs from the top joint. A hook at the bottom of the chain holds the pot.
The tripod design is popular because it is simple, strong, and easy to adjust. Instead of placing a pot directly on flames, the pot hangs above the fire. This gives you more control over cooking temperature and reduces the chance of tipping.
A good campfire tripod is useful for:
- Boiling water
- Cooking soup or stew
- Heating camp meals
- Off-grid cooking
- Campsite cooking
- Emergency outdoor cooking
- Bug-out or field cooking practice
The key is to build it stable, keep the fire small, and use proper heat-resistant cooking gear.
Why an Adjustable Tripod Works So Well
Open-fire cooking can be difficult because flames do not behave like a kitchen stove. Heat changes constantly depending on fuel, airflow, wind, and coal depth.
An adjustable pot hanger helps solve this problem. By raising or lowering the cooking pot, you can control how much heat reaches the bottom of the pot.
A shorter chain places the pot closer to the fire, creating higher heat. A longer chain lowers the pot toward the fire or coals, depending on how the chain is arranged. Small adjustments make a big difference.
The tripod works because of four simple principles:
- Three legs create stable support.
A tripod is naturally stable when the legs are spread evenly on level ground. - The hanging chain centers the pot.
Suspending the pot from the top helps keep the weight balanced. - Height controls cooking intensity.
Moving the pot higher or lower changes how quickly food cooks. - A small fire is easier to manage.
Controlled coals usually cook better than large flames.
This makes the tripod a practical setup for slow cooking, boiling, and heating meals outdoors.
Materials Needed
You can build this project with basic outdoor materials and simple hardware.
Main Materials
- Three straight hardwood poles, saplings, or 2×2 wooden legs
- Strong cordage, paracord, wire, or one bolt with washers and nut
- Metal chain
- S-hook or pot hook
- Lidded camp pot or Dutch oven
- Optional fire ring stones or safe fire area
Basic Tools
- Saw or hatchet for cutting poles
- Knife or scissors for trimming cordage
- Drill and bit if using the bolt method
- Tape measure
- Gloves
- Lighter or fire starter
For best results, use dry hardwood poles. Avoid rotten, cracked, weak, painted, treated, or chemically contaminated wood. The tripod must hold weight over fire, so the legs need to be strong.
Best Location for This Build
Choose the location before building the tripod. A campfire cooking setup should be placed on level, nonflammable ground with enough open space around it.
Look for an area that is:
- Flat and stable
- Clear of dry grass, leaves, brush, and low branches
- Away from tents, tarps, vehicles, and gear
- Protected from strong wind when possible
- Legal and safe for open-fire cooking
- Close to water, dirt, or an extinguisher for fire control
Do not build this setup indoors, under a roof, inside a tent, or in an enclosed space. Open-fire cooking produces smoke, sparks, heat, and carbon monoxide.
How This Campfire Tripod Works
The build is simple. Three strong legs form the tripod. The top joint holds the legs together while still allowing them to spread. A chain hangs from the top, and a hook holds the pot. The pot is placed above a small controlled fire or bed of coals.
Here is the basic process:
- Spread the tripod legs over the fire area.
- Suspend the chain from the top joint.
- Attach the S-hook or pot hook to the chain.
- Hang the pot securely.
- Build a small fire beneath the pot.
- Raise or lower the pot to control heat.
The safest and most efficient cooking usually comes from a small fire or hot coals, not a large flame. Big flames can char the pot, burn food, weaken the wood, and make the setup harder to control.
Step-by-Step Build Guide
Step 1: Cut the Legs
Cut three straight wooden poles to the same length. A good beginner size is around 5 to 6 feet long. This gives enough height for a pot to hang above the fire while keeping the tripod manageable.
Trim off branches, sharp knots, and rough spots. The legs should sit firmly on the ground without rolling too easily.
Try to make all three legs similar in thickness. If one leg is much weaker than the others, the tripod may lean or become unstable.
Step 2: Join the Top
Bring the top ends of the three legs together. You can join them with rope lashing, strong cordage, wire, or a bolt.
For a simple field build, lashing works well. Wrap the cordage firmly around the top area several times, then weave between the poles to tighten the joint. The joint should hold the legs together while still allowing them to spread into a tripod shape.
For a more permanent build, drill through the top section of the legs and use a bolt with washers and a nut. Do not overtighten so much that the legs cannot spread.
Whichever method you use, test the joint before hanging a loaded pot.
Step 3: Attach the Chain
Attach a metal chain to the top joint so it hangs down from the center of the tripod. The chain should be strong enough to support your pot when it is full of water or food.
Do not use plastic rope near the fire as a pot hanger. Heat can weaken or melt unsafe materials. A metal chain is better for the section that hangs near the cooking area.
Make sure the chain hangs near the center. If the chain is off to one side, the pot may pull the tripod unevenly.
Step 4: Add the Hook
Attach an S-hook or pot hook to the chain. This hook will hold the handle of your camp pot or Dutch oven.
Check that the hook fits the pot handle securely. The pot should not slide off easily. If the hook is too shallow or weak, replace it with a stronger cooking hook.
Before lighting a fire, test the empty pot first. Then test the pot with water. If the tripod shifts or leans, adjust the legs before cooking.
Step 5: Spread the Tripod
Stand the tripod over the fire-safe area and spread the legs wide. A wider footprint makes the tripod more stable.
The legs should sit on level ground. If one leg is on soft dirt or loose leaves, it may sink during cooking. Remove loose debris and press each leg firmly into the ground if needed.
Keep the pot centered over the fire area. A centered pot reduces tipping risk and improves cooking control.
Step 6: Build the Fire and Cook
Start with a small fire or a bed of coals. Large flames are not necessary and can be harder to control.
Hang the pot from the hook and adjust the chain height. For boiling water, you may want the pot closer to the heat. For simmering soup or stew, raise the pot slightly or cook over coals instead of direct flame.
Wear gloves when handling the pot, chain, or hook. Metal parts can become extremely hot.
Stay nearby while cooking. Never leave an open fire unattended.
Heat Control Tips
The biggest advantage of this tripod is heat control. Instead of constantly moving the fire, you can adjust the pot height.
Use these basic rules:
- Lower pot = more heat
- Higher pot = less heat
- Small flames = easier cooking
- Hot coals = steadier heat
- Lid on pot = faster boiling
- Too much flame = burned food and charred pot
If your food is burning, raise the pot or reduce the fire. If your water is not boiling, lower the pot slightly or add small dry fuel.
Do not make sudden large adjustments. Small changes are easier to control.
Best Practices for Open-Fire Cooking
A tripod is simple, but good results come from good habits.
Use dry hardwood for cleaner heat. Keep the pot centered to prevent tipping. Start with a small controlled fire. Use a lid to boil faster and save fuel. Check the lashing or bolt before every use.
After cooking, let the metal parts cool before touching or storing them. Wipe the chain and hook dry to reduce rust.
Good habits include:
- Keep the cooking area clean.
- Use only fire-safe cookware.
- Avoid overloading the tripod.
- Keep children and pets away from the fire zone.
- Store the chain and hook dry.
- Fully extinguish the fire when finished.
- Keep gloves nearby before you start cooking.
A controlled cooking fire is safer and more useful than a large campfire.
Common Mistakes to Avoid
Mistake 1: Building the Fire Too Large
Large flames can overheat the pot, burn food, weaken the tripod legs, and make the setup unsafe. Use a small fire or coals instead.
Mistake 2: Using Weak or Rotten Poles
The legs must support the weight of a loaded pot. Rotten or cracked wood can fail unexpectedly.
Mistake 3: Hanging the Pot Off-Center
An off-center pot can pull the tripod sideways. Always check that the chain hangs near the middle.
Mistake 4: Overloading the Pot
Water is heavy. A full pot can weigh much more than expected. Test the tripod with weight before cooking.
Mistake 5: Touching Hot Metal
The chain, hook, and pot handle can become very hot. Use gloves or a pot lifter.
Mistake 6: Cooking in an Unsafe Location
Never cook under low branches, near dry brush, inside tents, or close to flammable gear.
Safety Notes
This project is for outdoor open-fire cooking only. Fire safety should always come first.
Follow these safety rules:
- Use outdoors only.
- Keep the tripod on level, nonflammable ground.
- Keep flames low enough that the top joint does not char.
- Do not leave the fire unattended.
- Wear gloves when handling hot metal.
- Keep water, dirt, sand, or an extinguisher nearby.
- Keep children, pets, and loose gear away from the fire zone.
- Fully extinguish the fire before leaving.
- Follow local fire rules, burn bans, and campsite regulations.
If the top joint begins to smoke, char, loosen, or shift, stop cooking and adjust the setup.
What Can You Cook With This Tripod?
This tripod is best for foods that cook well in a hanging pot.
Good options include:
- Boiled water
- Rice
- Soup
- Stew
- Beans
- Pasta
- Camp coffee
- Blackout meals
- Simple one-pot meals
It is also useful for reheating food during a power outage if you have a safe outdoor fire area.
For best results, use a pot with a sturdy bail handle and a lid. A lid helps trap heat, boil faster, and keep ash out of the food.
Why This Is Useful for Preparedness
Many emergency cooking plans depend on fuel canisters, propane, or electricity. Those are useful, but it is also smart to understand basic open-fire cooking.
A campfire tripod gives you a backup cooking method using simple materials. It is low-cost, easy to build, and can be packed or rebuilt in the field.
For preppers, campers, and homesteaders, this project teaches several useful skills:
- Building a stable field structure
- Managing a small cooking fire
- Using coals instead of uncontrolled flames
- Adjusting heat without a stove
- Cooking safely outdoors
It is not just a project. It is a practical skill.
Final Thoughts
A DIY adjustable campfire pot hanger tripod is one of the simplest and most useful off-grid cooking builds. With three strong legs, a secure top joint, a hanging chain, and a good cooking pot, you can create a stable outdoor cooking setup almost anywhere fire is safe and allowed.
The most important parts are stability, heat control, and safety. Keep the legs spread wide, keep the pot centered, keep the fire small, and always handle hot metal with gloves.
For anyone interested in emergency preparedness, camping, or basic outdoor cooking, this is a smart project to learn before you actually need it.
Frequently Asked Questions
Can I use green wood for the tripod legs?
Dry hardwood is usually better because it is stronger and cleaner to work with. Green wood may smoke, bend, or shrink as it dries. Avoid rotten, cracked, painted, or treated wood.
How long should the tripod legs be?
A practical beginner size is about 5 to 6 feet long. This gives enough height for a cooking pot while keeping the tripod stable and easy to manage.
Can I use rope instead of chain to hang the pot?
Rope should not be used close to the fire as the main pot hanger because heat can weaken or melt it. A metal chain is safer for the hanging section near the cooking area.
What is the safest way to control heat?
Use a small fire or hot coals and adjust the pot height. Large flames are harder to control and can burn food or damage the tripod.
Can I cook with this during a power outage?
Yes, but only outdoors in a safe fire area. Never use open-fire cooking indoors, in a garage, in a tent, or in an enclosed space.
What kind of pot works best?
A lidded camp pot or Dutch oven with a strong bail handle works best. The handle must be strong enough to support the pot when it is full.
Should I leave the fire burning after cooking?
No. Fully extinguish the fire with water, dirt, or sand before leaving the area. Stir the ashes and check that there is no remaining heat.