Growing food at home does not always require a greenhouse, expensive equipment, or electricity. A simple raised cold frame garden box can help protect young plants, start seeds earlier, and extend the growing season using only sunlight and basic materials.
A cold frame works like a small passive greenhouse. It uses a clear lid to let sunlight in, while the wooden frame helps block cold wind and hold warmth around the soil. This makes it useful for cool-season crops, seedlings, and early spring planting.
This DIY raised cold frame garden box is a practical project for gardeners, homesteaders, and preppers who want a low-cost way to grow more food with less dependence on power. In this guide, you’ll learn how it works, what materials you need, how to build it, and the mistakes to avoid.
What Is a Raised Cold Frame Garden Box?
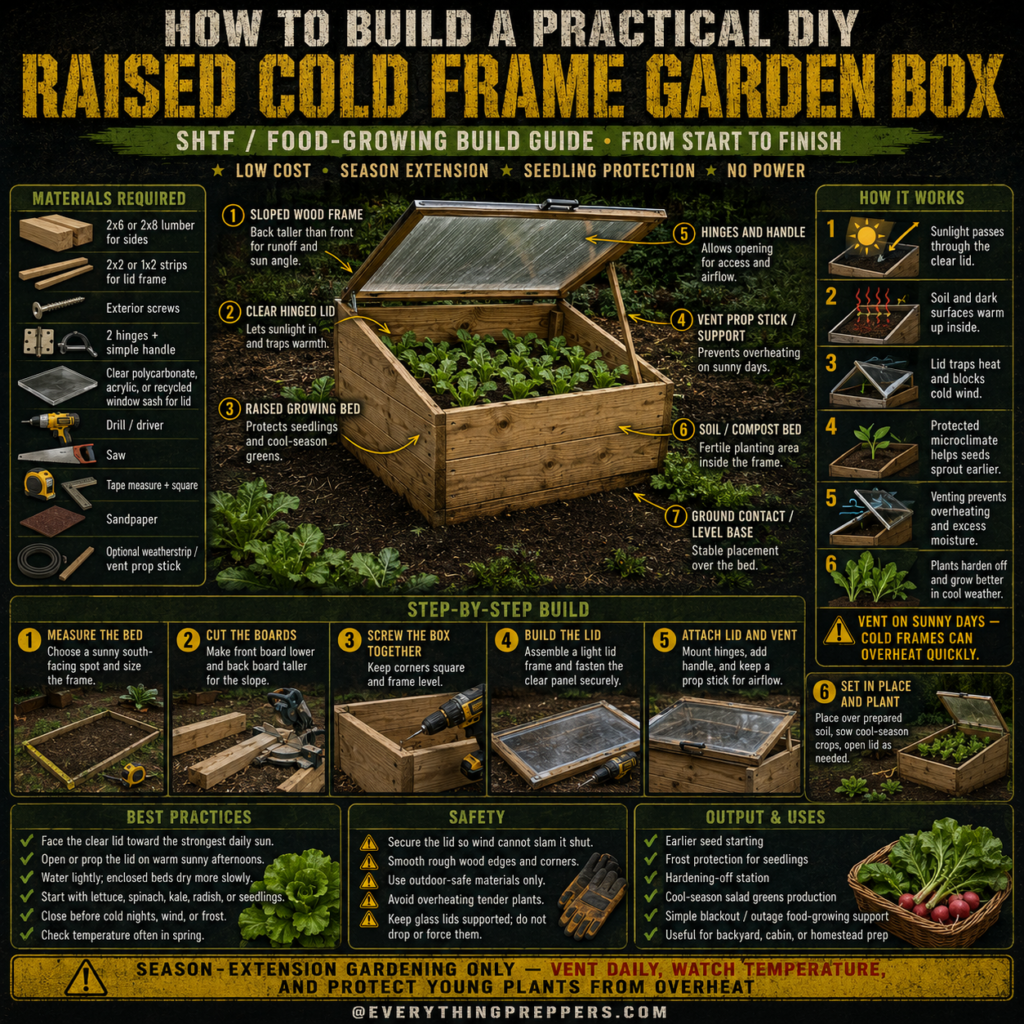
A raised cold frame garden box is a small growing bed with a clear hinged lid. The box sits above the ground and creates a protected growing space for plants. The clear lid allows sunlight to enter, while the enclosed sides help reduce wind exposure and temperature swings.
Unlike a full greenhouse, a cold frame is small, simple, and easy to build. It can be placed directly over prepared soil, filled with compost and garden mix, or used as a protective cover over young seedlings.
A cold frame can be used for:
- Starting seeds earlier in the season
- Protecting seedlings from frost
- Growing cool-season greens
- Hardening off young plants
- Extending harvests into colder weather
- Protecting plants from wind and heavy rain
- Supporting small-space food production
This makes it a useful project for anyone who wants a stronger backyard food-growing system.
Why a Cold Frame Works
A cold frame works by creating a small protected microclimate around your plants. During the day, sunlight passes through the clear lid and warms the soil, compost, and dark surfaces inside the box. The lid and wooden frame help trap some of that warmth while blocking cold wind.
This can give seedlings a better start than leaving them fully exposed outdoors.
The raised cold frame design works because of a few simple principles:
Sunlight Enters Through the Clear Lid
The clear lid lets light reach the plants while also helping trap warmth inside the box. Materials like clear polycarbonate, acrylic, or an old window sash can work well.
The Sloped Frame Improves Sun Exposure
The back of the box is usually taller than the front. This creates a sloped lid that faces the sun more effectively and also allows rainwater to run off instead of pooling on top.
The Box Blocks Cold Wind
Wind can dry out seedlings and make cold weather harder on young plants. The wooden sides reduce direct wind exposure and protect tender growth.
The Soil Warms Up Faster
Because the bed is enclosed, the soil inside can warm faster than open garden soil. This helps seeds sprout earlier and helps cool-season plants grow more consistently.
Venting Prevents Overheating
A cold frame can become too hot on sunny days. Opening the lid or using a prop stick allows excess heat and moisture to escape.
The most important habit is simple: vent the cold frame during warm sunny days and close it before cold nights.
Materials Needed
You can build this project with basic lumber, simple hardware, and a clear lid material.
Basic Materials
- 2×6 or 2×8 lumber for the box sides
- 2×2 or 1×2 strips for the lid frame
- Exterior screws
- Two hinges
- Simple handle
- Clear polycarbonate, acrylic sheet, or recycled window sash
- Optional weatherstrip
- Optional vent prop stick
- Soil and compost mix
Tools
- Drill or driver
- Saw
- Tape measure
- Square
- Sandpaper
- Work gloves
- Safety glasses
Use outdoor-safe materials because the box will be exposed to moisture, sunlight, and changing temperatures. If using recycled materials, avoid anything that may have been painted with lead paint, treated with unsafe chemicals, or exposed to fuel, pesticides, or solvents.
Choosing the Best Location
The location matters as much as the build itself. A cold frame needs sunlight to work properly.
Choose a spot that is:
- Sunny for most of the day
- Protected from strong wind
- Level and well-drained
- Easy to water and check daily
- Close enough that you will actually monitor it
- Away from roof runoff or standing water
In cooler climates, a south-facing location is usually best because it gets stronger daily sunlight. In very hot climates, you may need partial afternoon shade to prevent overheating.
Before building, watch the area for a full day if possible. Make sure it gets enough sunlight and does not flood after rain.
Step-by-Step Build Guide
Step 1: Measure the Bed
Choose where the cold frame will sit and decide the size of the box. A practical beginner size is around 3 feet by 4 feet or 4 feet by 6 feet. Keep it small enough that you can easily reach inside without stepping into the bed.
Mark the footprint on the ground and make sure the area is level.
If you plan to place the cold frame over an existing garden bed, match the size to that bed. If you plan to use it as a standalone box, make sure there is enough depth for soil and roots.
Step 2: Cut the Boards
Cut the boards for the front, back, and sides of the frame. The back board should be taller than the front board so the lid slopes downward.
That slope is important because it helps catch sunlight and allows rainwater to run off the lid.
For example, you can use a taller board at the back and a shorter board at the front, or cut the side boards at an angle so the lid naturally slopes.
Sand rough edges after cutting to reduce splinters and make the box easier to handle.
Step 3: Screw the Box Together
Assemble the wooden box using exterior screws. Keep the corners square and the frame level.
A simple rectangular box is enough, but the structure should be sturdy. Cold frames are often opened and closed many times, so weak corners can loosen over time.
Check that the frame sits flat on the ground. If it rocks or shifts, level the soil underneath before moving forward.
Step 4: Build the Clear Lid
Build a lightweight lid frame using 2×2 or 1×2 strips. Attach the clear panel securely to the frame.
Good lid options include:
- Clear polycarbonate sheet
- Acrylic sheet
- Recycled window sash
- Clear greenhouse panel
- Storm window panel
Polycarbonate is often a good choice because it is lighter and less breakable than glass. If using glass, handle it carefully and make sure it is supported well.
The lid should be strong enough to open and close safely but not so heavy that it becomes difficult to manage.
Step 5: Attach the Hinges and Handle
Attach the lid to the back of the cold frame using two hinges. Then add a simple handle to the front edge so the lid is easy to lift.
Open and close the lid a few times to make sure it moves smoothly. If the lid binds or shifts, adjust the hinges before planting.
Add a vent prop stick so you can hold the lid partly open on sunny days. This is very important because cold frames can heat up quickly.
You can also add weatherstrip around the lid if you want to reduce drafts during colder weather.
Step 6: Set the Box in Place and Plant
Place the cold frame in its final location. Fill the bed with good soil and compost, or set the frame over prepared garden soil.
Plant cool-season crops or seedlings, then water lightly. Avoid soaking the bed too heavily because enclosed beds can dry and warm differently than open garden beds.
After planting, close the lid during cold nights, wind, frost, or heavy rain. Open or vent the lid during warm sunny days to prevent overheating.
Best Crops for a Cold Frame
A raised cold frame garden box is best for cool-season crops and seedlings. These plants usually handle mild cool weather better than heat-loving summer crops.
Good options include:
- Lettuce
- Spinach
- Kale
- Radishes
- Arugula
- Green onions
- Swiss chard
- Mustard greens
- Parsley
- Cilantro
- Broccoli seedlings
- Cabbage seedlings
- Cauliflower seedlings
Warm-season crops like tomatoes, peppers, cucumbers, and basil may be started in a cold frame when conditions are right, but they are more sensitive to cold. Do not assume the box protects them from hard freezes.
How to Use the Cold Frame Correctly
The cold frame is not a “set it and forget it” garden box. It needs simple daily attention, especially during spring when temperatures change quickly.
Use this routine:
- Open the lid on warm sunny days.
- Close the lid before cold nights.
- Check soil moisture often.
- Water lightly when needed.
- Keep the clear lid clean so light can enter.
- Watch for condensation and mold.
- Protect tender plants during hard freezes.
- Gradually expose seedlings to outdoor conditions before transplanting.
The biggest secret is temperature control. A cold frame can protect plants from cold, but it can also overheat them if left closed under strong sun.
Common Mistakes to Avoid
Mistake 1: Forgetting to Vent the Lid
This is the most common mistake. A cold frame can become surprisingly hot on a sunny day. Tender seedlings may wilt or die if the lid stays closed too long.
Use a prop stick, vent arm, or automatic vent opener if possible.
Mistake 2: Placing the Box in Too Much Shade
A cold frame needs sunlight. If it sits in shade most of the day, it will not warm properly and seedlings may grow weak.
Mistake 3: Overwatering
Because the box is partly enclosed, moisture does not always evaporate the same way it does in open beds. Check the soil before watering.
Mistake 4: Using Unsafe Recycled Materials
Avoid old painted wood, questionable window frames, chemical-treated boards, or materials exposed to fuel and pesticides. Food-growing projects should use safer materials.
Mistake 5: Making the Lid Too Heavy
A heavy lid is harder to open, more dangerous to handle, and more likely to slam shut in wind. Keep the lid strong but manageable.
Mistake 6: Ignoring Wind
Wind can catch the lid and slam it shut or tear it open. Use hinges, a handle, and a secure prop system. Close the lid during strong wind if needed.
Safety Tips
This is a simple garden project, but safety still matters during both building and daily use.
- Wear gloves and eye protection when cutting or drilling.
- Smooth rough edges and sharp corners.
- Secure the lid so wind cannot slam it shut.
- Do not let the lid drop suddenly.
- Be careful with glass lids.
- Use outdoor-safe materials only.
- Avoid overheating tender plants.
- Keep children away from unsupported lids.
- Do not grow food in materials contaminated with chemicals.
If using a recycled glass window, inspect it carefully for cracks, sharp edges, and old paint. When in doubt, use clear polycarbonate instead.
Best Practices for Better Results
A cold frame works best when it becomes part of your daily garden routine.
Face the clear lid toward the strongest daily sun. Open the lid on warm afternoons. Close it before frost, wind, or cold nights. Start with hardy greens and seedlings before experimenting with more sensitive plants.
Helpful best practices include:
- Start with lettuce, spinach, kale, radish, or seedlings.
- Keep a thermometer inside the box.
- Vent daily during sunny weather.
- Use a prop stick or automatic vent opener.
- Water lightly and check soil moisture often.
- Clean the clear lid so sunlight can pass through.
- Add extra cover during hard freezes.
- Harden off seedlings before transplanting.
A small thermometer is one of the most useful upgrades because it tells you when the box is getting too hot or too cold.
Output and Uses
This raised cold frame garden box can support several practical gardening goals.
It can help with:
- Earlier seed starting
- Frost protection for seedlings
- Hardening off plants
- Growing cool-season salad greens
- Small blackout or outage food-growing support
- Backyard preparedness
- Homestead garden expansion
- Learning season-extension gardening
For preppers and homesteaders, the value is not just the food grown in one box. The real value is learning how to grow more food through changing weather, cool nights, and uncertain seasons.
Simple Upgrades You Can Add Later
Once the basic cold frame is working, you can upgrade it over time.
Useful upgrades include:
- A thermometer inside the box
- Automatic vent opener
- Weatherstripping around the lid
- Removable shade cloth for warm days
- Handles on the sides
- Hardware cloth under the bed for pest protection
- Extra insulation around the outside in winter
- Removable divider sections for different crops
Start simple first. A basic cold frame used correctly is better than a complicated one that is hard to maintain.
Final Thoughts
A DIY raised cold frame garden box is a smart, low-cost way to grow food earlier, protect seedlings, and extend the gardening season without electricity. It uses basic materials and natural sunlight to create a warmer, more protected space for plants.
The build itself is simple: a sloped wooden box, a clear hinged lid, and a way to vent heat on sunny days. The success comes from how you use it. Keep the lid facing the sun, vent it daily, watch the temperature, and protect young plants from both frost and overheating.
For gardeners, homesteaders, and anyone building a more resilient backyard food system, this is one of the most practical projects to start with.
Frequently Asked Questions
What is the best direction for a cold frame to face?
In most cooler climates, the clear lid should face south to capture the strongest daily sunlight. In hotter climates, you may need partial shade or more frequent venting.
Can I use an old window for the lid?
Yes, but inspect it carefully. Avoid old windows with peeling paint, cracked glass, sharp edges, or unknown chemical exposure. Clear polycarbonate is often safer and lighter.
Does a cold frame need electricity?
No. A basic cold frame uses sunlight and trapped warmth. You do not need electricity unless you add optional accessories.
Can plants overheat inside a cold frame?
Yes. Cold frames can become very hot on sunny days. Vent the lid regularly and consider keeping a thermometer inside.
What should I grow first?
Start with cool-season crops such as lettuce, spinach, kale, radishes, arugula, and hardy seedlings. These are easier than heat-loving summer crops.
Should I water more or less inside a cold frame?
Water lightly and check the soil first. Enclosed beds can hold moisture differently than open beds, so avoid overwatering.
Can a cold frame protect plants from hard freezes?
It can help with light frost and cool weather, but it may not be enough for severe cold. Add extra protection or move sensitive seedlings indoors during hard freezes.