When heavy rain, storms, or rising water threaten your home, the lowest openings are usually the first places to worry about. Doorways, garage side doors, sheds, storage rooms, and low exterior entrances can allow shallow floodwater to enter quickly.
A DIY sandbag doorway flood barrier is a low-cost temporary defense that can help slow shallow, slow-moving water before it reaches an opening. It does not make a doorway fully waterproof, and it should never be treated as protection against fast-moving floodwater. However, when built early and used correctly, a sandbag barrier can reduce seepage, protect low entrances, and give you more time to respond.
This guide explains how a sandbag doorway barrier works, what materials you need, how to build it step by step, and the most important safety mistakes to avoid.
What Is a Sandbag Doorway Flood Barrier?
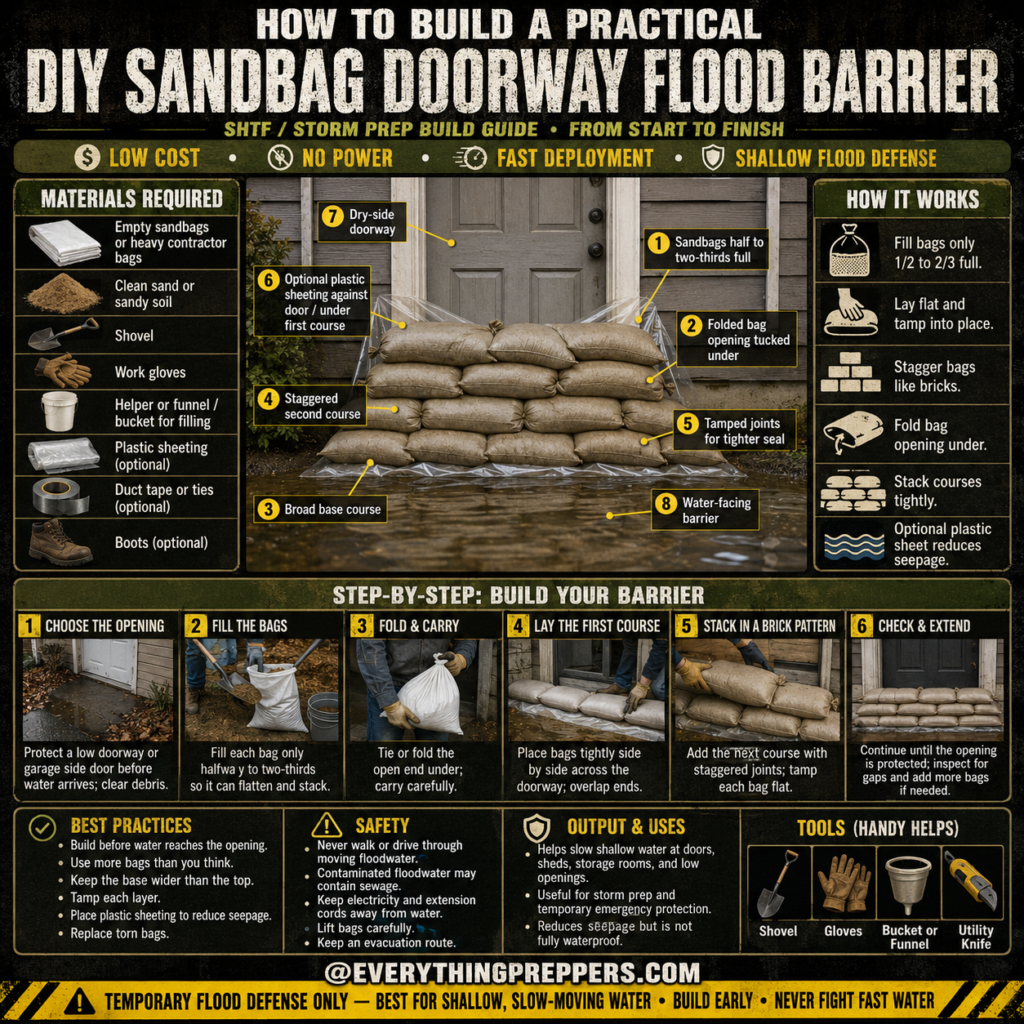
A sandbag doorway flood barrier is a temporary wall made from sand-filled bags stacked across a doorway or low opening. The bags are laid flat, packed tightly, and staggered like bricks to create a stronger barrier.
The goal is not to create a perfect waterproof wall. Sandbags are porous, and some water may still seep through. The real purpose is to slow water movement, reduce direct flow into the opening, and block debris from pushing through the entrance.
This type of barrier can be useful for:
- Exterior doorways
- Garage side doors
- Storage room entrances
- Shed doors
- Basement walkout doors
- Low patio doors
- Utility room entrances
Sandbag barriers are best for shallow, slow-moving water. They are not safe for deep floodwater, flash floods, storm surge, or fast-moving water.
Why Sandbags Work
Sandbags work because they are heavy, flexible, and stackable. When filled correctly, each bag can flatten into place and press against the bags around it. This helps form a temporary wall that resists shallow water.
The key is proper stacking. If bags are overfilled, they become round and hard to stack. If they are too loose, they may shift or collapse. The best fill level is usually around one-half to two-thirds full so the bag can flatten and mold into place.
A good sandbag barrier uses a few simple principles:
Weight
The sand inside each bag helps hold the barrier down.
Shape
Partially filled bags flatten better and seal more tightly.
Overlap
Staggered joints reduce gaps between bags.
Width
A wider base is more stable than a narrow stack.
Plastic Sheeting
Optional plastic sheeting can help reduce seepage when placed correctly against the water-facing side.
A sandbag wall is simple, but small details make a big difference.
Materials Needed
You do not need complicated equipment to build a basic doorway barrier.
Basic Materials
- Empty sandbags or heavy contractor bags
- Clean sand or sandy soil
- Shovel
- Work gloves
- Helper, bucket, or funnel for filling
- Optional plastic sheeting
- Optional duct tape or ties
- Boots
Handy Tools
- Shovel
- Gloves
- Bucket or funnel
- Utility knife
Use actual sandbags if possible because they are designed to stack and handle outdoor conditions. Heavy contractor bags may work as a backup, but they can tear more easily and may not stack as well.
Avoid filling bags with sharp debris, trash, mulch, or loose organic material. Clean sand or sandy soil works better.
When to Build the Barrier
The best time to build a sandbag barrier is before water reaches the doorway.
Do not wait until water is already pushing against the entrance. Once floodwater arrives, the work becomes harder, more dangerous, and less effective.
Build early when:
- Heavy rain is forecast
- Water is pooling near the home
- A low doorway has flooded before
- Drainage is overwhelmed
- Storm runoff is moving toward the entrance
- Local authorities warn about flooding
If water is already moving quickly, do not try to fight it. Prioritize personal safety, follow local emergency guidance, and keep an evacuation route open.
Choosing the Doorway or Opening
Start by identifying the most vulnerable opening. Usually, this is the lowest entrance or the doorway where water naturally flows during storms.
Before placing bags:
- Clear leaves, sticks, mud, and debris.
- Remove anything that prevents the bags from sitting flat.
- Check where the water is coming from.
- Make sure you are not blocking your only exit route.
- Keep drainage paths open where possible.
A sandbag barrier should help slow water at an opening, not trap people inside or create a new safety problem.
Step-by-Step Build Guide
Step 1: Choose the Opening
Choose the doorway, garage side door, shed entrance, or low opening that needs protection. Clean the area in front of the opening so the first row of bags can sit flat.
If you are protecting a home, think carefully about exit routes. Do not block every door unless there is another safe way out.
Step 2: Fill the Bags
Fill each sandbag only one-half to two-thirds full. This is one of the most important steps.
A partially filled bag can flatten and stack tightly. An overfilled bag becomes round, bulky, and unstable.
After filling, fold or tie the open end. Do not pack the bag so tightly that it cannot change shape. The bag should feel heavy but still flexible.
If you have a helper, one person can hold the bag open while the other shovels sand. A bucket or funnel can make filling easier.
Step 3: Fold and Carry
Fold the open end of the bag under the bag when placing it. This helps reduce leakage and keeps the opening from facing the incoming water.
Carry bags carefully. Wet sandbags are heavy, and repeated lifting can strain your back. Bend your knees, keep the bag close to your body, and work with a helper when possible.
Wear gloves to protect your hands from rough fabric, sand, and debris.
Step 4: Lay the First Course
Place the first row of bags tightly side by side across the doorway. This first course should be broad and stable because it supports the rest of the barrier.
Lay each bag flat and tamp it into place with your hands or feet. The bags should touch each other without large gaps.
If using plastic sheeting, place it on the water-facing side and under the first row if possible. The plastic should help direct water away from gaps, not create a slippery walking hazard.
Step 5: Stack in a Brick Pattern
Add the second layer with staggered joints, similar to a brick wall. This means the gaps between bags on the second row should not line up with the gaps below.
Tamp each bag flat as you go. The more tightly the bags settle together, the better the barrier will resist shallow water.
Keep the base wider than the top. A wide, low barrier is usually more stable than a tall, narrow one.
For many doorways, two or three layers may be enough for shallow water. Do not build higher than you can safely stabilize.
Step 6: Check and Extend
After stacking, inspect the barrier for gaps, loose bags, torn bags, or low spots. Add more bags where needed.
Look at both ends of the barrier. Water often sneaks around the sides, especially near door frames, walls, or uneven ground. Extend the barrier slightly beyond the opening if possible.
Check the barrier during the storm only if it is safe to do so. Do not step into moving floodwater to adjust bags.
How High Should the Barrier Be?
The right height depends on the expected water level, the shape of the doorway, and how much time and material you have.
For shallow water, a low barrier may help slow seepage. For deeper or faster-moving water, sandbags may not be enough.
As a basic rule:
- Use more bags than you think you need.
- Keep the base wider than the top.
- Do not build a tall, narrow stack.
- Stagger every layer.
- Extend beyond the doorway edges.
- Do not rely on sandbags for deep flood protection.
Sandbags are a temporary flood-reduction tool, not a guaranteed floodproofing system.
Best Practices for Better Results
A doorway sandbag barrier works best when built early and checked carefully.
Use these best practices:
- Build before water reaches the opening.
- Use more bags than you think you need.
- Fill bags only halfway to two-thirds full.
- Keep the base wider than the top.
- Tamp each layer flat.
- Stagger joints like brickwork.
- Fold bag openings under.
- Extend the barrier beyond the doorway edges.
- Place plastic sheeting on the water-facing side to reduce seepage.
- Replace torn or leaking bags.
The most common failure points are gaps between bags, water going around the sides, and bags shifting because they were overfilled or stacked poorly.
Common Mistakes to Avoid
Mistake 1: Overfilling the Bags
Overfilled bags do not stack well. They create gaps and roll out of position. Fill bags only one-half to two-thirds full.
Mistake 2: Building Too Late
Trying to build a barrier after water is already moving can be dangerous. Build before the water reaches the doorway.
Mistake 3: Stacking Bags Like a Straight Column
Do not line up the joints from one layer to the next. Stagger the bags like bricks for a stronger barrier.
Mistake 4: Forgetting the Sides
Water can move around the ends of the barrier. Extend the sandbags beyond the opening when possible.
Mistake 5: Trusting the Barrier Too Much
Sandbags reduce seepage but do not make a doorway fully waterproof. Plan for cleanup, drainage, and evacuation if conditions worsen.
Mistake 6: Walking Through Floodwater
Floodwater can hide holes, sharp objects, sewage, chemicals, and electrical hazards. Avoid walking or driving through moving water.
Safety Notes
Flood preparation can become dangerous quickly. Always put safety first.
Follow these safety rules:
- Never walk or drive through moving floodwater.
- Do not try to stop fast-moving water with sandbags.
- Keep electricity and extension cords away from water.
- Wear gloves and boots when handling bags.
- Lift carefully to avoid injury.
- Keep children and pets away from floodwater.
- Assume floodwater may contain sewage, chemicals, or sharp debris.
- Keep an evacuation route open.
- Follow local emergency warnings and evacuation orders.
If water is rising quickly, leave the area. Property can be repaired, but floodwater can become life-threatening very fast.
What to Do After the Water Recedes
After the storm, do not rush to remove the barrier if water is still nearby or the ground is unstable. Wait until conditions are safe.
When removing sandbags:
- Wear gloves and boots.
- Avoid direct contact with contaminated water or mud.
- Do not reuse bags that contacted sewage or chemicals.
- Follow local disposal rules.
- Clean and dry the doorway area.
- Check walls, flooring, and trim for moisture.
- Use fans or dehumidifiers only when electricity is safe.
- Watch for mold after any water intrusion.
Sandbags that touched floodwater may be contaminated. Do not empty flood-exposed sand into vegetable gardens, play areas, or clean storage spaces.
Output and Uses
A properly built sandbag doorway barrier can help reduce shallow water entry at vulnerable openings.
It may be useful for:
- Storm preparation
- Shallow water defense
- Garage side doors
- Shed doors
- Basement walkout doors
- Storage room entrances
- Temporary emergency protection
- Slowing water long enough to move valuables
This build is not a permanent solution. If a doorway floods repeatedly, consider improving grading, drainage, gutters, downspouts, sump systems, door thresholds, or professional floodproofing options.
Final Thoughts
A DIY sandbag doorway flood barrier is a simple and practical storm-prep project. It is low-cost, requires no power, and can be built quickly with basic materials.
The key is to build it before water arrives, fill the bags correctly, stack them tightly, and understand the limits. Sandbags can slow shallow, slow-moving water, but they cannot guarantee full waterproofing or stop dangerous floods.
Use this method as one layer of protection, not your only plan. Combine it with good drainage, safe evacuation planning, and common-sense flood safety.
When flooding is possible, prepare early, stay alert, and never risk your life trying to protect property.
Frequently Asked Questions
How full should sandbags be?
Fill sandbags about one-half to two-thirds full. This allows them to flatten, stack tightly, and mold into place.
Should the open end of the bag face the water?
No. Fold or tuck the open end under the bag when placing it. This helps keep the bag sealed and reduces gaps.
Can sandbags make a doorway waterproof?
No. Sandbags can reduce seepage and slow shallow water, but they do not create a fully waterproof seal.
Should I use plastic sheeting with sandbags?
Plastic sheeting can help reduce seepage when placed on the water-facing side of the barrier. It should be secured so it does not become a slipping hazard.
Can I use soil instead of sand?
Clean sandy soil may work in an emergency. Avoid mulch, trash, sharp debris, or organic material that breaks down quickly.
How many sandbags do I need for a doorway?
It depends on the doorway width, desired height, and water conditions. Use more than you think you need, keep the base wider than the top, and extend the barrier beyond the doorway edges.
Can I reuse sandbags after a flood?
Only if they stayed clean and dry. Bags exposed to floodwater may be contaminated and should be handled carefully according to local disposal guidance.
Is this safe for fast-moving floodwater?
No. Sandbag doorway barriers are only for shallow, slow-moving water. Never try to fight fast-moving floodwater.