When the power goes out during hot weather, a stuffy room can become uncomfortable fast. Without air conditioning or fans, even a small amount of fresh airflow can make a big difference. The problem is that opening a window often lets mosquitoes, flies, and other insects inside.
A DIY window bug-screen vent panel is a simple removable screen frame that fits into an open window. It allows fresh air to pass through while helping keep insects outside. This project is useful for blackout cooling, off-grid cabins, camping cabins, sheds, workshops, and homes that need better airflow during warm weather.
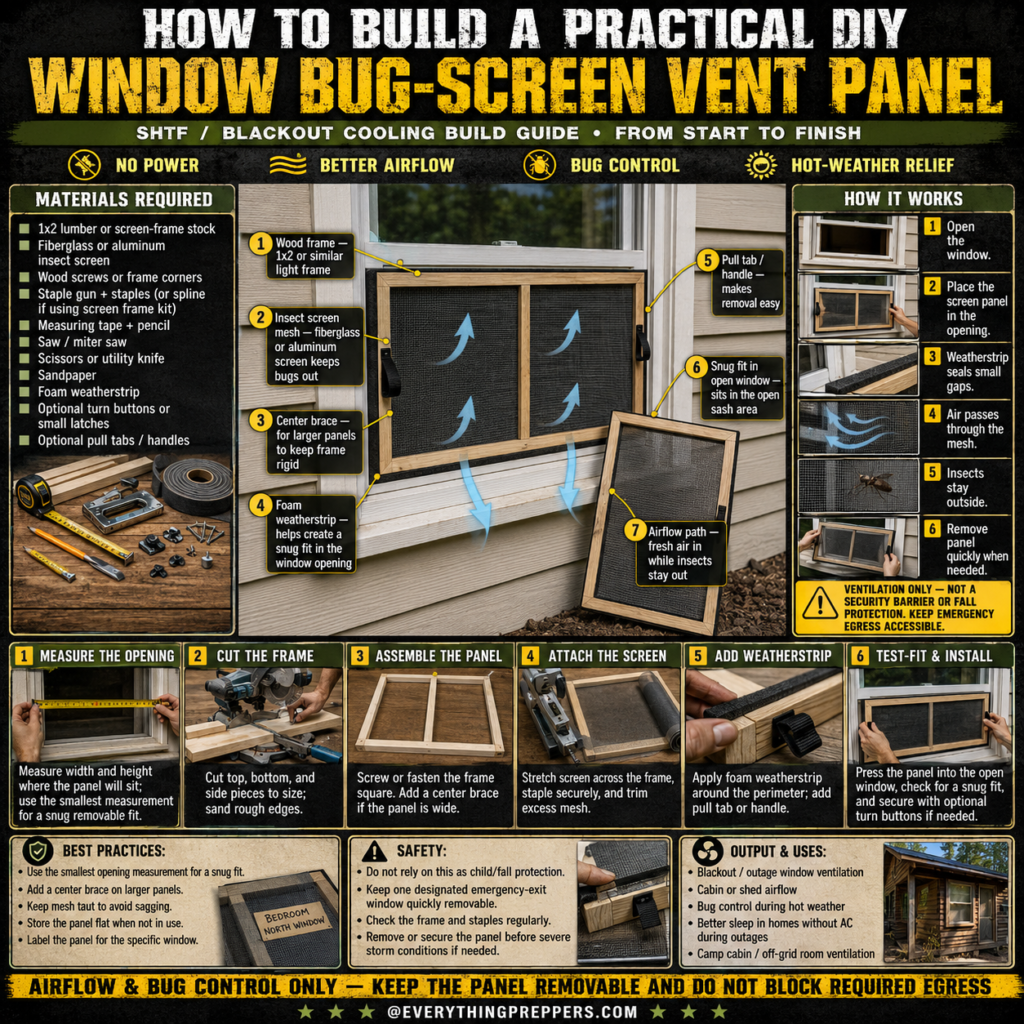
This build is not a security barrier, child-safety guard, or fall-protection device. It is only meant for airflow and insect control. The panel should remain removable, and emergency exit windows should never be blocked.
Safety note: This DIY window bug screen vent panel is intended for basic ventilation and insect control. Do not install it in a way that blocks emergency exits, window locks, fire escape access, or required ventilation. Use care when cutting wood, PVC, screen mesh, or metal parts.
What Is a Window Bug-Screen Vent Panel?
A window bug-screen vent panel is a lightweight wooden frame covered with insect screen mesh. It sits inside a partially open window and creates a temporary screened opening for ventilation.
Unlike a permanent window screen, this panel is designed to be simple, removable, and easy to store. You can build one for a specific window, label it, and install it when needed.
This type of panel is useful for:
- Blackout ventilation
- Hot-weather airflow
- Bug control
- Cabins and off-grid rooms
- Workshops or sheds
- Temporary window screening
- Better sleep during warm nights
- Emergency cooling when fans or AC are unavailable
The key is to measure carefully so the panel fits snugly without being forced into the window frame.
Why This Simple Vent Panel Works
The idea is simple: open the window, place the screen panel in the opening, seal small gaps with weatherstrip, and let air move through the mesh.
The screen mesh allows air to pass while blocking many common insects. The wooden frame keeps the mesh flat and gives the panel enough structure to sit securely in the open sash area.
A good vent panel works because of four basic features:
1. Lightweight Frame
A 1×2 wood frame or screen-frame stock creates a simple structure without making the panel too heavy.
2. Insect Screen Mesh
Fiberglass or aluminum insect screen helps keep mosquitoes, flies, and other bugs outside while still allowing airflow.
3. Snug Fit
A close fit helps reduce gaps where insects can enter. Foam weatherstrip can improve the seal around uneven edges.
4. Removable Design
The panel should be easy to remove quickly. This is important for cleaning, storage, weather changes, and emergency access.
This is a basic project, but careful measuring and a clean fit make it much more useful.
Materials Needed
You can build this panel with basic materials from most hardware stores.
Basic Materials
- 1×2 lumber or screen-frame stock
- Fiberglass or aluminum insect screen
- Wood screws or frame corners
- Staples, staple gun, or screen spline system
- Measuring tape
- Pencil
- Saw or miter saw
- Scissors or utility knife
- Sandpaper
- Foam weatherstrip
- Optional turn buttons or small latches
- Optional pull tabs or handles
Recommended Tools
- Drill or driver
- Staple gun
- Tape measure
- Square
- Saw
- Utility knife
- Safety glasses
- Work gloves
Fiberglass screen is easier to cut and handle for beginners. Aluminum screen is stronger but can be sharper on cut edges, so wear gloves when handling it.
Before You Build: Measure the Window Correctly
The most important step is measuring the window opening. A loose panel leaves gaps for insects. A panel that is too large may not fit or may damage the window trim.
Measure the width and height of the area where the panel will sit. If the opening is not perfectly square, use the smallest measurement for a snug removable fit.
Measure:
- Width at the top, middle, and bottom
- Height on the left, center, and right
- Depth of the sash area where the panel will rest
Use the smallest width and smallest height as your final reference. This helps prevent the panel from being too big for the narrowest part of the opening.
Step-by-Step Build Guide
Step 1: Measure the Opening
Open the window to the height you want for ventilation. Measure the space where the screen panel will sit.
Write down the measurements and label them clearly. If you plan to build panels for multiple windows, label each window separately. Many windows look similar but have slightly different dimensions.
For example, you can label one panel:
“Bedroom North Window”
This makes storage and reuse much easier.
Step 2: Cut the Frame
Cut the top, bottom, and side pieces of the frame to size. A simple rectangular frame is enough for most windows.
If your panel is wide, add a center brace. The brace helps prevent the frame from twisting and keeps the screen from sagging over time.
After cutting, sand rough edges and corners. Smooth edges are safer to handle and less likely to tear the screen mesh.
Step 3: Assemble the Panel
Screw or fasten the frame together. Use a square to keep the corners straight.
A frame that is out of square may not sit correctly in the window opening. Take your time during assembly and check the fit before attaching the screen.
If the frame feels weak, add a center brace or corner brackets.
Step 4: Attach the Screen
Lay the screen mesh across the frame. Pull it gently so it is flat and smooth, but do not stretch it so hard that it warps the frame.
Attach the screen using staples, spline, or another screen-frame method. Work from one side to the opposite side, keeping the mesh even as you go.
After the screen is secure, trim the extra mesh with scissors or a utility knife.
Check for:
- Loose corners
- Sagging mesh
- Sharp staple points
- Tears or gaps
- Uneven tension
A tight, clean screen will look better and work better.
Step 5: Add Weatherstrip
Apply foam weatherstrip around the outer edge of the panel. This helps close small gaps between the panel and the window frame.
Weatherstrip is especially useful for older windows, uneven trim, or handmade wood panels that are not perfectly precise.
Do not make the panel so tight that it becomes difficult to remove. The goal is a snug fit, not a permanent installation.
Step 6: Test-Fit and Install
Place the panel into the open window. Check that it sits flat and does not wobble or fall out easily.
Close the window sash gently against the top or bottom edge of the panel if your window style allows it. You can also use small turn buttons or removable latches to help hold the panel in place.
Do not use permanent fasteners on emergency-exit windows. The panel should be removable quickly when needed.
Once installed, check for visible gaps around the sides. Add more weatherstrip if necessary.
Best Practices for Better Results
A simple screen panel works best when it is built for a specific window and stored carefully.
Use these best practices:
- Use the smallest opening measurement for a snug fit.
- Add a center brace on wide panels.
- Keep the screen mesh taut to prevent sagging.
- Add foam weatherstrip around the perimeter.
- Use a pull tab or handle for quick removal.
- Store the panel flat when not in use.
- Label the panel for the exact window.
- Check staples and frame joints regularly.
If you build several panels, write the room name and window location on each one. This prevents confusion when you need to install them quickly.
Important Safety Notes
This project is for airflow and insect control only. It should not be used as a safety barrier.
Follow these safety rules:
- Do not rely on this panel for child protection.
- Do not rely on this panel for fall protection.
- Do not use it as a security barrier.
- Keep emergency-exit windows quickly removable.
- Do not block required egress windows.
- Remove or secure the panel before severe storms.
- Check the frame and staples regularly.
- Do not leave children unattended near open windows.
A bug-screen panel helps with ventilation, but it does not replace proper window locks, safety guards, or emergency planning.
Where This Panel Is Most Useful
This build is especially useful in places where you want airflow without letting insects inside.
Good use cases include:
- Bedrooms during warm nights
- Cabins without air conditioning
- Off-grid rooms
- Sheds and workshops
- Emergency blackout cooling
- Camp cabins
- Screened airflow in storage spaces
- Temporary ventilation during power outages
During a blackout, cross-ventilation works best. If possible, open screened windows on opposite sides of the home to help air move through the building. Even without a powered fan, this can help reduce stale indoor air.
Common Mistakes to Avoid
Mistake 1: Measuring Only Once
Windows are not always perfectly square. Measure the opening in several places and use the smallest measurement.
Mistake 2: Making the Panel Too Tight
A panel that is too tight may be hard to remove and could damage trim. Keep it snug but removable.
Mistake 3: Leaving Gaps Around the Frame
Small gaps can let insects inside. Foam weatherstrip can help seal uneven edges.
Mistake 4: Skipping the Center Brace
A wide frame can twist or sag. Add a center brace if the panel is large.
Mistake 5: Treating It Like a Safety Guard
Screen mesh is not strong enough to stop a child, pet, or person from falling. This is only a vent screen.
Mistake 6: Leaving It Installed During Severe Weather
Strong wind or heavy rain can damage the panel or push water indoors. Remove or secure it before severe storm conditions.
How to Improve Airflow Without Power
This panel is most effective when combined with smart airflow habits.
Try these simple cooling tips:
- Open lower windows on the cooler side of the home.
- Open upper windows if warm air can escape safely.
- Use shaded windows during the day.
- Close hot sunny windows when outdoor air is hotter than indoor air.
- Open windows at night when the air cools down.
- Keep interior doors open to allow air movement.
- Use multiple screened openings for cross-breeze.
The screen panel does not cool air by itself. It simply allows ventilation while reducing insect entry.
Cleaning and Storage
To keep the panel useful, clean and store it properly.
Brush off dust, pollen, and debris from the screen. If needed, wipe the frame with a damp cloth and let it dry fully before storage.
Store the panel:
- Flat against a wall
- Away from heavy objects
- Away from moisture
- Away from direct sun when not in use
- Labeled for the correct window
Before each season, inspect the mesh for holes and check that the frame is still square.
Simple Upgrades You Can Add Later
Once the basic panel is built, you can improve it with small upgrades.
Useful upgrades include:
- Pull handle for fast removal
- Turn buttons for a better hold
- Corner brackets for strength
- Thicker weatherstrip for older windows
- Aluminum screen for more durability
- Pet-resistant screen for stronger mesh
- Painted or sealed frame for outdoor exposure
- Magnetic strips for certain window styles
Keep upgrades simple. The best version is still easy to remove and easy to repair.
Final Thoughts
A DIY window bug-screen vent panel is a low-cost project that solves a real hot-weather problem. It helps bring fresh air into a room while reducing insects, making it useful for blackouts, cabins, off-grid spaces, and everyday summer ventilation.
The build is simple: measure the opening, cut a light frame, attach screen mesh, add weatherstrip, and test the fit. The most important details are a snug fit, taut mesh, and quick removability.
For emergency preparedness, this is a practical comfort project. It will not replace air conditioning, security screens, or safety guards, but it can make warm nights and power outages much easier to handle.
Frequently Asked Questions
Can this screen panel replace a permanent window screen?
It can work as a temporary or removable screen, but it is not the same as a professionally fitted permanent window screen. It is best for simple ventilation and insect control.
What type of screen mesh should I use?
Fiberglass screen is easy to cut and install. Aluminum screen is stronger but can have sharper edges. For most beginners, fiberglass is the easiest option.
Can this panel stop mosquitoes?
A properly fitted panel with good insect screen can help keep mosquitoes out, but gaps around the frame can still let insects in. Use weatherstrip to improve the seal.
Is this safe for a child’s bedroom?
Only if you understand its limits. This panel is not a child-safety guard or fall barrier. Do not leave children unattended near open windows.
Should I screw the panel permanently into the window?
No, especially not on emergency-exit windows. The panel should remain quickly removable.
Can I use this during a storm?
It is better to remove or secure the panel before severe storms, strong wind, or heavy rain. This build is for ventilation, not storm protection.
How do I make the panel fit better?
Use foam weatherstrip around the perimeter, check for gaps, and make sure the panel was built using the smallest opening measurement.