When the power is out and your phone, radio, flashlight, or small USB fan is running low, even a little backup electricity can be valuable. A DIY pedal-powered 12V charging station gives you a simple way to turn human effort into small-load emergency power.
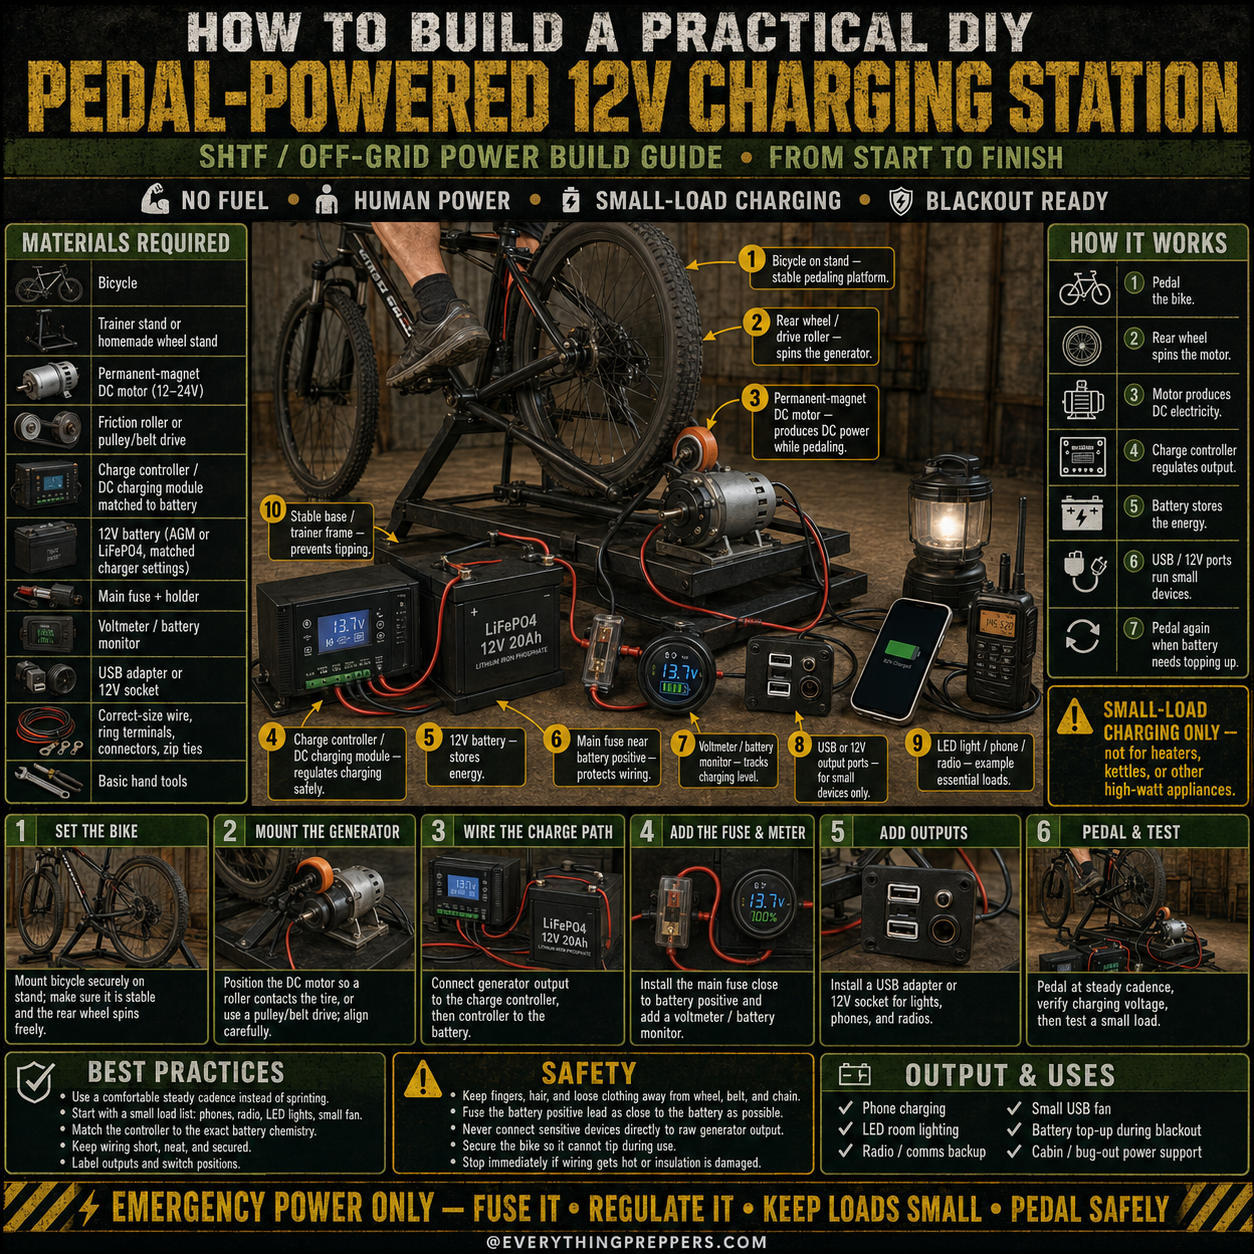
This project uses a bicycle, a stand, a DC motor or generator, a charge controller, a 12V battery, fuse protection, a voltmeter, and USB or 12V outputs. When you pedal, the rear wheel spins the generator. The charge controller regulates the output, the battery stores the energy, and the USB or 12V ports power small devices.
This is not a whole-house power system. It is not for heaters, kettles, refrigerators, microwaves, power tools, or high-watt appliances. It is best for small emergency loads such as phones, LED lights, radios, battery chargers, and small USB fans.

What Is a Pedal-Powered 12V Charging Station?
A pedal-powered 12V charging station is a small off-grid power setup that uses a bicycle to spin a generator. The generated power is regulated and sent into a 12V battery. From there, the stored energy can be used for small DC devices or USB charging.
This type of setup is useful because it does not depend on fuel, sunlight, or the electrical grid. As long as the bike and charging system are working, you can produce small amounts of backup power by pedaling.
A pedal charging station can be useful for:
- Phone charging
- LED room lighting
- Radio or communication backup
- Small USB fan use
- Battery top-up during blackouts
- Cabin or bug-out power support
- Off-grid learning projects
- Emergency preparedness practice
The key is to keep expectations realistic. Human-powered charging works, but it produces limited power compared with a wall outlet, generator, or solar panel.
How This Charging Station Works
The system works by converting motion into electricity.
1. Bicycle and Stand
The bicycle sits on a stable trainer stand or homemade platform. The rear wheel must spin freely without the bike tipping.
2. Generator or DC Motor
A permanent-magnet DC motor or small generator is mounted so the rear wheel can spin it. This may be done with a friction roller, pulley, or belt drive.
3. Charge Controller
The generator output can vary depending on pedaling speed. A charge controller or DC charging module helps regulate power before it reaches the battery.
4. 12V Battery
The battery stores energy so devices can be powered more steadily. AGM or LiFePO4 batteries are common options, but the charger must match the battery type.
5. Fuse Protection
A main fuse near the battery positive terminal helps protect wiring from short circuits.
6. Voltmeter or Battery Monitor
A meter helps track battery voltage and charging status.
7. USB or 12V Outputs
USB adapters or 12V sockets allow small devices to be powered from the stored battery energy.
The basic flow is: pedal → wheel spins generator → controller regulates output → battery stores energy → small devices use stored power.
Important Safety Warning
This project involves spinning bicycle parts, batteries, wiring, fuses, and charging equipment. Build it carefully and test it slowly.
Follow these safety rules:
- Keep fingers, hair, loose clothing, and straps away from the wheel, chain, belt, and roller.
- Fuse the battery positive lead as close to the battery as practical.
- Use a charge controller matched to your battery chemistry.
- Never connect sensitive devices directly to raw generator output.
- Do not reverse polarity.
- Keep the battery secure so it cannot tip or slide.
- Stop immediately if wiring gets hot, smells strange, sparks, or insulation is damaged.
- Keep children away from moving parts and exposed wiring.
- Ask an experienced technician or electrician to inspect the setup if you are unsure.
This project should be treated as an educational emergency charging system, not a toy.
Materials Needed
The exact parts depend on your design, but a practical basic setup may include:
Main Materials
- Bicycle
- Bicycle trainer stand or homemade wheel stand
- Permanent-magnet DC motor or generator, commonly 12V to 24V
- Friction roller, pulley, or belt drive
- Charge controller or DC charging module matched to the battery
- 12V battery, such as AGM or LiFePO4
- Main fuse and fuse holder
- Voltmeter or battery monitor
- USB adapter or 12V socket
- Correct-size wire, ring terminals, connectors, and zip ties
- Stable base or frame
- Basic hand tools
Helpful Tools
- Drill or driver
- Wrenches
- Wire crimper
- Wire cutter
- Multimeter
- Screwdrivers
- Safety glasses
- Work gloves
- Labels
Do not use random wiring or mystery electronics without checking ratings. Charging systems need correct voltage, current limits, and battery compatibility.
Step 1: Set the Bike Securely
Start by mounting the bicycle on a stable trainer stand or a strong homemade platform. The rear wheel should spin freely without the bike rocking side to side.
Check that:
- The bike is upright and stable.
- The rear wheel spins smoothly.
- The tire does not rub the frame.
- The chain is working properly.
- The stand cannot slide during pedaling.
- The rider can stop safely.
A shaky bike stand can make the entire project unsafe. Stability comes before charging.
Step 2: Mount the Generator
Position the DC motor or generator so the rear wheel can spin it. Many DIY builds use a roller pressed against the tire. Others use a belt or pulley system.
The generator should be aligned carefully. If the roller is crooked, it may slip, wear the tire, or create uneven resistance.
Mount the generator firmly to the base. It should not bounce, twist, or move toward the wheel unexpectedly.
Test the wheel by spinning it slowly by hand before pedaling. Listen for scraping, binding, or slipping.
Step 3: Wire the Charge Path
Connect the generator output to the charge controller or DC charging module. Then connect the controller output to the battery according to the controller instructions.
The charge controller matters because pedaling speed changes voltage and current. A controller helps regulate charging and protects the battery from improper charging conditions.
Do not connect a phone, USB device, or small electronics directly to the raw generator output. The voltage may fluctuate and damage sensitive devices.
Use proper polarity:
- Positive to positive
- Negative to negative
Verify everything with a multimeter before connecting the battery.
Step 4: Add the Fuse and Meter
Install the main fuse near the battery positive terminal. This helps protect the wiring if a short circuit occurs.
Add a voltmeter or battery monitor where it is easy to see while testing. A meter helps you understand whether the battery is charging and whether the system is behaving normally.
Useful labels include:
- Generator input
- Charge controller
- Battery
- Main fuse
- USB output
- 12V output
- Positive
- Negative
During an outage, labels reduce confusion and mistakes.
Step 5: Add USB or 12V Outputs
Install a USB adapter or 12V socket for small devices. These outputs should be connected through proper fuse protection and should match the devices you plan to use.
Good small loads include:
- Phone charger
- LED light
- Small USB fan
- Radio charger
- Rechargeable flashlight charger
- AA or AAA battery charger
Avoid high-watt devices. A pedal-powered charging station is best for topping up small essentials, not running appliances.
Step 6: Pedal and Test
Start pedaling at a steady, comfortable cadence. Do not sprint. The goal is stable charging, not maximum speed.
Watch the voltmeter or battery monitor. Test with a small load only after confirming the battery and controller are working properly.
During the first test, check for:
- Hot wires
- Slipping roller
- Loose brackets
- Unusual smells
- Sparks
- Inverter or controller errors
- Battery movement
- Wheel wobble
Stop immediately if anything looks unsafe.
What Can This System Actually Power?
A pedal-powered 12V charging station is best for low-power essentials. It can help keep small devices running during an outage, but it will not replace normal household electricity.
Good uses include:
- Charging phones
- Running LED lights
- Charging radios
- Topping up a small 12V battery
- Running a small USB fan
- Charging small battery packs
Poor uses include:
- Space heaters
- Electric kettles
- Refrigerators
- Microwaves
- Toasters
- Hair dryers
- Air conditioners
- High-watt power tools
If a device creates heat, it usually uses far too much power for this kind of system.
Best Practices
To make the station safer and more useful:
- Use a comfortable steady cadence instead of sprinting.
- Start with small load tests first.
- Match the charge controller to the exact battery chemistry.
- Keep wiring short, neat, and secure.
- Label outputs and switch positions.
- Secure the bike and battery before use.
- Keep the generator aligned with the wheel.
- Use proper fuses for each circuit.
- Store the system in a dry place.
- Test it before storm season.
A simple, reliable setup is better than a complicated one that is difficult to troubleshoot.
Common Mistakes to Avoid
Mistake 1: Skipping the Charge Controller
Raw generator output can fluctuate. A charge controller or charging module helps regulate power before it reaches the battery.
Mistake 2: Connecting Devices Directly to the Generator
Phones and other electronics should not be connected directly to unregulated generator output. Use the battery and regulated USB or 12V outputs.
Mistake 3: Forgetting Fuse Protection
A fuse near the battery positive terminal is a basic safety feature. Do not skip it.
Mistake 4: Using the Wrong Battery Settings
AGM and LiFePO4 batteries have different charging needs. Use charging equipment matched to the battery chemistry.
Mistake 5: Letting Cables Touch Moving Parts
Keep all wires away from the wheel, chain, belt, roller, and pedals.
Mistake 6: Expecting Too Much Power
Pedal power is limited. Use it for small emergency loads only.
Maintenance Checklist
Check the station regularly so it is ready when needed.
Before use:
- Check bike stability.
- Inspect the stand.
- Check generator alignment.
- Inspect wiring.
- Confirm fuse condition.
- Check battery charge.
- Make sure cables are away from moving parts.
- Test USB output with a small device.
After use:
- Let components cool.
- Check for loose brackets.
- Recharge or rest the battery as needed.
- Store in a dry location.
- Record any issues to fix before next time.
A charging station is only helpful if it works before the emergency starts.
Output and Uses
A DIY pedal-powered 12V charging station can support:
- Phone charging
- LED room lighting
- Radio and communications backup
- Small USB fan use
- Battery top-up during a blackout
- Cabin or bug-out power support
- Off-grid learning and preparedness practice
It is a practical small-load charging system, not a full backup power solution.
Final Thoughts
A DIY pedal-powered 12V charging station is a useful emergency project for anyone interested in blackout readiness, off-grid power, or human-powered backup charging. It turns a bicycle into a small charging source for essential devices when fuel, sunlight, or grid power may not be available.
The build is straightforward: secure the bike, mount the generator, wire through a charge controller, protect the battery with a fuse, add a monitor, install small-load outputs, and test everything carefully.
The most important rule is to keep it safe and realistic. Fuse it, regulate it, keep loads small, and pedal safely. Used correctly, this station can help keep phones, lights, radios, and small devices powered when they matter most.
Frequently Asked Questions
Can this charge a phone directly?
It is better not to connect a phone directly to the generator. Use a battery and regulated USB output so the phone receives stable power.
Can it power a refrigerator?
No. This type of setup is for small loads only, such as phones, LED lights, radios, and small USB fans.
What kind of motor works best?
A permanent-magnet DC motor or small generator is commonly used. It should be matched to your desired voltage, charging controller, and pedaling setup.
Do I need a battery?
A battery makes the power more stable and useful. It stores energy so devices are not depending directly on uneven pedaling.
Do I need a fuse?
Yes. A main fuse near the battery positive terminal is an important safety feature.
Can I use a car battery?
A regular car starting battery is not ideal for deep cycling. A deep-cycle AGM or LiFePO4 battery is usually more suitable, with a matching charger/controller.
How fast should I pedal?
Use a steady, comfortable cadence. Sprinting can create unstable output, more wear, and safety problems.
What should I use this for during a blackout?
Use it for small essentials: phones, LED lights, radios, rechargeable batteries, and small USB fans.