When the power is out or a water line stops working, every available container suddenly becomes important.
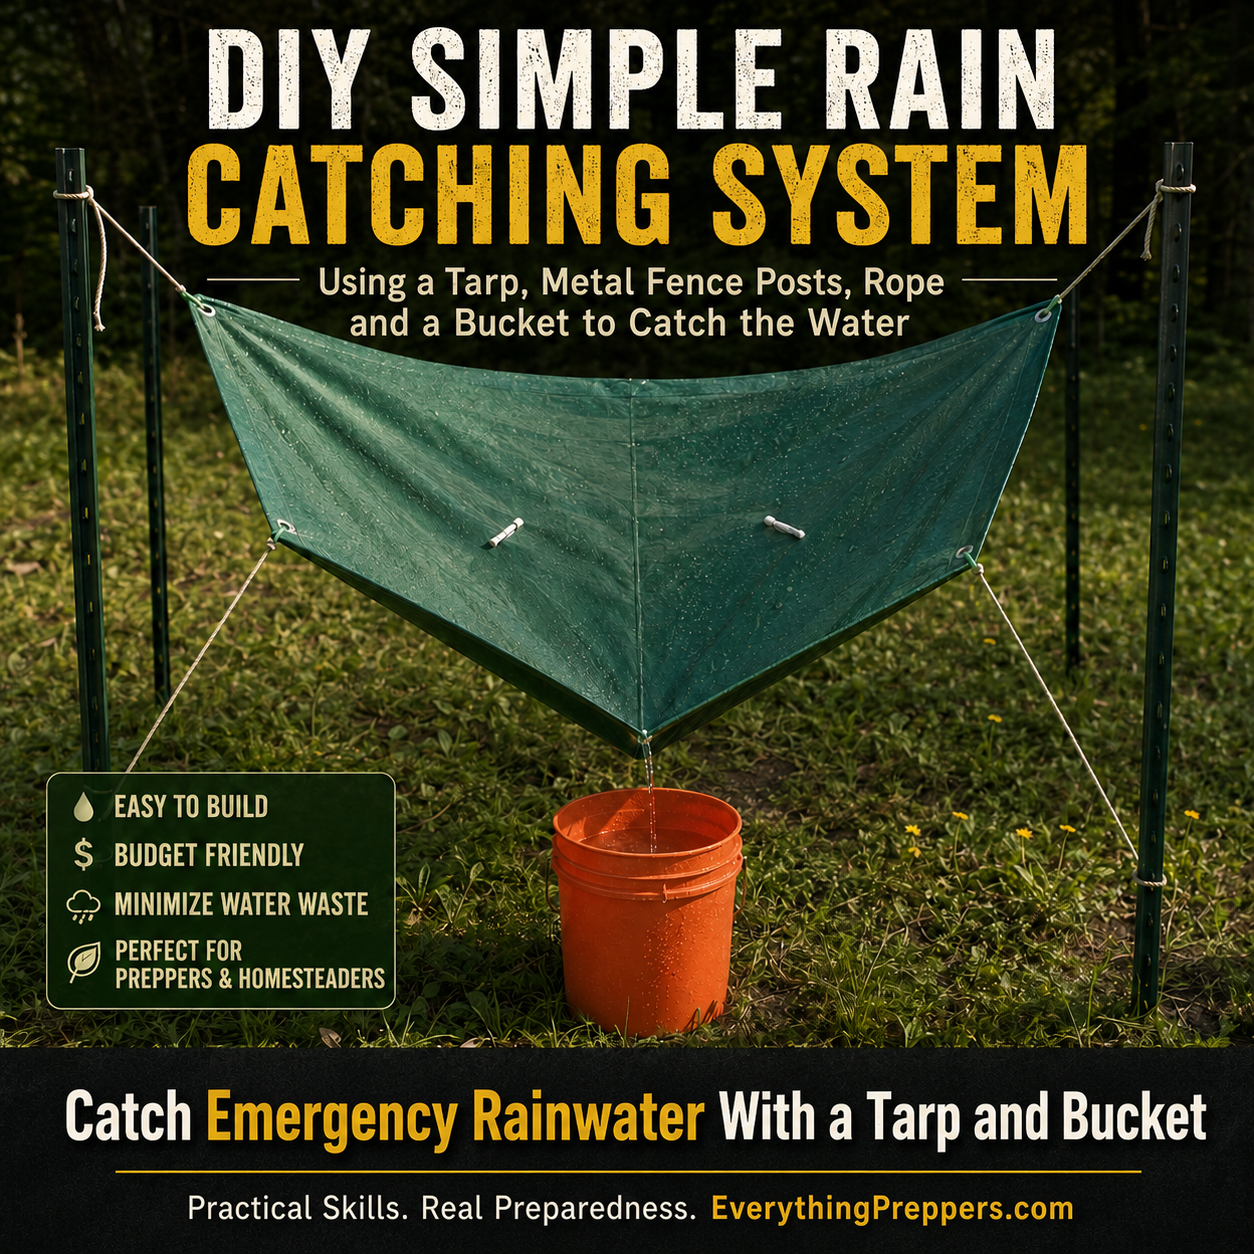
A clean tarp can provide a much larger collection surface than an open bucket. By suspending the tarp between four posts and creating a low point in the center, rainfall can be directed into a covered container without gutters, pumps, or permanent construction.
This simple system is useful for collecting water for:
- Flushing toilets
- Washing tools
- Cleaning outdoor equipment
- Watering non-edible plants
- Emergency sanitation
- Supplying a gravity-fed hand-washing station
- Reducing reliance on stored drinking water for non-drinking tasks
The project can be assembled from basic hardware-store materials and taken down after the storm.
However, collected rainwater should not automatically be considered drinking water. Rain can collect dust, smoke particles, animal waste, chemicals, and contamination from every surface it touches. Even water that looks perfectly clear can contain harmful germs or chemicals. (CDC)
For the safest use, treat this as a temporary non-potable rainwater collector unless the system uses suitable water-contact materials and the collected water is properly tested and treated.
How the Tarp Catchment Works
The design uses gravity rather than mechanical equipment.
Four posts support the corners of a waterproof tarp. Three corners are held relatively high, while the collection area is allowed to sag slightly toward a controlled low point.
Rain striking the tarp moves toward that low point and drains into a bucket or larger storage container below.
The system has five basic components:
- Collection surface: the tarp
- Support structure: four posts
- Tension system: rope or straps
- Drainage point: the lowest part of the tarp
- Storage container: a bucket, barrel, or tank
The tarp must have enough slope for water to move, but not so much slack that a large, uncontrolled pool forms in the center.
How Much Water Can a Tarp Collect?
The theoretical collection formula is:
Collection area in square feet × rainfall in inches × 0.62 = gallons
The Department of Energy uses approximately 0.62 as the conversion factor for turning one inch of rain over one square foot into gallons. Real-world output will be lower because of splashing, wind, imperfect positioning, edge runoff, and water remaining on the tarp. (The Department of Energy’s Energy.gov)
Examples for one inch of rain
- A 4-by-6-foot tarp has 24 square feet of area and could theoretically receive about 15 gallons.
- A 6-by-8-foot tarp has 48 square feet and could receive about 30 gallons.
- An 8-by-10-foot tarp has 80 square feet and could receive nearly 50 gallons.
That means a five-gallon bucket beneath an 8-by-10-foot tarp could theoretically overflow after only about one-tenth of an inch of rain.
Use a larger container, several interchangeable buckets, or a controlled overflow route when heavy rain is expected.
Do not allow overflowing water to undermine the posts, flood a building foundation, or create a muddy walking hazard.
Materials
Collection surface
- One clean, waterproof tarp
- Reinforced corner grommets
- Dark green, brown, or blue color, optional
- Approximately 6 by 8 feet for a compact system
A new tarp is preferable to one that has been used beneath vehicles, around chemicals, over treated lumber, or on contaminated ground.
A general-purpose hardware-store tarp should not automatically be assumed suitable for drinking-water contact.
Support structure
Choose one option:
- Four metal fence posts
- Four sturdy wooden posts
- Four adjustable canopy poles
- A freestanding pipe frame
- Existing trees or structural supports, when safe and permitted
When using metal T-posts, add protective caps over the sharp tops.
Tension and anchoring
- UV-resistant rope
- Paracord
- Ratchet straps
- Four carabiners, optional
- Ground stakes
- Guy lines
- Rope tensioners
- Extra cord for reinforcing the center drain
Collection container
- Food-grade five-gallon bucket
- Rain barrel
- Covered storage tank
- Tight-fitting lid
- Fine insect screen
- Clean funnel, optional
- Overflow hose, optional
Do not store water in containers that previously held fuel, pesticides, bleach, solvents, oil, or other toxic materials. CDC advises using clean, durable water-storage containers and avoiding containers previously used for toxic chemicals. (CDC)
Tools
- Tape measure
- Post driver or mallet
- Work gloves
- Safety glasses
- Level
- Scissors or utility knife
- Small shovel
- Clean cloth
- Step stool, when necessary
Step 1: Choose a Safe Location
Look for a relatively level outdoor area with open exposure to the sky.
The location should be:
- Away from power lines
- Away from dead branches
- Away from vehicle traffic
- Away from septic systems
- Away from fuel or chemical storage
- Far enough from buildings to avoid foundation flooding
- Close enough to monitor during rain
- Accessible without crossing slippery ground
Avoid setting the tarp directly beneath trees. Leaves, bird droppings, insects, sap, and falling branches can contaminate the water or damage the tarp.
Do not place the collector where runoff from a roof, roadway, driveway, or pesticide-treated surface can enter the bucket.
Rainwater may pick up airborne dust, smoke, and other particles before reaching the tarp. The collection surface, ropes, funnel, and container can add further contamination, so cleaner placement and maintenance improve water quality but do not guarantee potability. (CDC)
Step 2: Determine the Post Layout
Lay the tarp flat on the ground temporarily.
Mark a post location approximately 12 to 24 inches beyond each corner. Leaving space between the tarp and posts creates room for ropes, tension adjustments, and guy lines.
For a 6-by-8-foot tarp, the posts might form a rectangle roughly:
- 8 to 10 feet wide
- 10 to 12 feet long
The exact spacing depends on the available rope and how much slope you intend to create.
Do not stretch the tarp completely flat. It must direct water toward a controlled drainage point.
Step 3: Install the Four Posts
Drive each post deeply enough to resist the expected load.
Rainwater is heavy. One gallon weighs about 8.34 pounds, so even a few gallons accidentally pooling on the tarp can place substantial force on the posts, ropes, and grommets. (UA Cooperative Extension)
Check that each post is:
- Firm
- Approximately vertical
- Free of severe rust or cracking
- Positioned away from buried utilities
- Protected by a top cap when sharp
Do not install posts where underground power, gas, water, irrigation, or communication lines may be present.
When the soil is soft, use wider anchors, deeper posts, or a freestanding weighted frame.
Step 4: Attach the Tarp Corners
Tie a separate rope to each corner grommet.
A carabiner between the rope and grommet makes the tarp easier to remove and reduces repeated wear from tying knots directly through the opening.
Attach the ropes to the posts loosely at first.
Raise the tarp high enough that:
- The bucket fits beneath it
- The lowest area remains above the container
- People do not walk into the ropes
- The fabric does not touch the ground
- Water cannot splash from soil back onto the tarp
Do not apply full tension yet.
Step 5: Create the Collection Slope
Raise three corners slightly higher than the fourth, or create a controlled low point near the center.
The simplest arrangement is:
- Two rear corners highest
- Two front corners slightly lower
- Drain point between the two lower corners
Another option is a center-drain configuration, where all four corners remain high and the middle is drawn downward gently.
The goal is a smooth funnel shape.
Avoid:
- Large flat sections
- Deep uncontrolled pockets
- Sharp folds
- Water flowing toward a grommet
- Excessive stress on one corner
- A drain point directly touching the bucket
Pour a small amount of clean water onto the tarp to test the direction of flow.
Adjust the corner heights until water moves naturally toward the intended outlet.
Step 6: Make a Controlled Drain Point
There are several ways to direct water from the tarp into the bucket.
Method 1: Folded corner
Position one tarp corner lower than the other three.
Allow the corner to act as a spout and direct the runoff into a wide funnel or screened bucket opening.
This is the least complicated design and does not require cutting the tarp.
Method 2: Smooth center funnel
Place a clean, smooth ball or rounded object beneath the middle of the tarp.
Tie a loop around the fabric from underneath to form a downward collection point.
Do not use sharp objects that could puncture the tarp.
The gathered point can be positioned above a funnel or screen.
Method 3: Purpose-made drain fitting
A reusable system can include a rain-tarp drain fitting designed to clamp around an opening.
Follow the fitting manufacturer’s instructions and reinforce the area to prevent tearing.
Cutting a hole without reinforcement can cause the tarp to split under the weight of moving water.
For a first project, the folded-corner method is the easiest and safest.
Step 7: Prepare the Bucket
Wash the collection container with detergent and clean water. Rinse it completely and allow it to dry.
Place fine insect screen across the opening.
Secure the screen with:
- The bucket’s lid ring
- A bungee cord
- A large clamp
- A fitted screened lid
The screen helps keep out:
- Leaves
- Insects
- Tarp fragments
- Large debris
- Mosquitoes
CDC recommends screening collection openings or emptying rain barrels regularly to reduce mosquito breeding. It also recommends keeping catchment systems clean and repairing damaged parts. (CDC)
Do not let the tarp or drain spout touch the stored water.
That contact can transfer dirt from the tarp into the container and create a route for insects.
Step 8: Add an Overflow Route
A tarp can fill a bucket much faster than expected.
For a basic setup, keep a second clean bucket ready. Replace the first container before it overflows.
For a more developed system, install a bulkhead fitting near the top of the collection barrel and connect an overflow hose.
Route overflow:
- Away from the posts
- Away from the building
- Away from septic or well components
- Toward a safe drainage area
- Where it will not erode soil
- Where it cannot create a slipping hazard
Do not seal a storage barrel without a screened vent. Air must escape as water enters.
Step 9: Rinse the Collection Surface
A tarp stored in a shed or emergency kit can accumulate dust, insects, odors, and debris.
Before collecting water:
- Shake off loose debris.
- Wash the tarp with clean water when possible.
- Rinse away any cleaning product.
- Allow the first rainfall to wash the surface.
- Direct that first runoff away from the storage container.
- Move the bucket into position after the initial rinse.
CDC recommends a first-flush diverter for rainwater systems because the earliest runoff often carries the greatest concentration of dirt, germs, and chemicals. A temporary tarp has no automatic diverter, but discarding its first runoff follows the same risk-reduction principle. (CDC)
This step improves water quality but does not make the water safe to drink.
Step 10: Monitor the System During Rain
Do not leave a temporary tarp collector unattended during a severe storm.
Check for:
- Water pooling
- Ropes becoming loose
- Posts leaning
- Grommets stretching
- Bucket overflow
- Tarp flapping
- Wind lifting the frame
- Drainage washing soil from the posts
A large tarp behaves like a sail in strong wind.
Lower or dismantle it before severe winds, thunderstorms, hail, or tropical weather. Do not attempt to adjust the structure while lightning is nearby.
Never stand beneath a tarp holding a large pool of water.
When pooling begins, move away and release the water from a safe position after conditions improve.
Recommended Uses for the Collected Water
The lowest-risk uses are those that minimize the chance of swallowing the water.
Suitable non-potable uses may include:
- Flushing toilets
- Washing tools
- Cleaning muddy footwear
- Rinsing outdoor equipment
- Supplying a camp-style hand-washing station
- Watering ornamental plants
- Initial cleaning of dirty outdoor surfaces
- Fire-control reserve where appropriate
CDC recommends limiting untreated rainwater to activities that reduce the likelihood of swallowing it, such as watering non-edible plants or washing objects not used for food preparation. It recommends public tap water or bottled water for drinking, cooking, brushing teeth, rinsing produce, and watering food plants whenever possible. (CDC)
Label every untreated-rainwater container:
UNTREATED RAINWATER — DO NOT DRINK
Keep it separate from stored drinking water.
Mixing untreated rainwater with previously treated tap or bottled water can contaminate the entire supply. (CDC)
Can You Drink the Collected Rainwater?
Not directly.
Rainwater can contain microorganisms and chemicals even when it appears clear and has no unusual odor. Contamination may come from the air, tarp, ropes, funnel, storage container, insects, animals, hands, or nearby activities. (CDC)
During an emergency, CDC lists rainwater as a possible outside source that may be made safer through appropriate treatment. It must first be protected from obvious chemical contamination and treated to address harmful germs. (CDC)
Important limitations include:
- Boiling can kill germs but does not remove harmful chemicals.
- Many portable filters do not remove viruses.
- A sediment filter only removes particles unless it has additional validated treatment claims.
- Water contaminated by fuel, toxic chemicals, or radioactive material cannot be made safe by ordinary boiling, disinfection, or portable filtration. (CDC)
For drinking, cooking, infant formula, brushing teeth, or washing food, use bottled water or an officially approved source whenever possible.
When rainwater must be used, follow current CDC and local health-department treatment instructions. Long-term potable rainwater systems should use suitable collection materials, first-flush control, filtration, disinfection, testing, and professional design appropriate to local requirements. (US EPA)
Storage and Handling
Transfer collected water into a covered container promptly.
The container should be:
- Clean
- Durable
- Labeled
- Protected from sunlight
- Protected from animals
- Kept away from chemicals
- Closed against insects
- Easy to inspect and empty
Do not reach into the water with hands, cups, or dirty tools.
Use a spigot or clean pouring method instead.
For temporary non-potable storage, rotate the water regularly rather than leaving it stagnant indefinitely. Empty and scrub the container when slime, odor, sediment, algae, insect activity, or discoloration appears.
Never top off an old contaminated batch with new rainwater.
Empty, clean, and refill the container.
Cleaning the System
After each storm
- Remove leaves and debris.
- Empty water trapped in tarp folds.
- Check the ropes and grommets.
- Wash the screen.
- Close the storage container.
- Inspect the water for sediment or odor.
- Correct any erosion around the posts.
Before storage
- Drain the tarp completely.
- Wash off dirt.
- Allow it to dry on both sides.
- Clean the ropes and clips.
- Dry the bucket.
- Repair damaged grommets.
- Store everything away from chemicals and rodents.
Do not fold and store a wet tarp.
Trapped moisture encourages mildew and can make the collector unsuitable for future water use.
Common Mistakes
Using a contaminated tarp
A tarp previously used beneath a vehicle, around treated lumber, or near chemicals should not become a water-collection surface.
Use a dedicated clean tarp.
Stretching it completely flat
A flat tarp collects pools rather than directing water.
Create a deliberate slope.
Allowing too much sag
A deep pocket can hold dozens of gallons and overload the ropes, posts, and grommets.
The center should funnel water—not become a suspended pond.
Using only a five-gallon bucket
A moderate tarp can collect far more than five gallons during a short storm.
Prepare overflow capacity.
Leaving the bucket uncovered
Open water attracts insects and collects debris.
Use a screened inlet and covered storage.
Calling the water clean because it is rain
Rainwater can contain harmful germs and chemicals before and after it reaches the collection system. (CDC)
Mixing it with stored drinking water
One addition of untreated water can contaminate the entire container.
Keep untreated and treated supplies separate.
Depending on boiling for chemical contamination
Boiling does not remove harmful chemicals and can sometimes concentrate nonvolatile contamination as water evaporates. Use another source when fuel or chemical contamination is suspected. (CDC)
Leaving the tarp up in strong wind
The collector can behave like a sail and pull posts or anchors loose.
Take it down before severe weather.
Ignoring local rules
Rainwater collection and allowable uses vary by location. CDC recommends checking with state or local environmental and health authorities before establishing a system. (CDC)
Optional Improvements
Add a removable gutter
Attach a clean section of half-round gutter beneath the low edge of the tarp.
The gutter directs water through a screened downspout into a covered barrel.
Add a first-flush container
Route the initial runoff into a small removable jug.
Once the jug fills, redirect later runoff into the main container.
A true automatic diverter requires careful sizing and cleaning, but even a manual first-flush arrangement can reduce debris reaching the storage tank.
Add a sediment sock
Install a washable filter sock at the inlet to capture visible debris.
This is prefiltration only. It does not make water drinkable.
Add a covered rain barrel
A 30- to 55-gallon barrel provides much greater capacity than a bucket.
Use:
- Screened inlet
- Secure lid
- Overflow pipe
- Low spigot
- Stable base
- Child-resistant access
A full 55-gallon barrel weighs more than 450 pounds, so it requires a solid, level foundation.
Add quick-release corners
Carabiners and rope tensioners allow the tarp to be lowered quickly when strong wind is forecast.
Add measurement marks
Mark the bucket or barrel at one-gallon intervals.
This helps you measure actual collection and compare it with the theoretical estimate.
Add a non-potable supply hose
A spigot and short hose can feed:
- A hand-washing station
- A toilet-flushing bucket
- A garden watering can
- An equipment-cleaning area
Prevent any connection between untreated rainwater and household drinking-water pipes.
Is This Project Worth Building?
Yes—especially as a temporary source of utility water.
Its advantages include:
- No electricity
- No permanent gutter system
- Low material cost
- Fast setup
- Large collection area
- Easy disassembly
- Useful non-potable water during outages
- Adjustable capacity
- Practical preparedness training
Its limitations are equally important:
- The tarp can fail in wind.
- A small bucket can overflow quickly.
- Collected water may contain germs or chemicals.
- General-purpose tarp materials may not be suitable for potable use.
- The system requires cleaning and supervision.
- Collection may be restricted locally.
- Rain is unpredictable.
- It cannot replace stored drinking water.
Build and test the system before an emergency.
Use a garden hose to simulate light rain.
Watch where the water pools.
Measure how quickly the bucket fills.
Practice lowering the tarp.
Then dry and store the complete kit together.
Final Safety Note
This project is best used to collect non-potable utility water.
Do not assume rainwater is safe to drink because it looks clear. Use bottled, treated public water, or another approved supply for drinking and food preparation whenever possible.
Keep untreated rainwater separate from potable water. Never collect runoff exposed to fuel, pesticides, toxic chemicals, sewage, or floodwater. Ordinary boiling and disinfection cannot make chemically contaminated water safe.
Use protective caps on metal posts, anchor the frame securely, monitor it during rainfall, and dismantle it before high winds or severe weather.