An old cooler can be useful long after its final camping trip.
The thick insulated walls, tight lid, carrying handles, and washable interior make it a convenient container for emergency food, especially when pantry space is limited.
With a few removable dividers, sealed containers, labels, and a simple inventory system, an unused cooler can become a compact preparedness box for:
- Canned foods
- Packaged dry goods
- Emergency meal ingredients
- Water-treatment supplies
- Cooking essentials
- Short-term refrigerated food during an outage
- A portable evacuation food kit
But there is one important fact to understand before beginning:
An empty cooler does not refrigerate food.
Insulation slows heat transfer, but it does not create cold. Without ice, frozen gel packs, or another cold source, the inside will eventually reach approximately the same temperature as the surrounding room.
The best way to use this project is to choose one of two clearly defined purposes:
- A dry emergency pantry box
- An iced emergency cold-food cooler
Do not confuse the two.
What This Project Actually Does
In dry-storage mode, the cooler acts as a portable, pest-resistant cabinet for shelf-stable food. Its insulation can reduce rapid temperature swings, while the lid helps protect sealed packages from dust, insects, and accidental damage.
In cold-storage mode, the cooler holds ice or frozen packs around refrigerated food. Perishable food must remain at 40°F or below to be kept safely cold. A thermometer—not touch, smell, or guesswork—is the reliable way to check the temperature. (U.S. Food and Drug Administration)
The conversion does not require cutting the cooler apart. In fact, keeping the body intact preserves its insulation and makes it possible to return the unit to ordinary cooler use later.
First Decide How You Will Use It
Option 1: Dry emergency pantry
This is the best everyday use.
The box can hold shelf-stable foods such as:
- Commercially canned foods
- Properly home-canned jars
- Rice, pasta, and oats in sealed containers
- Dry beans and lentils
- Crackers
- Powdered drink mixes
- Shelf-stable milk
- Nut butter
- Cooking oil
- Salt, sugar, and seasonings
- Ready-to-eat emergency meals
- Can openers and basic utensils
Use this mode only in a cool, dry location.
Option 2: Temporary cold-food storage
During a power outage, remove the dry supplies and add:
- Block ice
- Bagged ice
- Frozen water bottles
- Frozen gel packs
- A refrigerator thermometer
- Sealed perishable-food containers
USDA guidance recommends transferring refrigerated food to a cooler with sufficient ice or frozen gel packs when an outage lasts longer than approximately four hours. The cooler must remain at or below 40°F, and more ice should be added as it melts. (Food Safety and Inspection Service)
Do not combine the modes carelessly
Melting ice creates moisture that can damage:
- Paper packages
- Cardboard boxes
- Can labels
- Metal lids
- Dry ingredients
- Wooden dividers
When the cooler is used for cold storage, place food in watertight containers and remove any wooden pantry insert that cannot be washed and dried immediately.
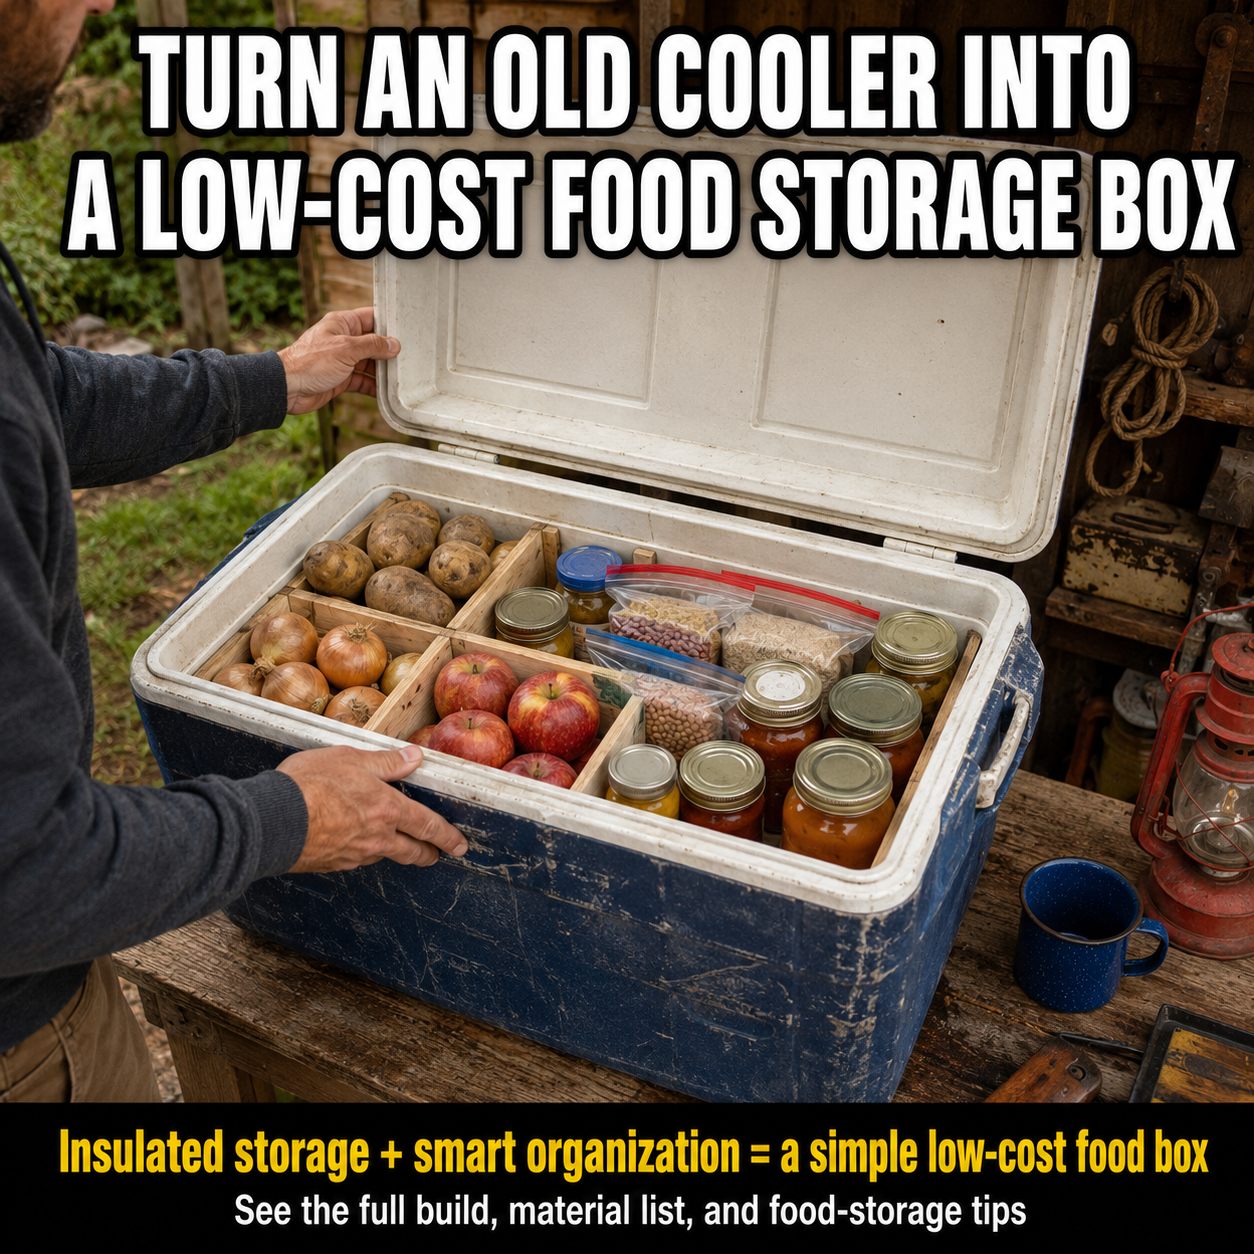
A Warning About the Foods Shown in the Image
The image is visually appealing, but potatoes, onions, apples, home-canned jars, and dry packages should not all be stored loose together inside a tightly closed cooler.
Potatoes and dry onions require a cool, dark, well-ventilated environment. Apples and other ripening fruit can release ethylene, which may encourage sprouting or quality loss in certain vegetables. Extension guidance recommends keeping potatoes away from apples and storing dry onions loosely in a mesh bag or another ventilated arrangement. (Utah State University Extension)
A closed cooler is generally better for sealed shelf-stable packages than for long-term loose-produce storage.
Use separate ventilated crates for potatoes, onions, garlic, and apples.
Materials
Basic storage-box conversion
- One structurally sound hard-sided cooler
- Warm water
- Dish detergent
- Clean cloths or soft brushes
- Removable plastic baskets
- Small sealed food containers
- Adhesive labels
- Permanent marker
- Inventory sheet
- Battery-free dial thermometer or digital thermometer
- Nonslip drawer liner, optional
- Moisture-resistant shelf liner, optional
For a removable divider
Choose one of these:
- Thin untreated wood
- Sealed plywood strips
- Food-safe plastic cutting-board material
- Corrugated plastic sheet
- Washable plastic baskets
Plastic is generally easier to wash and sanitize than wood.
When using wood, it should be:
- Clean
- Dry
- Smooth
- Free of mold
- Free of pressure treatment
- Free of oil or chemical contamination
- Removable from the cooler
Food should remain in its own packaging or container rather than touching the wood directly.
Useful emergency additions
- Manual can opener
- Measuring cup
- Plastic utensils
- Waterproof matches in a separate safe container
- Small flashlight
- Water-resistant inventory card
- Food thermometer
- Refrigerator thermometer
- Disposable gloves
- Trash bags
Do not place fuel, stove canisters, pesticides, medicines, cleaners, or batteries in the same cooler as food.
Step 1: Inspect the Old Cooler
Do not assume every discarded cooler is suitable for food storage.
Open it and inspect:
- Interior walls
- Drain plug
- Lid seal
- Hinges
- Handles
- Bottom
- Exterior seams
Reject the cooler when it has:
- Deep cracks that cannot be cleaned
- Persistent mold
- Animal contamination
- Unknown chemical residue
- Fuel or pesticide odor
- A badly damaged drain
- Crumbling insulation
- A lid that cannot close securely
Never repurpose a cooler that previously held gasoline, pesticides, paint thinner, solvents, industrial chemicals, or unidentified liquids.
Food packaging can leak or become damaged, so the interior environment must be suitable for accidental food contact.
Step 2: Clean and Sanitize It
Remove loose debris.
Wash the entire interior, lid, gasket, drain, and handles using warm water and detergent. Pay particular attention to seams and the area beneath the lid seal.
Rinse thoroughly.
USDA guidance for food-contact surfaces permits sanitizing with a solution made from one tablespoon of unscented liquid chlorine bleach in one gallon of water. Apply the solution to already-clean surfaces and allow the cooler to air-dry completely. Never mix bleach with ammonia, vinegar, acids, or other cleaners. (Food Safety and Inspection Service)
Follow the bleach manufacturer’s label because product concentrations can differ.
Do not load food while the cooler is damp or while it retains a strong chemical odor.
Step 3: Remove Persistent Odors
An old cooler may smell stale even after washing.
After it has been cleaned:
- Leave the lid open in a ventilated location.
- Allow the interior to dry completely.
- Place a shallow open container of baking soda inside.
- Close it for a day or two.
- Remove the baking soda and air the cooler again.
Do not attempt to cover a fuel, solvent, pesticide, or mold odor with fragrance.
When an unidentified odor remains after repeated cleaning and airing, retire the cooler from food use.
Step 4: Measure the Interior
Measure:
- Interior length
- Interior width
- Depth at the center
- Depth near the sloped walls
- Space taken by the lid
- Space around the drain
Cooler interiors often taper toward the bottom.
Measure at both the top and base before building a rectangular divider. A grid that fits the upper opening may become stuck halfway down.
Leave enough clearance to lift the complete insert out using both hands.
Step 5: Plan the Compartments
A simple three-zone arrangement works well.
Zone 1: Heavy canned foods
Place this section near the bottom or close to the wheels when using a rolling cooler.
Suitable items include:
- Canned beans
- Canned vegetables
- Canned meat
- Soup
- Fruit
- Pasta sauce
Keep heavier containers low so they cannot crush lighter packages.
Zone 2: Dry ingredients
Use sealed bins or heavy zipper bags for:
- Rice
- Pasta
- Oats
- Lentils
- Powdered foods
- Crackers
- Seasonings
Original paper and cardboard packaging offers little protection from moisture or pests.
Zone 3: Ready-to-eat supplies
Keep frequently needed items together:
- Energy bars
- Nut butter
- Shelf-stable snacks
- Disposable utensils
- Manual can opener
- Meal-plan card
This section should remain accessible without unloading the entire box.
Step 6: Make a Removable Divider
The easiest design uses two interlocking panels.
Measure and cut
Cut one panel to run lengthwise through the cooler and another to run across it.
Make both panels slightly smaller than the internal dimensions so they can be removed without scraping the walls.
Cut a slot halfway through the center of each panel:
- Slot downward from the top of one
- Slot upward from the bottom of the other
Slide the slots together to create a cross-shaped divider.
Smooth the edges
Sand all wooden edges.
Round sharp corners so they cannot puncture bags or scratch the cooler liner.
Test the fit
Lower the empty divider into the cooler.
It should:
- Sit securely
- Remain upright
- Avoid blocking the drain
- Lift out without tools
- Leave space for baskets
- Avoid excessive pressure on the insulated walls
Do not drive screws through the cooler.
Puncturing the interior shell can expose insulation, introduce moisture, and reduce thermal performance.
Step 7: Add a Raised Bottom
A removable raised floor prevents containers from sitting directly in small spills or condensation.
Use:
- A plastic refrigerator shelf
- A rigid plastic grid
- A dishwasher-safe cooling rack
- A slatted removable platform
- Several low plastic risers
Leave access to the drain plug.
Do not use cardboard as a permanent base. It absorbs moisture and can support mold.
Step 8: Add a Thermometer
Even in dry-pantry mode, a thermometer is useful.
Place it where it can be read shortly after opening the lid.
Properly canned and dried foods maintain their best quality in a cool, dark, dry environment. The National Center for Home Food Preservation recommends approximately 50°F to 70°F for best quality and advises against storing home-canned jars above 95°F, near heating equipment, in uninsulated attics, or in direct sunlight. (Home Food Preservation)
The cooler should therefore be kept:
- Indoors
- Out of direct sun
- Away from furnaces
- Away from water heaters
- Away from hot pipes
- Away from ovens
- Above damp basement floors
A cooler left inside a hot vehicle, outdoor shed, or sunny garage can become a heat-storage box rather than a food-protection box.
Step 9: Repackage Vulnerable Dry Goods
Move foods from weak packaging into tightly sealed food-storage containers.
Good candidates include:
- Rice
- Beans
- Pasta
- Oats
- Sugar
- Salt
- Powdered milk
- Crackers
- Dry soup mixes
Label each container with:
- Food name
- Purchase date
- Best-by date
- Preparation instructions
- Required water amount
- Allergen information when relevant
Do not mix a new product into an older partially filled container unless both are checked and the older food remains in good condition.
Use the oldest supply first.
Step 10: Inspect Cans Before Loading
Do not store cans that are:
- Bulging
- Swollen
- Leaking
- Heavily rusted
- Deeply dented
- Damaged along a seam
- Sticky from an unknown leak
USDA advises discarding swollen cans and avoiding containers that are bulging, leaking, badly rusted, or deeply dented. (Food Safety and Inspection Service)
Wipe clean cans before placing them inside.
Do not allow metal cans to remain in standing water. Moisture can damage labels and encourage corrosion.
Keep an inventory so old cans do not disappear beneath newer supplies.
Step 11: Store Home-Canned Jars Correctly
Only store jars that were prepared using current, research-tested canning methods.
A vacuum-sealed lid alone does not prove that food was processed safely. The heat required to create a lid vacuum may be far lower than the heat needed to destroy dangerous microorganisms in improperly canned food. (Home Food Preservation)
Before storage:
- Confirm that the lid is properly sealed.
- Remove ring bands when using standard two-piece lids.
- Wash residue from the jar and lid.
- Dry everything thoroughly.
- Label the contents and date.
- Place jars upright.
- Protect jars from impact.
The lid should be slightly concave. A flat, springing, or bulging center may indicate a failed seal. (Home Food Preservation)
Use padded dividers so glass jars cannot strike one another when the cooler is moved.
Do not stack heavy cans directly on glass lids.
Foods That Work Well in Dry-Storage Mode
The strongest candidates are foods that require no refrigeration before opening.
Examples include:
- Commercial canned vegetables
- Canned beans
- Canned fruit
- Canned chicken or tuna
- Shelf-stable soup
- Peanut or seed butter
- Rice
- Pasta
- Oatmeal
- Lentils
- Dry beans
- Powdered milk
- Shelf-stable milk cartons
- Crackers
- Ready-to-eat cereal
- Energy bars
- Dried fruit
- Nuts
- Instant coffee or tea
- Salt
- Sugar
- Honey
- Cooking oil in a sealed bottle
Always check each package’s storage directions.
Some foods that appear shelf-stable must be refrigerated after opening.
Foods That Do Not Belong in a Dry Cooler
Without ice or active refrigeration, do not store:
- Raw or cooked meat
- Poultry
- Seafood
- Milk
- Refrigerated cheese
- Eggs
- Cooked rice
- Cooked beans
- Leftovers
- Cut melon
- Opened canned food
- Prepared salads
- Temperature-sensitive medicines
- Refrigerated sauces
Cold perishable food must stay at or below 40°F. Food should generally not remain above 40°F for more than two hours, or more than one hour when the surrounding temperature is above 90°F. (Food Safety and Inspection Service)
A closed lid does not make warm food safe.
Why Loose Potatoes and Onions Are a Poor Fit
Potatoes and onions need airflow.
Potatoes should generally remain:
- Unwashed
- Dark
- Cool
- Dry
- Well ventilated
Light can cause potatoes to turn green, while trapped moisture encourages deterioration. Dry onions should be stored loosely in mesh or another ventilated container in a cool, dry place away from sunlight. (OSU Extension Service)
A sealed cooler can trap moisture from fresh produce.
This may create:
- Condensation
- Mold
- Sprouting
- Softening
- Odor
- Rot spreading between items
A better setup uses separate ventilated crates or mesh bags outside the cooler.
Why Apples Should Be Stored Separately
Ripening fruit can affect nearby produce.
Ethylene released by fruit may cause potatoes to sprout and can reduce the quality of certain stored vegetables. Apples can also absorb strong odors from onions and potatoes. (OSU Extension Service)
Do not pack apples, onions, and potatoes tightly together simply because the compartments look organized.
Preparedness storage must protect food quality, not just create an attractive photograph.
Turning It Into a Cold-Food Cooler During an Outage
When refrigeration fails, the same container can become an iced emergency cooler.
Empty and clean it
Remove:
- Dry food
- Paper labels
- Wooden dividers
- Inventory cards
- Moisture-sensitive supplies
Clean and dry the interior.
Prechill the cooler
When warning time is available, cool the empty interior using frozen water bottles or ice packs before adding food.
Add a thermometer
Keep an appliance thermometer inside.
Do not rely on whether the food “feels cold.”
Pack cold food directly from the refrigerator
Use food that is already refrigerated or frozen.
USDA recommends packing perishable food directly from the refrigerator or freezer and monitoring the cooler to ensure it remains at or below 40°F. (Food Safety and Inspection Service)
Use generous cold material
Surround food with:
- Block ice
- Frozen gel packs
- Frozen water bottles
- Bagged ice in sealed bags
A full cooler generally retains cold better than one containing large empty spaces.
Keep raw food separated
Seal raw meat, poultry, and seafood so their juices cannot contaminate foods that will be eaten without cooking.
Open it as little as possible
Plan meals before lifting the lid.
Keep drinks in a separate cooler when possible because the drink cooler is likely to be opened repeatedly.
Add ice as needed
When the thermometer approaches 40°F, add more ice or move food to another reliable cold source.
What to Do When the Temperature Rises
Do not use appearance or smell to decide whether perishable food is safe.
Food that still contains ice crystals or remains at or below 40°F can generally be refrozen or cooked. Perishable food that has remained warmer than 40°F for more than two hours should be discarded. (U.S. Food and Drug Administration)
When there is uncertainty, discard the food.
Food poisoning is not worth the cost of saving a questionable package.
Create a Simple Emergency Inventory
Tape a waterproof list beneath the lid or keep it in a clear sleeve.
Record:
- Item
- Quantity
- Purchase date
- Best-by date
- Calories or servings
- Water needed for preparation
- Cooking fuel required
- Date rotated
Review the box every three months.
Move foods approaching their dates into the normal kitchen and replace them with newer items.
A preparedness supply should be food the household already understands and will willingly eat.
Build Meals, Not Just a Collection of Ingredients
Plan several complete meals around the contents.
For example:
No-cook meal
- Canned chicken
- Crackers
- Canned fruit
- Shelf-stable milk
Minimal-fuel meal
- Instant rice
- Canned beans
- Salsa
- Seasoning
Breakfast
- Oats
- Powdered milk
- Dried fruit
- Nut butter
Simple soup
- Canned soup
- Crackers
- Shelf-stable fruit cup
Attach the meal list to the inventory.
This reduces decision-making during an outage and helps reveal missing supplies such as water, utensils, or a manual can opener.
Keep Water Needs in Mind
Dry foods can be compact, but many require water.
Rice, beans, pasta, powdered milk, soup mixes, and oatmeal can quickly consume stored water.
Record the preparation water needed for each meal and keep a separate emergency water supply.
Do not plan an entire food box around ingredients that require long cooking times when fuel may also be limited.
Ready-to-eat foods provide flexibility when neither safe water nor cooking equipment is available.
Where to Place the Storage Box
Choose a location that is:
- Cool
- Dry
- Dark
- Indoors
- Easy to inspect
- Above flood level
- Away from chemicals
- Away from rodents
- Away from heat sources
- Accessible during an outage
Avoid:
- Attics
- Hot vehicles
- Sunny balconies
- Damp crawlspaces
- Outdoor sheds in extreme climates
- Garages containing fuel or chemicals
- Areas beneath plumbing likely to leak
Insulation delays temperature change. It cannot protect food indefinitely from a hot or freezing environment.
Cleaning and Maintenance
Every three months
- Empty the cooler.
- Check dates.
- Inspect cans for rust or swelling.
- Inspect jars and seals.
- Check dry foods for insects.
- Wipe crumbs and dust.
- Examine the drain and gasket.
- Record the internal temperature.
- Rotate older food into kitchen use.
After cold-storage use
- Drain melted ice.
- Wash with detergent and warm water.
- Rinse.
- Sanitize when needed.
- Air-dry completely.
- Wash and dry removable baskets.
- Inspect wooden dividers for mold or swelling.
- Reassemble only when every part is dry.
Store the empty cooler with the lid slightly open when practical to prevent trapped odors.
Common Mistakes
Calling it a refrigerator
Without ice or another cold source, it does not refrigerate food.
Use “insulated food-storage box” or “emergency pantry box.”
Storing perishables without a thermometer
Cold food must remain at or below 40°F. Guessing is not enough. (U.S. Food and Drug Administration)
Keeping it in a hot shed
The insulation will eventually warm to the surrounding temperature.
Store canned and dried foods in a cool location.
Mixing loose apples, onions, and potatoes
These foods require different handling and benefit from separation and ventilation. (OSU Extension Service)
Using damp wooden dividers
Wet wood can swell, smell, and develop mold.
Remove and dry it after any ice-cooler use.
Storing paper packages directly on the floor
One spill can damage an entire supply.
Use sealed containers and a raised washable base.
Loading damaged cans
Discard swollen, leaking, badly rusted, or deeply dented containers. (Food Safety and Inspection Service)
Assuming a sealed home-canned jar is safe
Only store home-canned food prepared with a current research-tested method. A seal alone does not establish safety. (Home Food Preservation)
Forgetting a can opener
A box full of canned food is far less useful without a manual opener.
Store one inside and test it.
Optional Improvements
Add color-coded baskets
Use separate baskets for:
- Breakfast
- Lunch
- Dinner
- Snacks
- Cooking supplies
Add a lid organizer
Attach a removable pouch beneath the lid for:
- Inventory cards
- Can opener
- Utensils
- Thermometer
- Marker
Do not puncture the cooler shell with long screws.
Add padded jar cells
Use corrugated plastic or foam dividers to keep glass jars from touching.
Add a rotating stock tray
Place the oldest foods in the front basket and refill from the back.
Add a meal instruction card
List exact quantities of food, water, and fuel needed for each planned meal.
Add an exterior label
Mark the cooler clearly:
EMERGENCY FOOD — DRY STORAGE
When converted to iced use, temporarily relabel it:
PERISHABLE FOOD — KEEP AT OR BELOW 40°F
Add tamper protection
A simple child-resistant strap can prevent young children or pets from opening the container.
Never use a lock that could create an entrapment hazard.
Is This Project Worth Building?
Yes, provided it is used honestly.
An old cooler cannot create refrigeration, and it is not the ideal environment for every type of produce. But it can become a useful, portable, organized container for sealed emergency foods.
The project offers several practical benefits:
- Reuses equipment already owned
- Protects packages from dust and minor spills
- Reduces pantry clutter
- Makes evacuation supplies portable
- Organizes meals instead of random ingredients
- Can be converted to iced storage during an outage
- Provides insulation against rapid temperature changes
- Encourages regular food rotation
The most valuable improvement is not the wooden divider.
It is the system created around it:
- Safe food choices
- Correct temperatures
- Clear labels
- Regular inspection
- Planned meals
- Reliable water
- A tested manual can opener
Build the organizer before an emergency.
Load it with food your household already eats.
Prepare at least one complete meal from it.
Then adjust the contents based on what you actually needed.
Final Safety Note
An old cooler used without ice is an insulated pantry box—not a refrigerator.
Keep shelf-stable foods in a cool, dark, dry indoor location. Store potatoes, onions, and apples separately in suitable ventilated conditions rather than packing them together in a sealed cooler.
When using the cooler for perishable food, add sufficient ice or frozen packs and verify with a thermometer that the interior remains at or below 40°F. Discard questionable, leaking, swollen, badly rusted, or improperly stored food.
Never use a cooler that has held fuel, pesticides, solvents, or unidentified chemicals.