A well-stocked pantry is only useful if you can actually manage it. Many people buy canned food for emergencies, then forget what they have, lose cans in the back of the shelf, or discover expired food months later. That is why a simple pantry can rotation rack is such a smart project.
A DIY pantry can rotation rack helps organize canned goods using the “first in, first out” method. New cans are loaded from the back, older cans roll forward, and the oldest can is used first. This keeps your emergency food storage easier to manage, reduces waste, and makes everyday meal planning faster.
This project is useful for preppers, homesteaders, apartment pantries, cabins, small kitchens, and anyone building a more organized food storage system.
What Is a Pantry Can Rotation Rack?
A pantry can rotation rack is a sloped storage shelf designed to move cans forward by gravity. Instead of stacking cans randomly in a cabinet, each lane holds cans in a neat row.
You load newer cans from the rear lane, and the cans roll forward toward the front opening. When you need a can, you take the oldest one from the front first.
This type of rack is helpful for:
- Emergency food storage
- Pantry organization
- First-in, first-out rotation
- Reducing expired food
- Quick access to canned goods
- Small kitchen storage
- Cabin pantry storage
- Bulk grocery organization
The main goal is simple: make food rotation automatic and easy.
Why Food Rotation Matters
Canned food can last a long time, but it still needs to be managed properly. If cans are hidden behind newer groceries, older cans may sit too long and eventually become wasted.
A can rotation rack helps solve this problem by keeping older cans at the front and newer cans at the back.
Good food rotation helps you:
- Use older food first
- Avoid forgotten cans
- Reduce pantry waste
- Find meals faster
- Keep emergency food fresher
- Track what you actually eat
- Avoid overbuying items you do not use
For emergency preparedness, this is important because a pantry should not just be full. It should be usable.
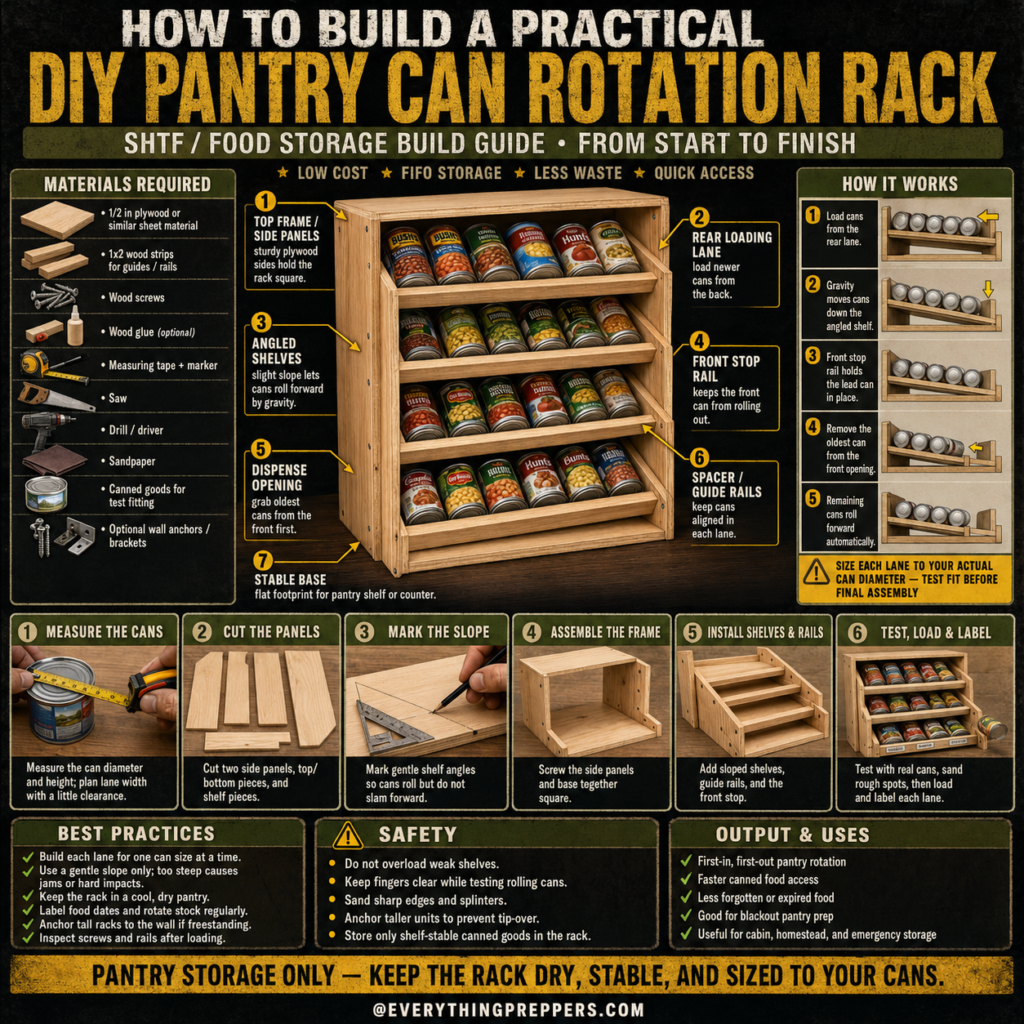
How This Can Rotation Rack Works
The rack uses a simple gravity-fed design.
1. Rear Loading Lane
New cans are loaded from the back of the rack. This keeps newer cans behind the older ones.
2. Angled Shelves
Each shelf has a gentle slope. The slope allows cans to roll forward slowly by gravity.
3. Front Stop Rail
A front rail keeps the first can from rolling out of the rack.
4. Dispense Opening
The oldest can is removed from the front. After one can is taken, the remaining cans roll forward automatically.
5. Guide Rails or Spacers
Small rails help keep cans aligned in each lane so they do not turn sideways or jam.
6. Stable Base
A flat, sturdy base keeps the rack steady on a shelf, counter, pantry floor, or inside a cabinet.
The design is simple, but sizing matters. Each lane should be matched to the can size you actually use.
Materials Needed
This project can be built with basic wood and common tools.
Basic Materials
- 1/2 inch plywood or similar sheet material
- 1×2 wood strips for guides, rails, and stops
- Wood screws
- Wood glue, optional
- Measuring tape
- Marker or pencil
- Sandpaper
- Canned goods for test fitting
- Optional wall anchors or brackets
Tools
- Saw
- Drill or driver
- Square
- Tape measure
- Sandpaper block
- Safety glasses
- Work gloves
Use smooth, sturdy material that can support the weight of canned goods. Cans are heavier than they look, especially when several rows are loaded.
Before You Build: Measure Your Cans
Do not skip this step. Cans come in different diameters and heights, and one rack size will not fit every can perfectly.
Measure the cans you plan to store most often.
Check:
- Can diameter
- Can height
- Label thickness
- Space needed for easy rolling
- Lane width
- Shelf depth
Build each lane for one main can size at a time. For example, soup cans, tuna cans, tomato cans, and large vegetable cans may all need different lane sizes.
A good fit should allow the can to roll freely without turning sideways or getting stuck.
Step-by-Step Build Guide
Step 1: Measure the Cans
Start by measuring the diameter and height of the cans you want to store. Add a small amount of extra clearance so the cans can roll smoothly.
Use real cans for test fitting, not just measurements from memory.
If the lane is too narrow, the cans will jam. If the lane is too wide, the cans may shift sideways.
For best results, choose one common can size for your first rack.
Step 2: Cut the Panels
Cut two side panels, a top piece, a bottom piece, and the shelf pieces. The rack can be built as a small countertop unit or sized to fit inside a pantry shelf.
Keep the design simple for the first version. A small rack is easier to build, test, and adjust.
After cutting, sand rough edges to remove splinters. Smooth edges also help protect labels from tearing.
Step 3: Mark the Slope
Mark gentle shelf angles on the inside of the side panels. The shelves should slope slightly downward toward the front.
Do not make the slope too steep. A steep shelf can cause cans to roll too fast, slam into the front rail, dent cans, or jam.
A gentle slope is usually enough. The goal is controlled movement, not speed.
Before assembling, hold a test can against the slope and make sure it rolls forward smoothly.
Step 4: Assemble the Frame
Attach the side panels to the top and bottom pieces. Keep the frame square and stable.
Use wood screws and wood glue if desired. Pre-drilling pilot holes can help prevent the wood from splitting.
Check the rack on a flat surface before installing the shelves. If the frame is crooked, the cans may not roll evenly.
A square frame makes the whole rack work better.
Step 5: Install the Shelves and Rails
Install the angled shelves along the marks you made earlier. Then add guide rails or spacers to keep cans aligned in each lane.
Add a front stop rail to prevent cans from rolling out. The stop should be high enough to hold the lead can in place but low enough that you can remove the can easily.
Test each shelf as you go. Place a few cans in the lane and watch how they move.
Check for:
- Cans rolling smoothly
- Cans staying aligned
- No sharp edges
- No tipping
- No jamming
- Easy front access
Adjust rails before final tightening if needed.
Step 6: Test, Load, and Label
Before fully loading the rack, test it with real cans. Sand rough spots and make small adjustments where cans drag or jam.
Once the rack works smoothly, label each lane by food type or can size.
Useful labels include:
- Beans
- Soup
- Corn
- Tuna
- Tomatoes
- Chili
- Fruit
- Vegetables
Load newer cans from the back and remove older cans from the front. This keeps the rotation system working properly.
Best Practices for Pantry Rotation
A can rotation rack works best when you use it consistently.
Follow these best practices:
- Build each lane for one can size at a time.
- Use a gentle slope only.
- Label each lane clearly.
- Load new cans from the back.
- Take older cans from the front.
- Keep the rack in a cool, dry pantry.
- Check dates regularly.
- Do not overload weak shelves.
- Anchor tall racks to prevent tipping.
- Inspect screws and rails after loading.
The rack helps organize food, but you still need a simple pantry routine.
Common Mistakes to Avoid
Mistake 1: Making One Lane Fit Every Can
Different cans have different sizes. A lane that fits soup cans may not work well for tuna cans or larger cans.
Mistake 2: Making the Shelf Too Steep
A steep shelf can cause cans to roll too fast and hit the stop rail hard. Use a gentle slope.
Mistake 3: Forgetting the Front Stop Rail
Without a stop rail, cans can roll out and fall. This can dent cans, damage the rack, or cause injury.
Mistake 4: Overloading the Rack
Canned goods are heavy. Weak shelves or thin wood can bend under too much weight. Build sturdy and test slowly.
Mistake 5: Ignoring Expiration Dates
A rotation rack helps, but it does not replace checking dates. Look at your pantry regularly.
Mistake 6: Storing Damaged Cans
Do not store leaking, bulging, badly rusted, or deeply dented cans. Damaged cans may be unsafe.
Safety Notes
This is a simple woodworking project, but safety still matters.
Follow these safety rules:
- Wear eye protection when cutting or drilling.
- Sand sharp edges and splinters.
- Keep fingers clear when testing rolling cans.
- Do not overload weak shelves.
- Anchor tall freestanding racks to the wall.
- Store only shelf-stable canned goods in the rack.
- Do not use the rack for glass jars unless designed for them.
- Keep heavy racks on stable surfaces.
- Inspect screws, rails, and shelves regularly.
If a rack wobbles, tips, bends, or jams, fix the problem before fully loading it.
Where This Rack Is Most Useful
A DIY pantry can rotation rack can be used in many places.
Good locations include:
- Pantry shelves
- Kitchen cabinets
- Basement food storage
- Cabin pantry
- Emergency food storage room
- Garage pantry, if temperature is safe
- Homestead storage area
- Apartment kitchen storage
Choose a location that is cool, dry, stable, and easy to access. Avoid damp areas, direct sunlight, and places with extreme heat.
Food Storage Tips for Canned Goods
A can rotation rack is only one part of good pantry management.
Use these food storage tips:
- Store cans in a cool, dry place.
- Keep cans off damp floors.
- Avoid freezing temperatures.
- Avoid high heat.
- Check for rust, leaks, swelling, or deep dents.
- Use older cans first.
- Write purchase dates on cans if helpful.
- Keep a simple pantry inventory list.
- Buy foods your family actually eats.
Emergency food storage works best when it is part of everyday cooking. If you rotate through your pantry regularly, your supplies stay fresher and less wasteful.
Simple Upgrades You Can Add
Once the basic rack works, you can improve it with small upgrades.
Useful upgrades include:
- Painted or sealed wood surface
- Clear lane labels
- Adjustable dividers
- Wall brackets
- Rubber feet
- Wider base
- Pull-out cabinet version
- Separate racks for different can sizes
- Date labels on each lane
- Pantry inventory sheet nearby
Keep the rack easy to use. A simple system that you actually maintain is better than a complicated system you ignore.
Output and Uses
A well-built pantry can rotation rack can help with:
- First-in, first-out food rotation
- Faster canned food access
- Less forgotten food
- Reduced pantry waste
- Better emergency storage
- Organized homestead pantry
- Cabin food storage
- Everyday meal planning
For preppers, this is one of the most practical food-storage projects because it supports both daily life and emergency readiness.
Final Thoughts
A DIY pantry can rotation rack is a simple project with a big payoff. It keeps canned goods organized, makes older food easier to use first, and helps reduce waste in your pantry.
The build is straightforward: measure your cans, cut the panels, mark a gentle slope, assemble the frame, install the shelves and rails, then test with real cans before loading.
The most important detail is sizing. Build each lane for the cans you actually use, keep the slope gentle, and label everything clearly.
A pantry is not just about storing more food. It is about storing food in a way that stays usable, visible, and easy to rotate. This rack helps make that happen.
Frequently Asked Questions
What is FIFO pantry storage?
FIFO means “first in, first out.” It means older food is used before newer food so fewer items expire or get forgotten.
Can I build this rack for different can sizes?
Yes, but each lane should be sized for a specific can diameter and height. Mixed can sizes can jam more easily.
How steep should the shelves be?
Use a gentle slope. The cans should roll forward slowly, not slam into the front stop.
Can I use this for glass jars?
Not unless the rack is specifically designed for jars. Glass jars can break if they roll or hit each other.
Should I anchor the rack to the wall?
If the rack is tall, freestanding, or heavily loaded, anchoring is a good safety idea to reduce tip-over risk.
Where should I store canned food?
Store canned food in a cool, dry place away from direct sunlight, damp floors, and extreme heat.
What cans should I throw away?
Discard cans that are leaking, bulging, badly rusted, or deeply dented. Do not taste food from suspicious cans.
Do I still need to check expiration dates?
Yes. A rotation rack helps, but you should still check dates and inspect cans regularly.