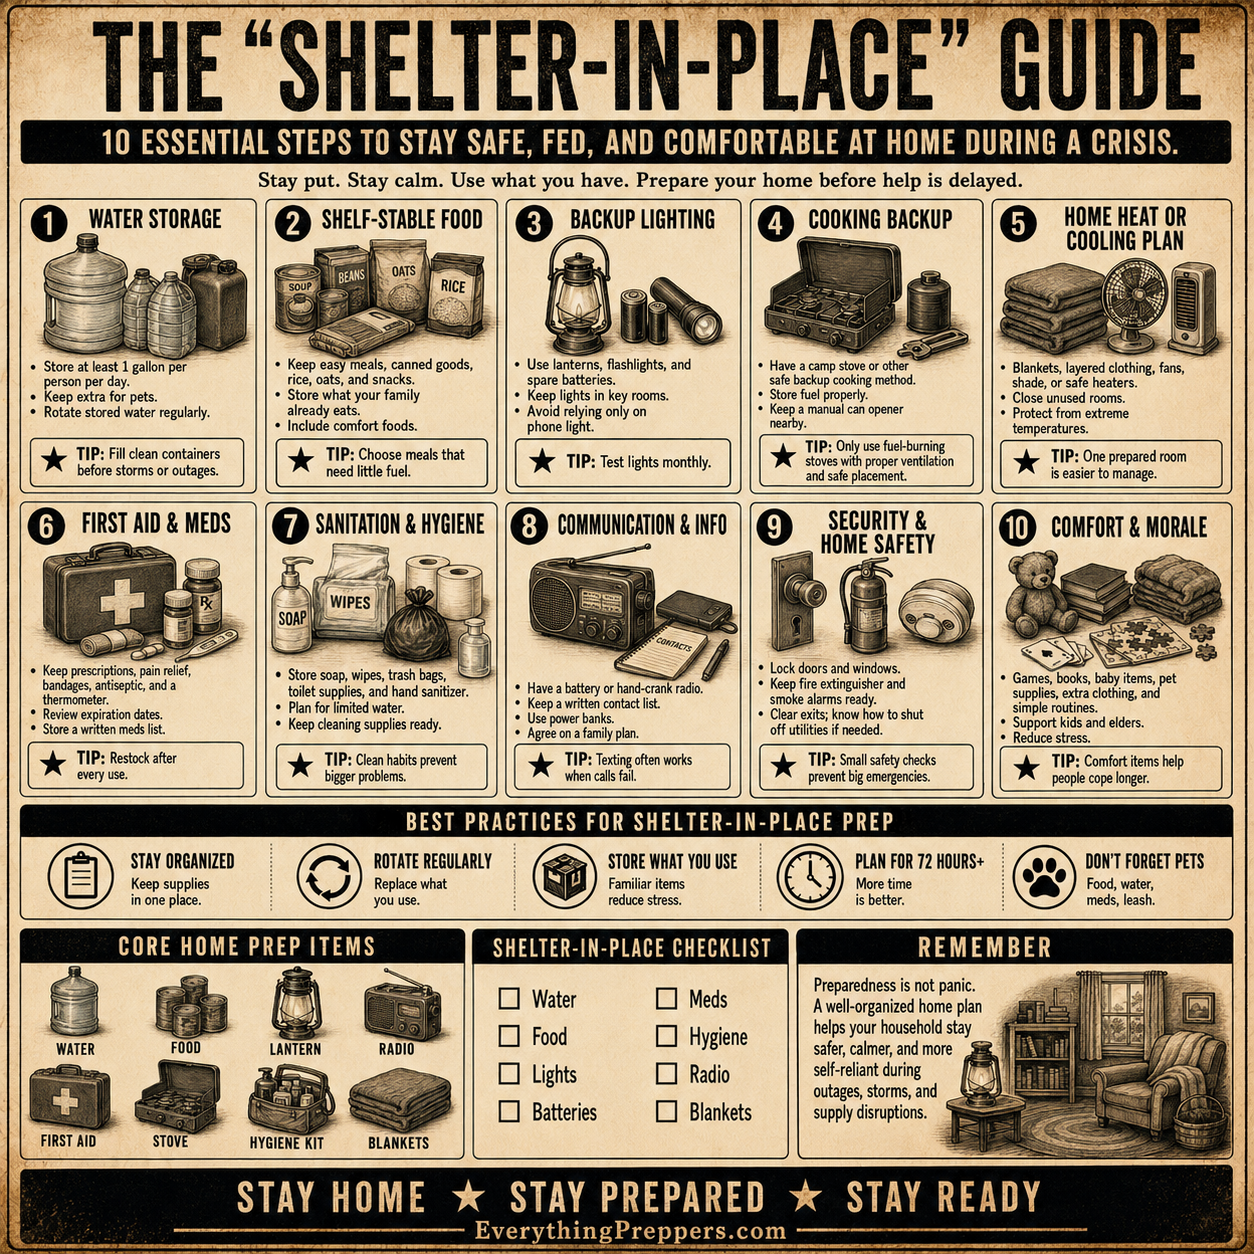
When rain, wind, or sudden bad weather hits, a simple tarp shelter can make a huge difference. Whether you are camping, building a bug-out kit, practicing bushcraft, or preparing for emergency situations, knowing how to pitch a basic ridgeline tarp shelter is one of the most useful outdoor skills to learn.
A DIY ridgeline tarp shelter is low-cost, fast to set up, and requires no power. With one tarp, some cordage, a few stakes, and two solid anchor points, you can create a simple A-frame shelter that sheds rain, blocks wind, and keeps your gear off wet ground.
This guide explains how the shelter works, what materials you need, how to set it up step by step, and the safety mistakes to avoid.

What Is a Ridgeline Tarp Shelter?
A ridgeline tarp shelter is a basic outdoor shelter made by tying a cord between two anchor points and draping a tarp over it. The tarp is then staked down on both sides to form an A-frame shape.
This design is popular because it is simple, lightweight, and quick to build. It can be used as a rain shelter, shade cover, gear cover, or emergency sleep area.
A ridgeline tarp shelter can be useful for:
- Emergency rain shelter
- Camping backup shelter
- Bug-out practice
- Gear protection during storms
- Blackout or roadside emergency cover
- Fast shade during hot weather
- Temporary outdoor work cover
It is not a permanent shelter, and it should not be used in dangerous weather conditions such as severe storms, flash floods, or high-wind events.
How This Shelter Works
The shelter works by creating a sloped roof that moves rain away from the sleeping or gear area.
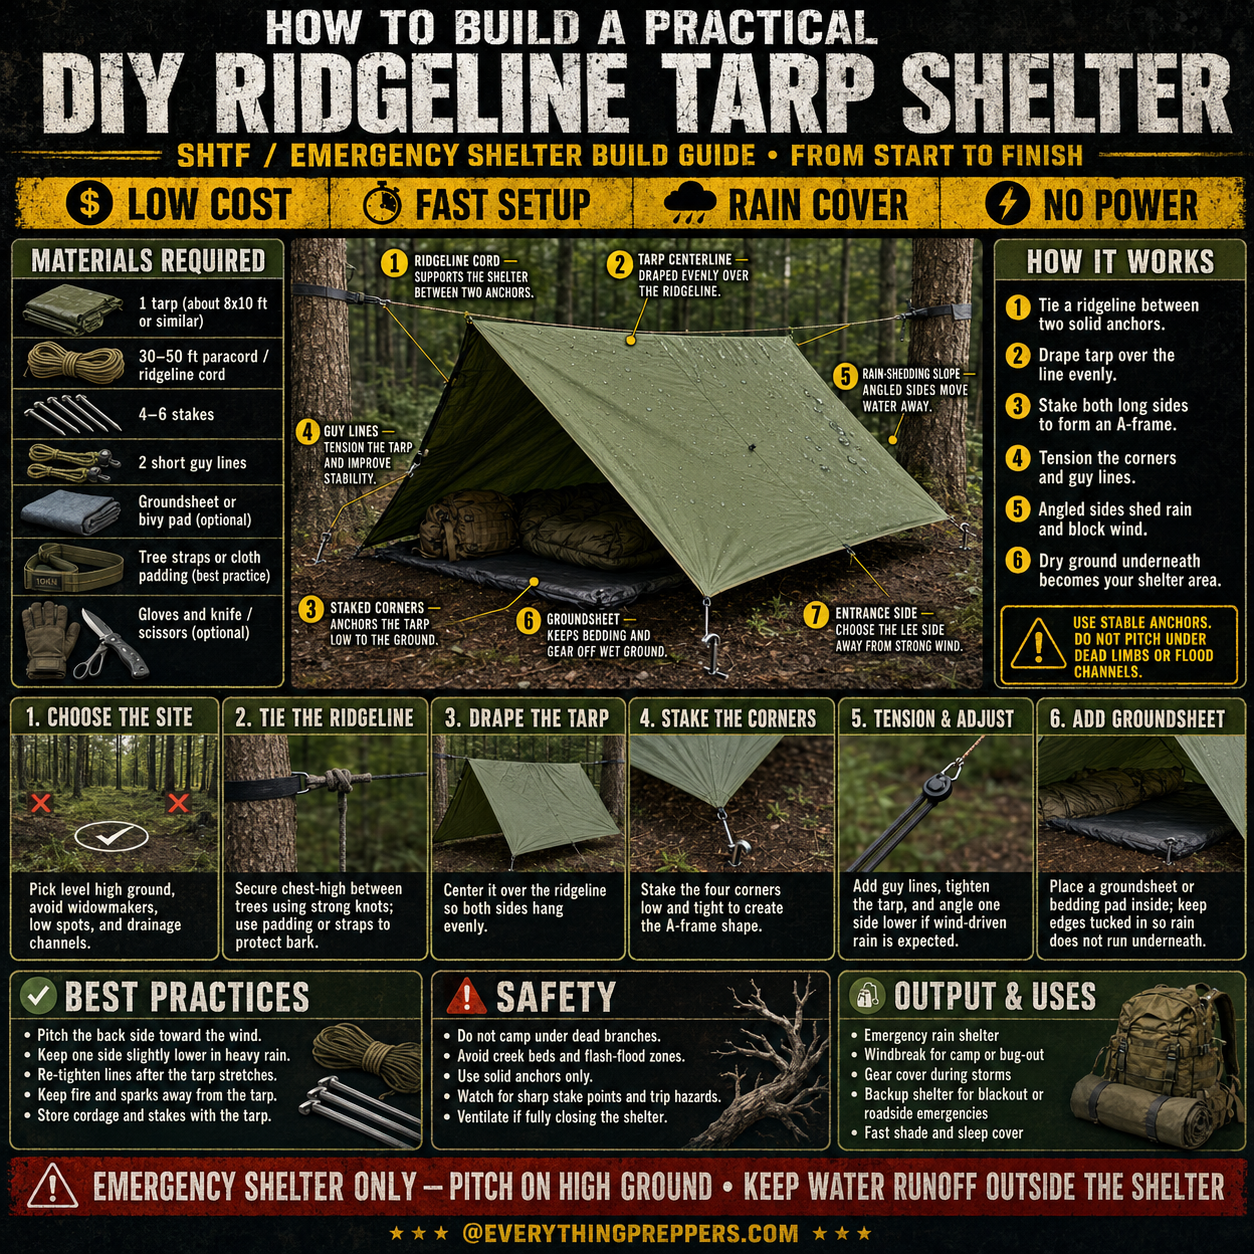
The ridgeline cord supports the highest point of the shelter. The tarp hangs evenly over the cord, and the long sides are staked down to form angled walls. This creates a simple A-frame shape.
The main parts are:
1. Ridgeline Cord
The ridgeline supports the tarp between two solid anchors, such as trees or sturdy posts.
2. Tarp Centerline
The tarp is centered over the ridgeline so both sides hang evenly.
3. Staked Corners
The corners are pulled outward and staked low to the ground to create the shelter shape.
4. Guy Lines
Guy lines help tension the tarp and improve stability.
5. Rain-Shedding Slope
The angled sides allow rain to run off instead of pooling on top.
6. Groundsheet
A groundsheet or bivy pad helps keep bedding and gear off wet soil.
The shelter is simple, but site choice and tensioning are what make it work well.
Materials Needed
You only need a few basic items to build this shelter.
Basic Materials
- One tarp, around 8×10 feet or similar
- 30 to 50 feet of paracord or ridgeline cord
- 4 to 6 stakes
- 2 short guy lines
- Groundsheet or bivy pad
- Tree straps or cloth padding
- Gloves
- Knife or scissors
A larger tarp gives more coverage, while a smaller tarp is easier to pack and set up quickly. For emergency use, choose a tarp that is durable, water-resistant, and large enough to cover your body and gear.
Step-by-Step Build Guide
Step 1: Choose the Site
Start by choosing a safe shelter location. This is more important than the tarp itself.
Look for level, high ground that is not in a drainage channel. Avoid low spots where water can collect. Do not pitch under dead branches, leaning trees, or loose limbs. These are often called widowmakers and can be dangerous.
A good shelter site should be:
- Slightly elevated
- Away from flood channels
- Free of dead overhead branches
- Protected from strong wind
- Clear of sharp rocks and debris
- Far enough from fire and sparks
- Easy to exit if conditions change
If rain is expected, look carefully at how water might move across the ground.
Step 2: Tie the Ridgeline
Tie the ridgeline between two solid anchors, such as healthy trees. Chest height is a good starting point for many A-frame tarp shelters.
Use strong knots, and make sure the line is tight. If tying to trees, use tree straps or cloth padding when possible to protect the bark.
Do not tie the ridgeline to weak branches, dead trees, loose posts, or unstable objects. The anchors need to hold the shelter under tension.
Step 3: Drape the Tarp
Drape the tarp evenly over the ridgeline. The center of the tarp should sit over the cord, with both sides hanging down evenly.
Check that the tarp is not twisted. If the sides are uneven, rain may run toward the wrong area or one side may sag.
Try to align the shelter so one side faces the expected wind and rain. In bad weather, the lower back side should usually face into the wind to reduce blowing rain.
Step 4: Stake the Corners
Pull out the four corners and stake them low to the ground. This creates the A-frame shape.
Keep the tarp tight, but do not overstretch it. Too much tension can damage grommets or tear weak tarp material.
Stake the corners at an angle so the lines pull away from the shelter. Push stakes fully into the ground when possible. If the ground is soft, use longer stakes, rocks, logs, or natural anchors.
Step 5: Tension and Adjust
Add short guy lines if needed to improve the shape and stability of the shelter. Tighten the tarp until the sides are smooth and rain can run off.
Look for sagging areas where water could pool. A tarp that collects water can become heavy and may collapse or tear.
If heavy rain is expected, angle one side slightly lower and make sure runoff flows outside the shelter area.
Recheck the tension after a few minutes. Tarps and cordage can stretch, especially when wet.
Step 6: Add a Groundsheet
Place a groundsheet, bivy pad, or sleeping pad inside the shelter. Keep the edges of the groundsheet tucked under the tarp coverage.
Do not let the groundsheet stick out beyond the shelter edge. If it extends outside, rain can land on it and run underneath your bedding.
Keep your backpack and gear near the center of the shelter, away from the edges where rain splash may reach.
Best Practices for a Stronger Shelter
A simple tarp shelter works better when small details are done correctly.
Use these best practices:
- Pitch the back side toward the wind.
- Keep one side slightly lower in heavy rain.
- Re-tighten lines after the tarp stretches.
- Keep fire and sparks away from the tarp.
- Store cordage and stakes with the tarp.
- Use stable anchors only.
- Keep bedding away from the tarp edges.
- Ventilate if the shelter is closed tightly.
- Avoid sharp rocks under the groundsheet.
- Practice setup before an emergency.
A tarp shelter is easy to learn, but practice makes it much faster when the weather is bad.
Common Mistakes to Avoid
Mistake 1: Pitching in a Low Spot
Low ground can flood quickly during rain. Always choose higher ground with visible drainage away from the shelter.
Mistake 2: Ignoring Dead Branches
Never camp under dead limbs or unstable trees. Falling branches can be dangerous, especially during wind or rain.
Mistake 3: Leaving the Tarp Loose
Loose tarp fabric can flap in the wind, collect water, and fail faster. Keep the tarp properly tensioned.
Mistake 4: Letting the Groundsheet Stick Out
If the groundsheet extends beyond the tarp edge, it can catch rain and channel water under your bedding.
Mistake 5: Pitching Too High in Windy Weather
A high-pitched tarp catches more wind. In rough weather, lower the ridgeline and stake the sides closer to the ground.
Mistake 6: Using Weak Anchors
Do not tie to dead trees, loose branches, or unstable objects. Strong anchors are essential.
Safety Notes
This shelter is for temporary emergency or outdoor use only. It is not designed for severe storms or dangerous weather.
Follow these safety rules:
- Do not pitch under dead branches.
- Avoid creek beds, drainage channels, and flash-flood zones.
- Use solid anchors only.
- Watch for sharp stake points and trip hazards.
- Keep fire, sparks, and hot cookware away from the tarp.
- Ventilate if fully closing the shelter.
- Move if water begins flowing under the shelter.
- Do not stay in exposed areas during lightning or severe wind.
If conditions become unsafe, leave the shelter area and move to a safer location.
When This Shelter Is Most Useful
A ridgeline tarp shelter is useful because it is simple and fast. It can be built with lightweight materials and adjusted for different weather.
Good uses include:
- Emergency rain cover
- Camping shelter
- Bug-out practice
- Gear cover during storms
- Temporary shade
- Outdoor work cover
- Backup shelter during blackouts or road emergencies
For preppers, the real value is not just the tarp. The value is knowing how to use it quickly and safely.
Simple Upgrades You Can Add
Once you understand the basic setup, you can improve the shelter with small upgrades.
Useful upgrades include:
- Better stakes
- Reflective guy lines
- Tensioners
- Larger tarp
- Waterproof groundsheet
- Tree straps
- Drip lines on the ridgeline
- Lightweight bivy bag
- Extra cordage
- Small repair kit
A few small upgrades can make the shelter more reliable in wet weather.
Final Thoughts
A DIY ridgeline tarp shelter is one of the most practical emergency shelter skills to learn. It is low-cost, fast to set up, and useful for rain cover, shade, camping, and bug-out practice.
The build is simple: choose a safe site, tie a ridgeline, drape the tarp, stake the corners, tension the lines, and keep your bedding off wet ground.
The most important part is safety. Pitch on high ground, avoid dead branches, keep water runoff outside the shelter, and never rely on a tarp shelter during severe weather.
With practice, this simple setup can become one of the most useful pieces of emergency gear in your kit.
Frequently Asked Questions
What size tarp is best for a ridgeline shelter?
An 8×10 foot tarp is a good common size for one person and some gear. Larger tarps provide more coverage but are heavier and harder to manage in wind.
How high should the ridgeline be?
Chest height is a good starting point. In windy or rainy weather, a lower pitch usually gives better protection.
Can I use this shelter in heavy rain?
It can help in rain if pitched correctly, but it must be placed on high ground with runoff flowing away. Avoid flood-prone areas.
Should the groundsheet go outside the tarp edge?
No. Keep the groundsheet tucked inside the shelter footprint so it does not catch rain and channel water underneath you.
What should I use for anchors?
Healthy trees, sturdy posts, good stakes, rocks, or solid natural anchors can work. Avoid dead branches and unstable objects.
Can I build this without trees?
Yes. You can use trekking poles, sturdy sticks, vehicle roof racks, fence posts, or other stable anchors, but the setup must be secure.
Is this good for cold weather?
It can block wind and rain, but it does not provide much insulation by itself. Use proper bedding, ground insulation, and cold-weather gear.
Is this safe during lightning?
No tarp shelter is safe in exposed lightning conditions. Move to a safer location if thunderstorms are nearby.