When cold weather hits and the power goes out, even a small amount of extra warmth can make a room feel more manageable. A DIY window solar air heater panel is a simple passive heating project that uses sunlight to warm air before it enters a room, shed, cabin, or workshop.
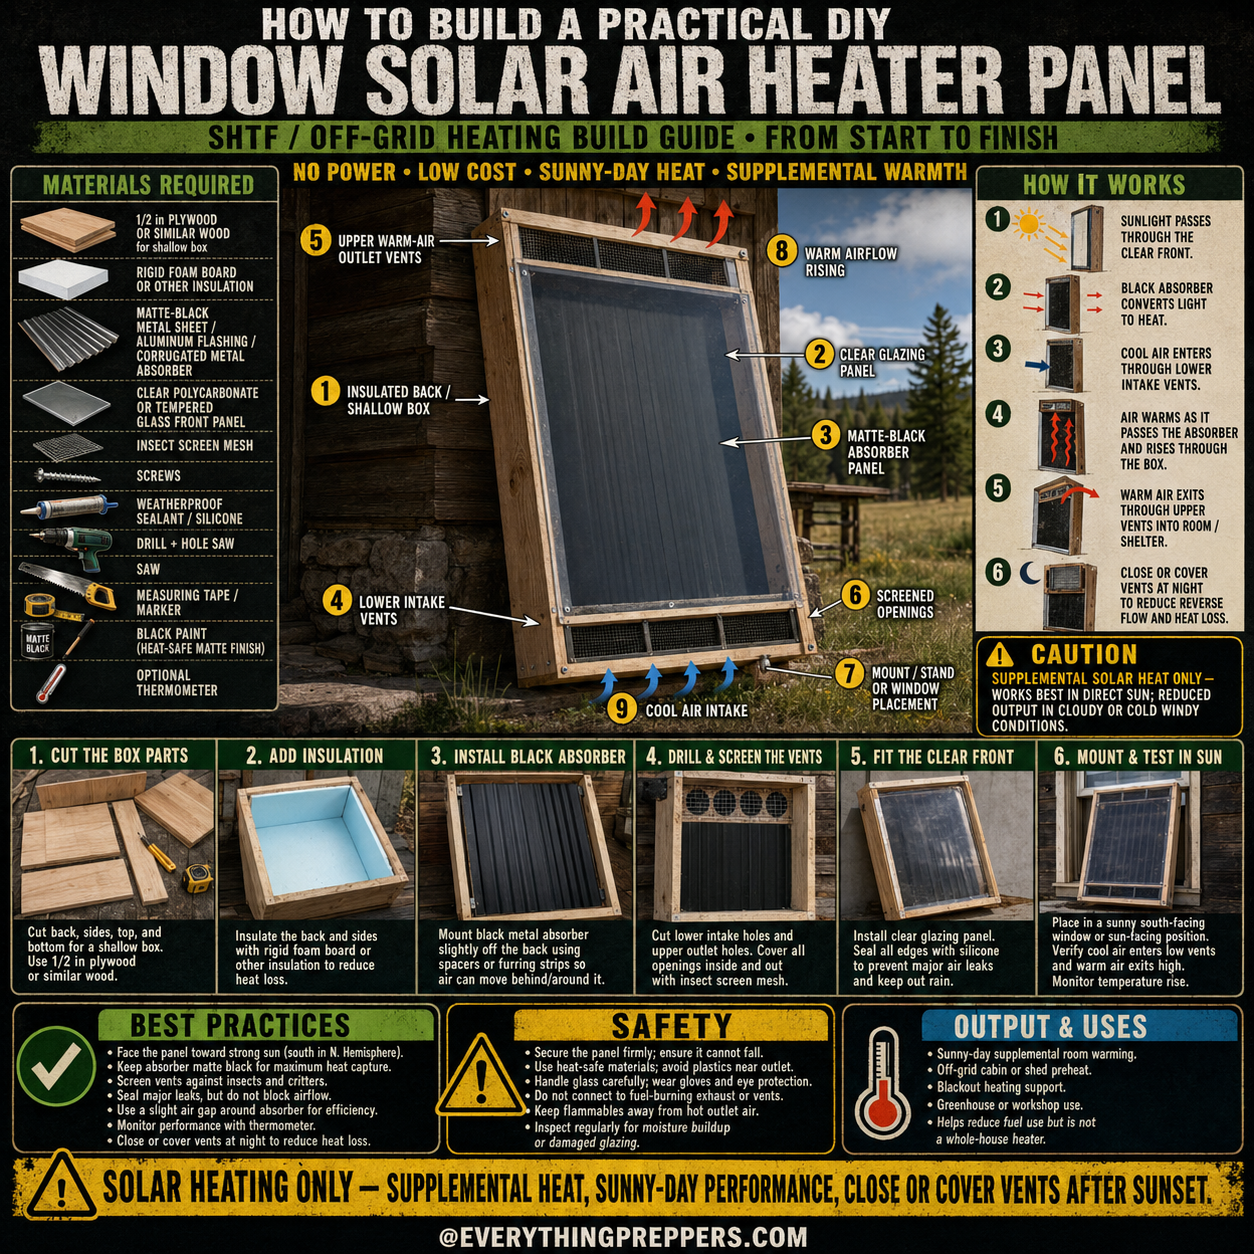
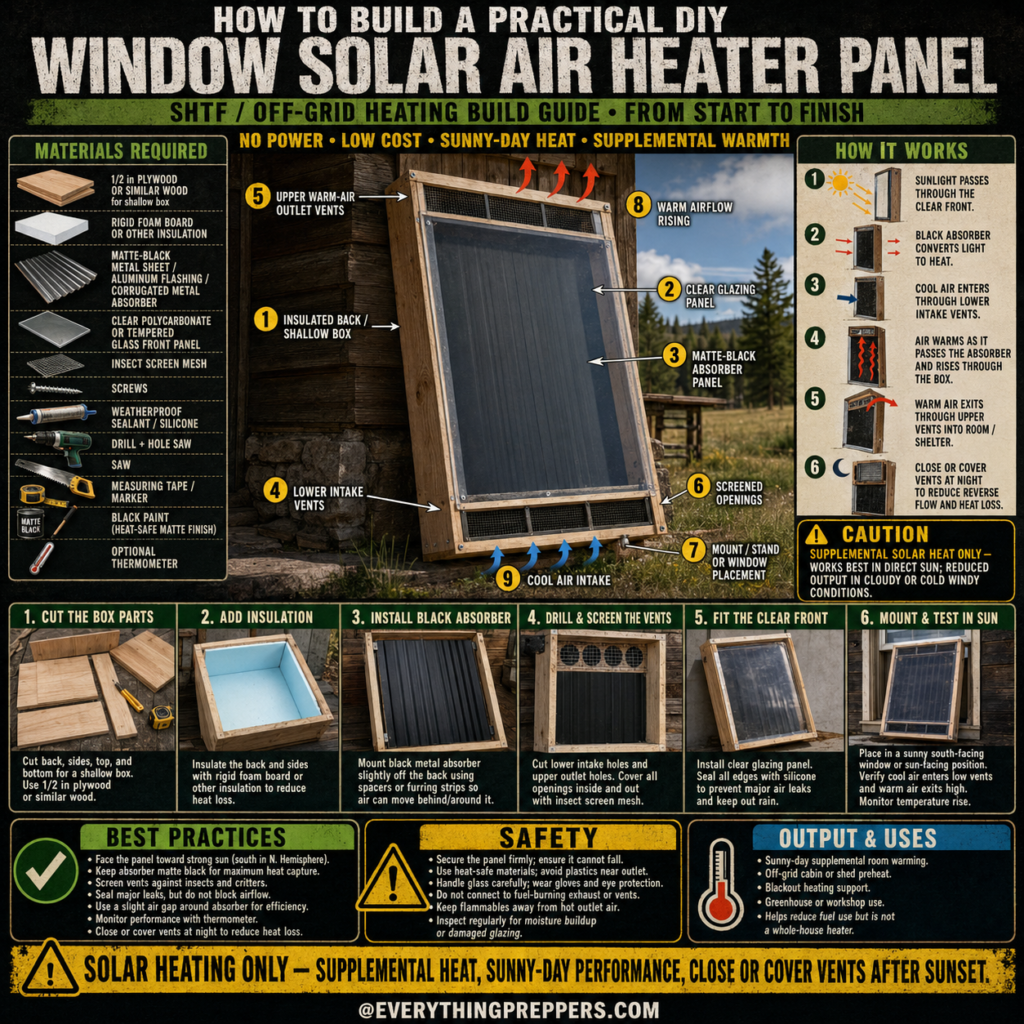
This build does not use fuel, electricity, or moving parts. It works by letting sunlight pass through a clear front panel, warming a dark absorber surface inside the box, and allowing warm air to rise through upper vents.
This project is best for sunny daytime use only. It is not a whole-house heater, and it will not perform well during cloudy weather, at night, or in cold windy conditions. Think of it as a low-cost supplemental solar heat panel for off-grid comfort, blackout support, or small-space preheating.
What Is a Window Solar Air Heater Panel?
A window solar air heater panel is a shallow insulated box with a clear front, dark heat-absorbing interior, lower intake vents, and upper warm-air outlet vents. When sunlight hits the black absorber surface inside the panel, the air inside warms up. Warmer air naturally rises and exits through the upper vents.
Cooler room air or outside air can enter through the lower intake vents depending on the design and placement. The result is a simple passive airflow cycle that can add some warmth during bright sunny periods.
This type of project can be useful for:
- Sunny-day supplemental room warming
- Off-grid cabin support
- Shed or workshop preheating
- Blackout heating support
- Greenhouse warming
- Fuel-saving daytime heat
- Learning passive solar basics
It should not be relied on as your only heat source in cold weather.
How This Solar Air Heater Works
The panel works by combining sunlight, a dark absorber, insulation, and natural convection.
1. Sunlight Passes Through the Clear Front
The clear glazing panel allows sunlight to enter the box. Polycarbonate, tempered glass, or another clear heat-tolerant panel can be used.
2. The Black Absorber Converts Light to Heat
A matte-black metal absorber panel inside the box absorbs sunlight and warms up. Dark matte surfaces absorb heat better than shiny reflective surfaces.
3. Cool Air Enters Through Lower Intake Vents
Cooler air enters near the bottom of the panel. The lower vents should be screened to help keep insects and debris out.
4. Air Warms as It Moves Past the Absorber
As air passes through or around the heated black absorber, it becomes warmer.
5. Warm Air Exits Through Upper Vents
Warm air naturally rises and exits through upper outlet vents. If the panel is connected to a window opening, that warm air can enter the room.
6. Vents Must Be Closed or Covered at Night
After sunset, the panel can lose heat and may allow reverse airflow if not covered. Closing or covering vents at night helps reduce heat loss.
This is a simple passive system, so performance depends heavily on sunlight, outdoor temperature, wind, insulation, panel angle, and build quality.
Important Safety Warning
A DIY solar air heater panel should be treated as a supplemental heating project only.
Follow these safety rules:
- Do not connect this panel to fuel-burning exhaust, fireplace vents, or appliance vents.
- Do not use flammable materials near hot outlet air.
- Do not block required emergency exit windows.
- Secure the panel so it cannot fall.
- Use heat-safe materials near the absorber and outlet vents.
- Do not leave plastic parts where they may overheat.
- Check regularly for moisture buildup.
- Keep insects, leaves, and debris out of vents.
- Cover or close vents after sunset to reduce reverse airflow.
- Do not rely on this as your only heat source in winter.
If the panel overheats, smells unusual, warps, leaks water, or becomes unstable, stop using it and inspect the build.
Materials Needed
You can build a simple solar air heater panel with common materials, but use outdoor-safe and heat-tolerant parts where possible.
Basic Materials
- 1/2 inch plywood or similar wood for the shallow box
- Rigid foam board or other insulation
- Matte-black metal sheet, aluminum flashing, or corrugated metal absorber
- Clear polycarbonate or tempered glass front panel
- Insect screen mesh
- Screws
- Weatherproof sealant or silicone
- Heat-safe matte black paint
- Optional thermometer
Tools
- Drill
- Hole saw
- Saw
- Measuring tape
- Marker
- Straightedge
- Safety glasses
- Work gloves
- Caulk gun
Avoid materials that may melt, release strong fumes, or become unsafe when heated. If painting the absorber, use a heat-safe matte black finish and allow it to cure fully before use.
Step-by-Step Build Guide
Step 1: Cut the Box Parts
Cut the back, sides, top, and bottom pieces for a shallow wooden box. The exact size depends on your window, wall space, or mounting location.
A rectangular panel is usually easiest to build. Keep it large enough to catch sunlight but not so large that it becomes heavy or difficult to mount safely.
Before assembling, dry-fit the pieces and check that the box is square.
Step 2: Add Insulation
Line the back and sides of the box with rigid foam board or another suitable insulation. The insulation helps reduce heat loss through the back of the panel.
Do not place insulation where it can touch extremely hot parts unless the material is rated for that use. Keep the absorber area safe and avoid exposing foam directly to high heat.
The goal is to keep heat moving toward the air path instead of escaping through the back of the box.
Step 3: Install the Black Absorber
Mount the matte-black metal absorber slightly off the back wall using spacers or thin furring strips. This creates an air gap so air can move behind or around the absorber.
Corrugated metal can work well because it creates more surface area and air channels. A flat black metal sheet can also work if the airflow path is clear.
Use a dark matte finish, not glossy paint. Matte black absorbs light better and helps convert sunlight into heat.
Step 4: Drill and Screen the Vents
Cut or drill lower intake vents and upper outlet vents. The lower vents allow cool air to enter, and the upper vents allow warmed air to exit.
Cover all openings with insect screen mesh. This helps keep bugs, leaves, and debris out of the panel.
Do not make the vents too small. Restricted airflow can reduce performance and may cause heat buildup. The panel needs enough airflow to move warm air out efficiently.
Step 5: Fit the Clear Front
Install the clear glazing panel over the front of the box. Seal the edges with silicone or weatherproof sealant to reduce air leaks and keep out rain.
The clear front should be secure, weather-resistant, and easy to inspect. Polycarbonate is lighter and more impact-resistant than glass, while tempered glass handles heat well but is heavier.
Do not use thin, weak plastic that may warp badly in direct sun.
Step 6: Mount and Test in the Sun
Place the panel in a sunny south-facing location if you are in the Northern Hemisphere. In the Southern Hemisphere, a north-facing orientation is usually better.
Tilt the panel toward the sun if possible. Better sun exposure usually means better heat output.
During the first test, check:
- Cool air entering lower vents
- Warm air exiting upper vents
- Leaks around the glazing
- Any plastic softening or warping
- Moisture buildup
- Secure mounting
- Temperature rise at the outlet
Use a thermometer if possible. Compare the inlet air temperature with the outlet air temperature to see if the panel is working.
Best Practices for Better Performance
A solar air heater works best when it gets strong direct sun and has good airflow.
Use these best practices:
- Face the panel toward the strongest daily sun.
- Use a matte-black absorber for maximum heat capture.
- Keep the clear glazing clean.
- Screen vents against insects and debris.
- Seal major air leaks, but do not block airflow.
- Use a slight air gap around the absorber.
- Monitor performance with a thermometer.
- Close or cover vents at night.
- Inspect regularly for moisture or damage.
- Secure the panel firmly before windy weather.
This project works best on bright sunny days. Cloudy skies, shade, wind, and poor sealing will reduce output.
Common Mistakes to Avoid
Mistake 1: Expecting Whole-House Heat
This is a supplemental heater, not a furnace. It may help warm a small space during sunny periods, but it cannot replace a safe primary heating system.
Mistake 2: Forgetting to Close Vents at Night
After sunset, the panel may lose heat and allow reverse airflow. Covering or closing vents can reduce nighttime heat loss.
Mistake 3: Using Unsafe Materials
Avoid plastics, adhesives, or paints that may fail in heat. Use heat-safe materials near the absorber and outlet vents.
Mistake 4: Blocking Airflow
A solar air heater needs airflow to work. If vents are too small or blocked, performance drops and the panel may overheat.
Mistake 5: Poor Sun Orientation
A panel placed in shade or facing the wrong direction will not produce much heat. Sun exposure matters.
Mistake 6: Ignoring Moisture
Outdoor panels can collect condensation. Check the inside regularly and make sure the build can dry out if moisture appears.
Safety Notes
This panel is simple, but it still needs careful use.
Follow these safety notes:
- Secure the panel firmly so it cannot fall.
- Keep flammable materials away from warm outlet air.
- Do not connect it to combustion exhaust or appliance vents.
- Do not block emergency exit windows.
- Use gloves and eye protection when cutting and drilling.
- Handle glass carefully if using a glass front.
- Inspect the panel after storms or high winds.
- Watch for overheating, warping, or strange smells.
- Keep children away from sharp edges and hot surfaces.
If you use this panel near a window, make sure the window can still be opened or accessed safely when needed.
Where This Panel Is Most Useful
A DIY window solar air heater panel works best in small spaces that receive strong sunlight.
Good uses include:
- Cabin rooms
- Workshops
- Sheds
- Greenhouses
- Small sun-facing rooms
- Emergency daytime warming
- Blackout support
- Off-grid projects
It is especially useful when you want to save fuel during the day and reserve other heating methods for night or cloudy weather.
How to Improve Heat Output
To improve performance, focus on sunlight, heat capture, and airflow.
Useful improvements include:
- Larger absorber surface
- Better sun angle
- Cleaner clear front panel
- Darker matte absorber
- Better insulation behind the absorber
- Reduced air leaks around the box
- Properly sized vents
- Shorter airflow path into the room
- A thermometer to measure results
A small fan can improve airflow, but that changes the project from passive to powered. For a no-power build, natural convection is the main driver.
Output and Uses
This DIY solar air heater panel can provide:
- Sunny-day supplemental warmth
- Off-grid cabin preheating
- Workshop or shed heat support
- Greenhouse warmth assistance
- Blackout heating support
- Fuel-saving daytime comfort
It helps reduce fuel use, but it is not a whole-house heater and should not be your only cold-weather plan.
Final Thoughts
A DIY window solar air heater panel is a practical low-cost project for anyone interested in off-grid comfort, blackout preparation, or passive solar heating. It uses sunlight, a dark absorber, and natural airflow to create supplemental warm air during sunny periods.
The build is straightforward: make an insulated box, install a black absorber, add screened lower and upper vents, seal a clear front panel, and test it in direct sun.
The most important thing is to understand its limits. It works best in direct sun and performs poorly at night, in heavy clouds, or in cold windy conditions. Close or cover vents after sunset, inspect it regularly, and never treat it as your only heat source.
Used correctly, this simple solar heater can be a helpful part of a wider emergency heating and off-grid preparedness plan.
Frequently Asked Questions
Can this heat a whole house?
No. This is only for supplemental sunny-day heat. It may help warm a small space, but it is not a whole-house heating system.
Does it work at night?
No. It needs sunlight to produce heat. At night, vents should be closed or covered to reduce heat loss.
What direction should the panel face?
In the Northern Hemisphere, it usually works best facing south. In the Southern Hemisphere, it usually works best facing north.
Can I use plastic instead of glass?
Clear polycarbonate may work well, but thin plastic can warp in heat. Use a clear material suitable for outdoor sun and temperature changes.
Do I need a fan?
No. This design can work passively through natural convection. A fan may improve airflow, but it requires power.
Can I connect it to a fireplace or stove vent?
No. Do not connect this panel to any fuel-burning exhaust, fireplace vent, or appliance vent.
Why should I screen the vents?
Screening helps keep insects, leaves, and debris out of the panel.
Should I close the vents after sunset?
Yes. Closing or covering vents at night helps reduce reverse airflow and heat loss.