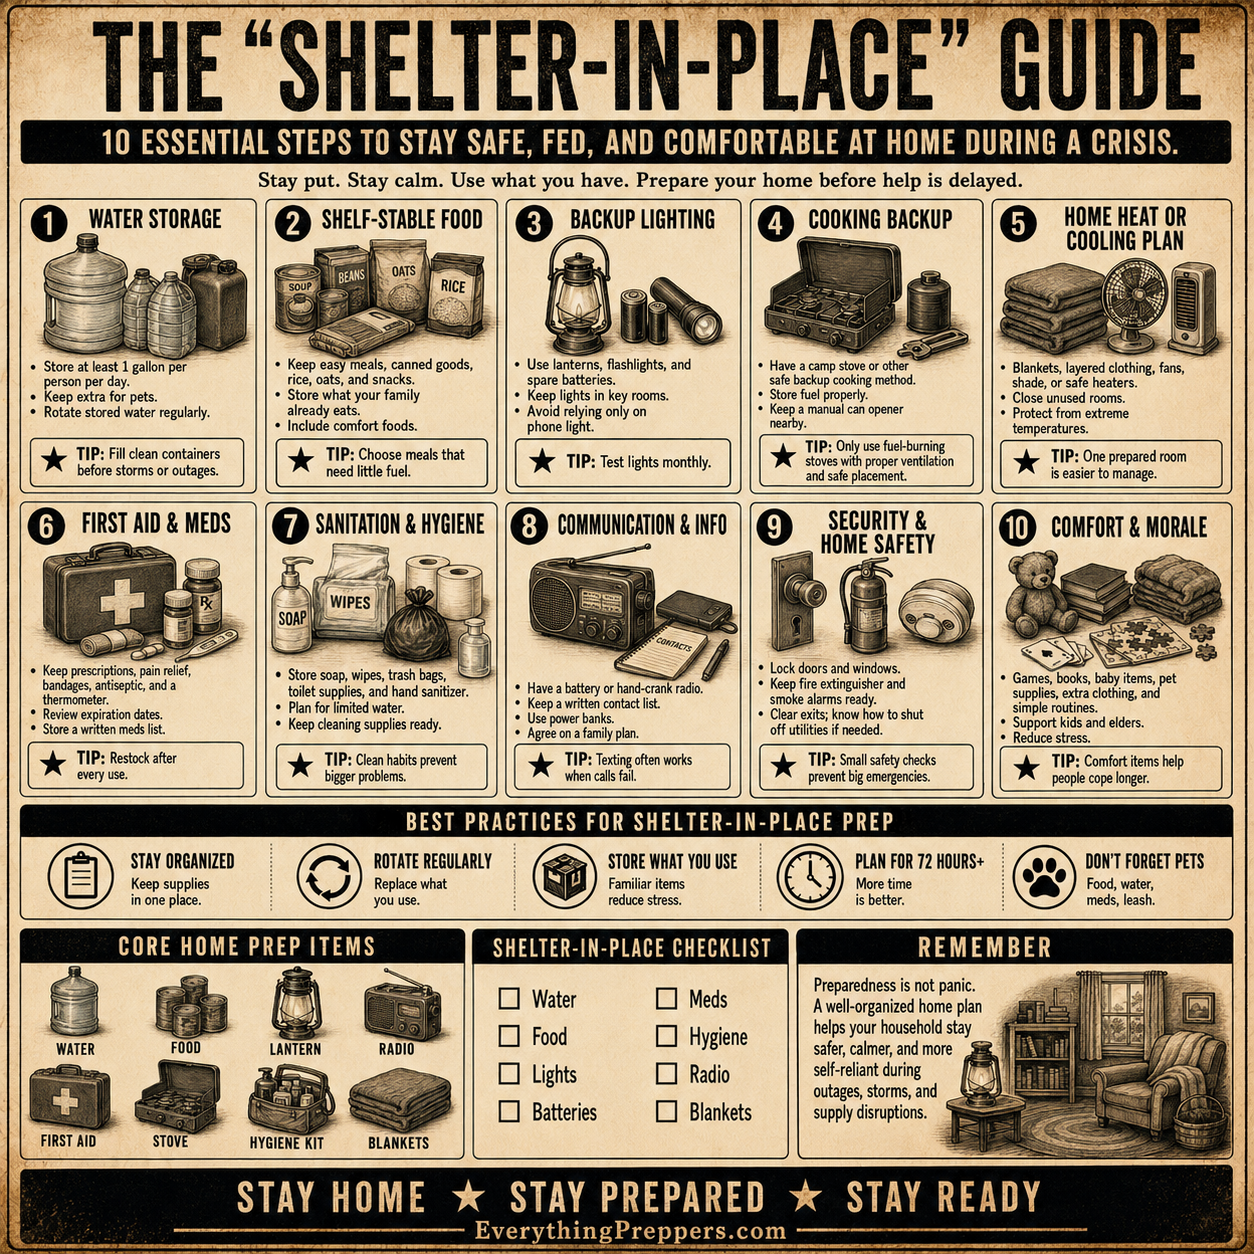
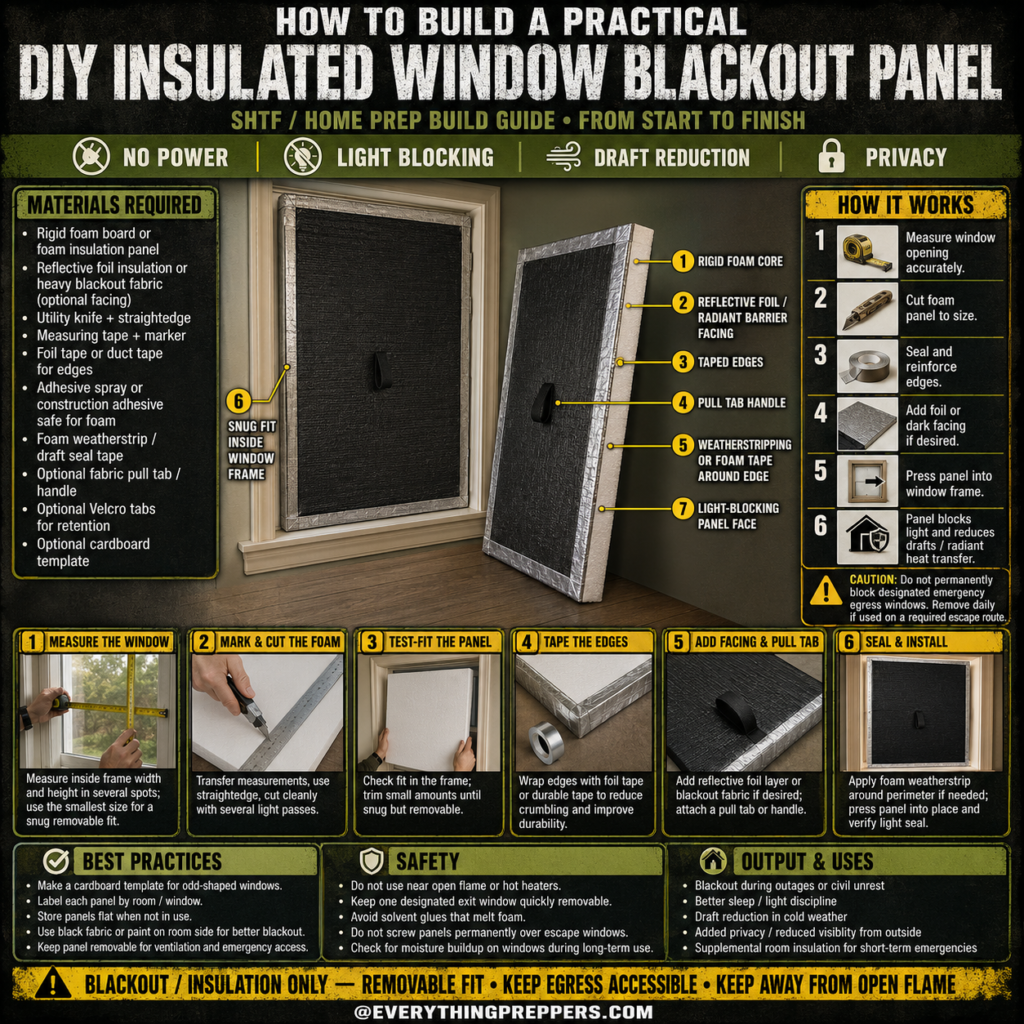
During a blackout, storm, heat wave, cold snap, or emergency shelter-in-place situation, windows can become one of the weakest points in a room. They let in light, leak drafts, reduce privacy, and allow heat to transfer in or out of the home.
A DIY insulated window blackout panel is a simple removable insert that fits inside a window frame. It can help block light, improve privacy, reduce drafts, and add a small layer of temporary insulation. The best part is that it requires no electricity and can be built with basic materials.
This project is useful for emergency preparedness, bedroom blackout, short-term insulation, privacy, and reducing visibility from outside. However, it should always remain removable. Do not permanently block required emergency exit windows.
What Is an Insulated Window Blackout Panel?
An insulated window blackout panel is a lightweight removable panel made from rigid foam board, reflective insulation, blackout fabric, or similar materials. It is cut to fit inside a window frame and pressed into place when needed.
Unlike curtains, this type of panel sits closer to the window opening and can create a tighter seal around the frame. This helps reduce light leaks and may reduce some drafts.
A blackout panel can be useful for:
- Blackout preparation
- Privacy
- Better sleep in bright rooms
- Draft reduction in cold weather
- Short-term emergency insulation
- Reducing outside visibility
- Storm or civil emergency sheltering
- Rooms without proper blackout curtains
This is not a permanent window replacement, storm shutter, fire barrier, or security shield. It is a removable light-blocking and insulation panel.
How This Window Panel Works
The panel works by combining a snug fit, an insulating core, sealed edges, and a light-blocking face.
1. Rigid Foam Core
The foam board gives the panel structure and adds insulation. It helps slow heat transfer through the window area.
2. Reflective Foil or Blackout Facing
A reflective foil layer can help reflect radiant heat, while black fabric or dark facing can improve light blocking from inside the room.
3. Taped Edges
Taping the edges helps reduce crumbling, improves durability, and gives the panel a cleaner finish.
4. Pull Tab Handle
A pull tab makes the panel easier to remove quickly. This is especially important if the window may be needed for ventilation or emergency exit.
5. Foam Weatherstrip
Foam weatherstrip around the edges helps create a snug fit and reduces small gaps.
6. Removable Fit
The panel should press into place securely but still come out easily when needed.
The goal is simple: block light, reduce drafts, and keep the panel easy to remove.
Important Safety Warning
This project should never create a fire or escape hazard.
Follow these rules:
- Do not permanently block emergency exit windows.
- Keep at least one designated exit window quickly removable if needed.
- Do not use panels near open flames, candles, wood stoves, or hot heaters.
- Do not screw panels permanently over escape windows.
- Remove panels regularly to check for moisture buildup.
- Keep children informed that the panel is not a wall or safety barrier.
- Do not rely on this panel for security or storm protection.
If a window is part of your emergency escape route, the panel must be removable in seconds.
Materials Needed
You can build this panel with common hardware-store materials.
Basic Materials
- Rigid foam board or foam insulation panel
- Reflective foil insulation or heavy blackout fabric
- Utility knife
- Straightedge
- Measuring tape
- Marker
- Foil tape or duct tape for edges
- Adhesive spray or construction adhesive safe for foam
- Foam weatherstrip or draft seal tape
- Optional fabric pull tab or handle
- Optional Velcro tabs
- Optional cardboard template
Helpful Tools
- Cutting mat or scrap board
- Scissors
- Gloves
- Safety glasses
- Pencil
- Square
Use adhesive that is safe for foam. Some solvent-based glues can melt foam board, create fumes, or weaken the material.
Step-by-Step Build Guide
Step 1: Measure the Window
Measure the inside of the window frame where the panel will sit. Measure the width and height in several spots because many window frames are not perfectly square.
Measure:
- Width at the top, middle, and bottom
- Height on the left, center, and right
- Depth of the frame where the panel will rest
Use the smallest measurement for the best removable fit. A panel that is too large may jam. A panel that is too small may leave light gaps.
If the window is unusual or older, make a cardboard template first.
Step 2: Mark and Cut the Foam
Transfer your measurements to the foam board. Use a straightedge and marker to draw clean cut lines.
Cut the foam with a sharp utility knife using several light passes instead of trying to cut through in one heavy pass. This gives a cleaner edge and reduces tearing.
After cutting, test the panel gently in the window frame. Do not force it. If it is too tight, trim small amounts until it fits snugly but can still be removed.
Step 3: Test-Fit the Panel
Before adding fabric, foil, tape, or weatherstrip, test the foam panel in the window.
Check for:
- Tight spots
- Loose corners
- Large light gaps
- Warping
- Difficult removal
- Interference with window locks or handles
The panel should sit flat and press into the frame without bending too much. It should not get stuck.
This is the best time to make small adjustments.
Step 4: Tape the Edges
Wrap the cut edges with foil tape or durable tape. This helps reduce crumbling and makes the panel more durable.
Taped edges also make the panel easier to slide in and out without damaging the foam.
Take your time around the corners. Clean edges make the finished panel look better and last longer.
Step 5: Add Facing and Pull Tab
Add reflective foil, blackout fabric, or a dark facing to one side of the panel if desired.
For better blackout performance, use black fabric or dark material on the room-facing side. For heat reflection, reflective foil may be useful depending on your climate and window direction.
Attach a pull tab or small handle to the panel. This makes removal much easier, especially if the panel fits tightly.
A simple pull tab can be made from:
- Fabric strip
- Nylon webbing
- Small cabinet pull
- Heavy tape loop
Make sure the handle is secure but does not prevent the panel from sitting flat.
Step 6: Seal and Install
Apply foam weatherstrip around the perimeter if needed. This helps close small gaps and improves the fit.
Press the panel gently into the window frame and check the light seal. If light leaks through the sides, add small strips of weatherstrip or adjust the fit.
The panel should be snug, but not permanent. You should be able to pull it out quickly using the tab or handle.
Best Practices for Better Results
A blackout panel works best when it is measured carefully and labeled clearly.
Use these best practices:
- Make a cardboard template for odd-shaped windows.
- Label each panel by room and window.
- Store panels flat when not in use.
- Use black fabric or dark facing on the room side for better blackout.
- Keep panels removable for ventilation and emergency access.
- Check windows for moisture during long-term use.
- Do not press panels against wet glass or damp frames.
- Remove panels during the day when ventilation is needed.
If you build multiple panels, do not assume they will all fit every window. Labeling saves time during an emergency.
Common Mistakes to Avoid
Mistake 1: Making the Panel Too Tight
A panel that jams in the frame can become dangerous if the window is needed for ventilation or escape. Keep it snug but removable.
Mistake 2: Blocking an Emergency Exit
Do not permanently block required egress windows. Every household should know which windows and doors are emergency exits.
Mistake 3: Using the Wrong Adhesive
Some adhesives melt foam board or release strong fumes. Use foam-safe adhesive only.
Mistake 4: Ignoring Moisture
Windows can collect condensation, especially in cold weather. A tight panel may hide moisture buildup. Remove the panel regularly to inspect the glass and frame.
Mistake 5: Placing Panels Near Heat Sources
Foam and fabric can be flammable or heat-sensitive. Keep panels away from candles, heaters, fireplaces, and open flames.
Mistake 6: Treating It as Security Protection
This panel is for blackout, privacy, and draft reduction. It is not a security panel or impact shield.
Safety Notes
This project is simple, but safe use matters.
Follow these safety notes:
- Keep panels away from open flame and hot heaters.
- Do not use candles near foam panels.
- Keep emergency exits accessible.
- Use pull tabs for quick removal.
- Do not screw panels permanently over escape windows.
- Inspect for condensation, mold, or dampness.
- Store panels flat to prevent warping.
- Do not allow children to lean against window panels.
- Use safe cutting practices when trimming foam.
If you notice moisture, mold, or a musty smell around the window, remove the panel and dry the area before using it again.
Where This Panel Is Most Useful
A DIY insulated blackout panel can be useful in many situations.
Good uses include:
- Bedroom blackout
- Blackout preparation during outages
- Privacy during emergencies
- Draft reduction in cold weather
- Temporary room insulation
- Shift-worker sleep support
- Bright streetlight blocking
- Reducing visibility from outside
For preparedness, this is a simple comfort and privacy project. It helps make a room darker, more private, and less drafty without relying on power.
Insulation and Draft Reduction Tips
This panel can help reduce drafts, but it works best when combined with other simple window improvements.
Helpful tips:
- Seal obvious air leaks around the window frame.
- Use weatherstrip where gaps are visible.
- Close curtains over the panel for extra insulation.
- Remove the panel occasionally to check for moisture.
- Use a draft stopper at the bottom of doors.
- Keep panels dry and clean.
- Avoid trapping moisture for long periods.
This panel is a temporary support tool, not a full window upgrade. If a window leaks badly, repair or weatherproof the window properly when possible.
Blackout and Privacy Tips
For better light blocking:
- Use dark fabric on the room-facing side.
- Make the panel slightly snug but removable.
- Use weatherstrip around light gaps.
- Add curtains over the window.
- Label panels so they can be installed quickly.
- Store panels flat so they do not warp.
If privacy is the main goal, make sure no reflective gaps are visible from outside at night when indoor lights are on.
Cleaning and Storage
When not in use, store the panel flat in a dry place. Do not lean heavy items against it because foam board can bend or crack.
Cleaning tips:
- Wipe dust with a dry cloth.
- Avoid soaking the foam.
- Let panels dry fully before storage.
- Check tape edges for peeling.
- Repair small dents or torn facing before reuse.
Good storage places include under a bed, behind a cabinet, in a closet, or flat against a wall.
Simple Upgrades You Can Add
Once you build the basic version, you can improve it with small upgrades.
Useful upgrades include:
- Better pull handle
- Velcro tabs for light retention
- Fabric cover for a cleaner look
- Reflective foil layer
- Extra foam weatherstrip
- Numbered labels for each window
- Storage sleeve
- Moisture reminder label
- Curtain layer over the panel
Keep upgrades simple. The panel should remain lightweight and easy to remove.
Output and Uses
This DIY insulated window blackout panel can help with:
- Light blocking
- Privacy
- Draft reduction
- Short-term insulation
- Emergency blackout preparation
- Better sleep in bright rooms
- Reduced visibility from outside
- Temporary home prep during outages
It is not designed for storm impact, forced entry protection, or permanent window sealing.
Final Thoughts
A DIY insulated window blackout panel is a simple, low-cost project that can make a room darker, more private, and more comfortable during outages or cold-weather emergencies. It requires no power, uses basic materials, and can be built for almost any window size.
The key is to measure carefully, cut cleanly, seal the edges, add a pull tab, and keep the panel removable. Never permanently block emergency exit windows, and always check for moisture if the panel is used for long periods.
For preppers, renters, homeowners, and anyone improving a blackout-ready room, this is a practical project that offers real everyday value.
Frequently Asked Questions
Can this panel replace curtains?
It can help block light better than many curtains, but it does not need to replace them. Using curtains over the panel can improve blackout and insulation.
Can I use this during a power outage?
Yes. It requires no power and can help with privacy, light blocking, and draft reduction during an outage.
Is it safe to leave installed all the time?
It is better to remove it regularly to check for moisture and allow ventilation. Long-term use can hide condensation on windows.
Can I use it on an emergency exit window?
Only if it remains quickly removable. Do not screw or permanently attach panels over required escape windows.
What material blocks light best?
A dark fabric or blackout fabric on the room-facing side works well. Foam board alone may still leak light around edges.
Does reflective foil help?
Reflective foil can help reflect radiant heat in some situations, especially when installed correctly. It is optional but useful for certain climates.
Can I use duct tape on the edges?
Yes, duct tape can work, though foil tape may look cleaner and last longer on some panels.
Is this a security panel?
No. This is for blackout, privacy, and draft reduction only. It is not a security barrier or storm shield.