When the power goes out, keeping food hot can become just as important as cooking it. A pot of soup, rice, beans, stew, oats, or porridge may be fully cooked, but if it cools too quickly, you either have to reheat it or risk wasting food.
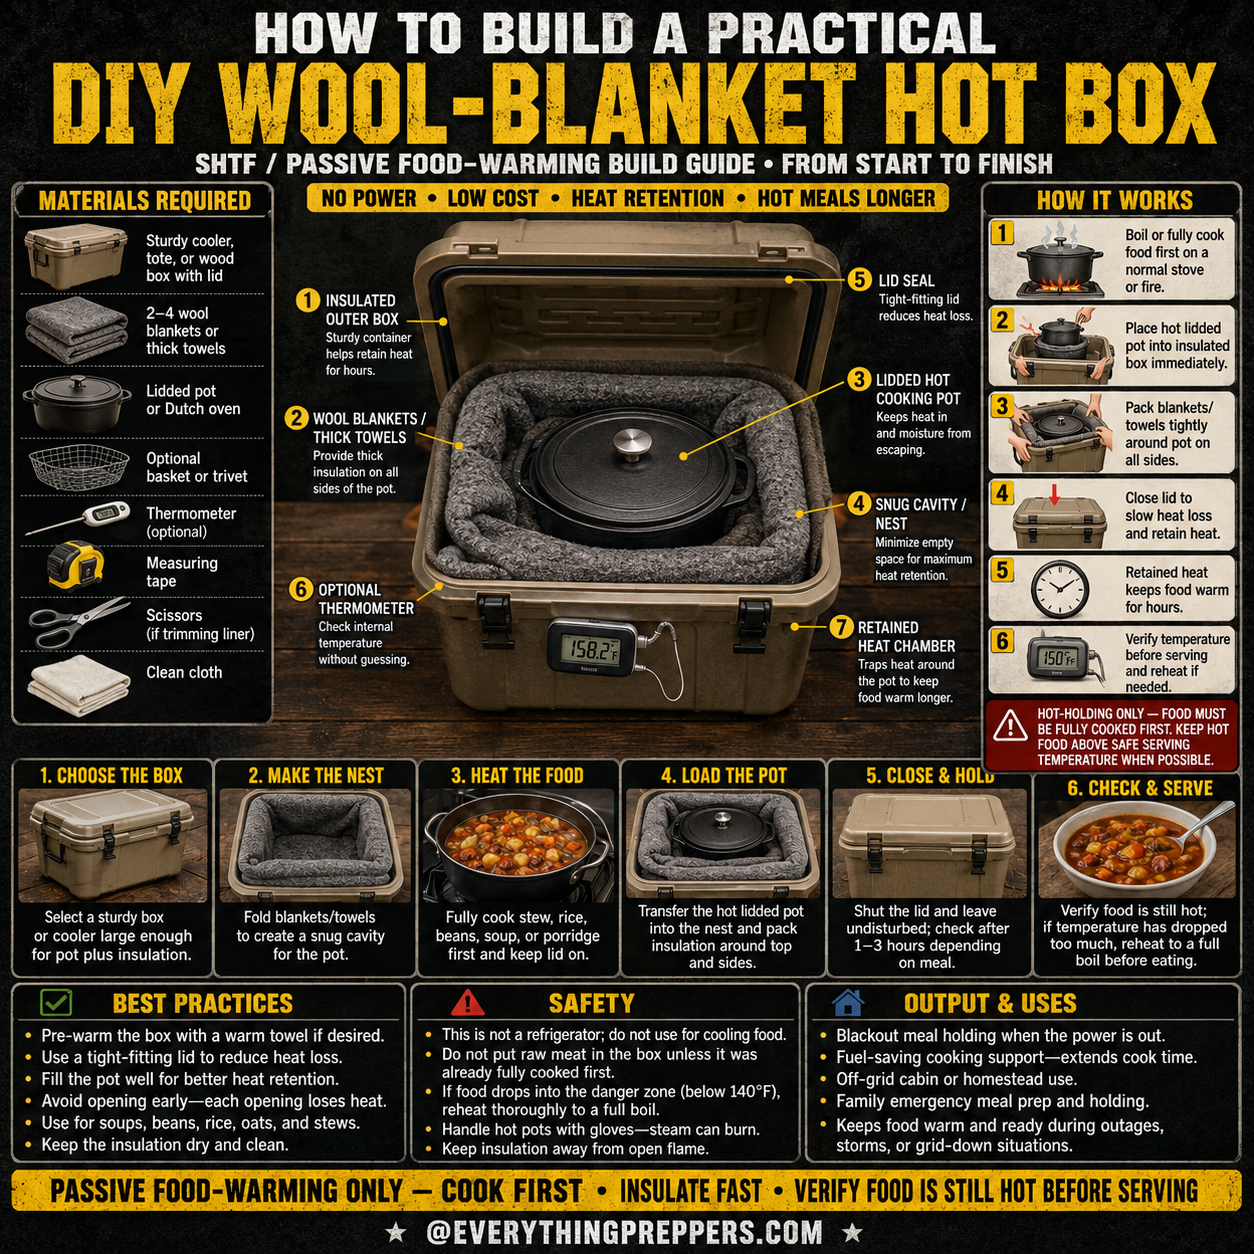
A DIY wool-blanket hot box is a simple passive food-warming setup that helps retain heat after food has already been fully cooked. It uses an insulated box, wool blankets or thick towels, and a tightly lidded pot to slow heat loss. It does not cook raw food safely on its own, and it is not a refrigerator. Think of it as a no-power heat-retention box for keeping hot food warm longer.
This project is useful during blackouts, storms, off-grid cabin stays, camping-style meal prep, fuel-saving cooking, and emergency food planning. The key rule is simple: cook first, insulate fast, and verify the food is still hot before serving.

What Is a Wool-Blanket Hot Box?
A wool-blanket hot box is an insulated container used to hold a hot lidded pot after the food has already been fully cooked. The blankets or towels wrap around the pot and help trap heat inside the box.
It is similar to the old-fashioned idea of a “hay box” or retained-heat cooker, where food is brought to a full boil first and then insulated so it stays hot longer. This version uses a sturdy cooler, tote, or wooden box with wool blankets or thick towels instead of hay.
A hot box can be useful for:
- Holding hot soup or stew
- Keeping cooked rice warm
- Holding beans after boiling
- Keeping oats or porridge warm
- Reducing reheating during outages
- Stretching cooking fuel
- Off-grid meal support
- Family emergency meal planning
The main purpose is heat retention, not raw-food cooking.
How This Hot Box Works
The hot box works by slowing down heat loss from the pot. A pot normally loses heat through the bottom, sides, lid, and surrounding air. By surrounding the pot with insulation, you reduce how quickly that heat escapes.
The system has several basic parts:
1. Insulated Outer Box
A sturdy cooler, tote, or wooden box gives the setup structure and helps hold the insulation in place.
2. Wool Blankets or Thick Towels
Wool blankets, heavy towels, or similar insulation wrap around the pot and reduce heat loss.
3. Lidded Hot Cooking Pot
The pot should have a tight-fitting lid. A lid helps keep heat and moisture inside the food.
4. Snug Interior Nest
The pot should sit inside a snug insulated cavity. Less empty air space usually means better heat retention.
5. Lid Seal
Closing the outer box reduces heat loss from the top.
6. Optional Thermometer
A thermometer helps check internal food temperature without guessing.
This setup works best when the food is placed into the hot box immediately after cooking.
Important Food Safety Warning
A wool-blanket hot box is for holding fully cooked hot food only.
Do not use it to cook raw meat, poultry, seafood, eggs, or unsafe partially cooked foods. Do not assume food is safe just because the pot still feels warm from the outside.
Food can become unsafe if it stays too long in the temperature danger zone. In general, hot foods should be kept at 140°F / 60°C or above when being held for serving. If the food drops below safe hot-holding temperature for too long, reheat it thoroughly before eating.
For best safety:
- Fully cook food first.
- Place the hot lidded pot into the box immediately.
- Keep the lid closed.
- Use a food thermometer when possible.
- Reheat food if temperature has dropped too much.
- Do not use the box for cooling food.
- Do not store leftovers in the hot box overnight.
When in doubt, reheat food to a full boil before serving.
Materials Needed
This project is simple and low-cost. You may already have most of the materials at home.
Basic Materials
- Sturdy cooler, tote, or wooden box with a lid
- 2 to 4 wool blankets or thick towels
- Lidded pot or Dutch oven
- Optional basket or trivet
- Optional food thermometer
- Measuring tape
- Scissors if trimming liner
- Clean cloth
A cooler works well because it already has insulation and a lid. A wooden box can also work, but it may need more blanket insulation. A plastic tote can be used, but make sure the pot is not hot enough to melt or damage the plastic.
The pot should be stable, clean, and safe to handle. A heavy Dutch oven can hold heat well, but it is also heavy, so handle it carefully.
Best Foods for a Hot Box
This method works best with foods that are already fully cooked and hold heat well.
Good options include:
- Soup
- Stew
- Rice
- Beans
- Lentils
- Oats
- Porridge
- Chili
- Curry
- Pasta dishes
- Boiled potatoes
Foods with more liquid usually hold heat better than dry foods. A full pot also stays hot longer than a half-empty pot because it contains more thermal mass.
Avoid using this method for raw or risky foods that require exact cooking temperatures unless you are following a verified retained-heat cooking method and checking temperatures properly.
Step-by-Step Build Guide
Step 1: Choose the Box
Choose a sturdy container large enough to hold your lidded pot plus insulation on all sides. A cooler is usually the easiest option because it already has a lid and insulating walls.
The box should be:
- Clean
- Dry
- Sturdy
- Big enough for the pot
- Small enough to reduce empty air space
- Easy to close tightly
Avoid containers with chemical smells, cracks, dirty interiors, or weak lids. The hot box will be used near food, so cleanliness matters.
Step 2: Make the Insulated Nest
Fold wool blankets or thick towels into the box to create a snug nest for the pot. Add insulation under the pot, around the sides, and over the top.
The goal is to reduce empty space. If there is too much air inside the box, the pot will cool faster.
A simple layout:
- One towel or folded blanket on the bottom
- Blanket walls around the sides
- Pot placed in the center
- More insulation wrapped over the top
- Outer lid closed tightly
Make sure the insulation is clean and dry. Wet towels or damp blankets will reduce heat retention.
Step 3: Heat the Food Completely
Cook the food fully on a normal stove, camp stove, rocket stove, or safe cooking fire before placing it into the hot box.
For soups, stews, beans, rice, or oats, bring the food to a strong simmer or full boil as appropriate for the recipe. Stir well so the heat is evenly distributed.
The hotter and fuller the pot is at the start, the better the hot box will work.
Do not place raw food into the hot box and expect it to cook safely.
Step 4: Load the Hot Pot
Carefully transfer the hot lidded pot into the insulated nest. Use oven mitts or heat-resistant gloves because the pot, handles, and steam can burn.
Keep the lid on the pot during transfer. Try to move quickly so you do not lose heat before closing the box.
Once the pot is inside, pack blankets or towels around the sides and top. The insulation should be snug but not so tight that it tips the pot or makes removal unsafe.
Step 5: Close and Hold
Close the box lid and leave it undisturbed. Every time you open the hot box, heat escapes.
Depending on the food, pot size, starting temperature, insulation, and room temperature, the box may keep food warm for several hours. However, time alone is not enough to prove food safety.
For best results:
- Do not open early.
- Keep the box indoors or sheltered.
- Avoid drafts and cold floors.
- Use a thermometer when possible.
- Reheat if the food cools too much.
A hot box works best as short-term meal holding, not long-term storage.
Step 6: Check and Serve
Before serving, check that the food is still hot. If you have a food thermometer, verify the temperature in the center of the food, not just near the edge of the pot.
If the food has dropped below safe hot-holding temperature, reheat it thoroughly before eating. For liquid foods like soup or stew, bringing it back to a full boil is a practical safety step.
Serve carefully. The pot and steam may still be hot enough to burn.
Best Practices for Better Heat Retention
Small details make this project work better.
Use these best practices:
- Pre-warm the box with a warm towel if desired.
- Use a tight-fitting pot lid.
- Use a full pot when possible.
- Wrap insulation around all sides.
- Avoid opening the box early.
- Keep the box closed tightly.
- Use liquid-heavy meals like soups and stews.
- Store the box away from cold drafts.
- Keep the insulation dry and clean.
- Use a thermometer instead of guessing.
A hot box does not create heat. It only slows heat loss. Starting with very hot food is important.
Common Mistakes to Avoid
Mistake 1: Using It to Cook Raw Food
This is the biggest mistake. A wool-blanket hot box is not a safe shortcut for cooking raw meat, poultry, seafood, or other risky foods unless you are using a verified method and checking temperatures carefully.
Mistake 2: Opening the Box Too Often
Every opening releases heat. If you keep checking the pot, it will cool faster.
Mistake 3: Using Too Little Insulation
Thin towels or loose wrapping may not hold heat well. Use enough insulation to surround the pot fully.
Mistake 4: Leaving Too Much Empty Space
A large box with a small pot inside loses heat faster. Make the interior nest snug.
Mistake 5: Guessing Food Temperature
The outside of the pot may feel warm while the food inside is not hot enough. Use a thermometer when possible.
Mistake 6: Treating It Like a Refrigerator
A hot box is not for cooling food or storing leftovers overnight. It is for short-term hot holding only.
Safety Notes
Food safety and burn safety both matter with this project.
Follow these safety rules:
- Fully cook food before placing it in the box.
- Do not put raw meat in the hot box.
- Keep hot foods at safe serving temperature when possible.
- Reheat food thoroughly if temperature drops too low.
- Use gloves when handling hot pots.
- Watch for steam burns when opening lids.
- Keep insulation away from open flames.
- Do not place a dangerously hot pot directly against meltable plastic.
- Keep the box clean and dry.
- Do not use contaminated towels or blankets around food containers.
If the food smells strange, looks spoiled, or has been held too long at unsafe temperature, do not eat it.
Output and Uses
A DIY wool-blanket hot box is useful for passive food warming and short-term heat retention.
It can help with:
- Blackout meal holding
- Off-grid cooking support
- Fuel-saving meal prep
- Keeping soup or stew warm
- Holding cooked rice or beans
- Family emergency meals
- Cabin cooking
- Storm and grid-down meal planning
It is especially useful when fuel is limited. Instead of reheating the same pot repeatedly, you can hold heat longer after the first full cook.
Simple Upgrades You Can Add
Once you build the basic version, you can improve it with small upgrades.
Useful upgrades include:
- Clip-on food thermometer
- Reflective inner liner
- Better lid seal
- Dedicated washable towel set
- Removable trivet or basket
- Heat-safe pot stand
- Label showing food safety reminders
- Separate clean storage bag for blankets
Keep the design simple. The best hot box is easy to clean, easy to pack, and easy to use safely.
Cleaning and Storage
After use, let the pot and box cool safely. Remove blankets or towels and check for spills, moisture, or food residue.
Clean the box interior with a damp cloth and allow everything to dry completely before storage. Wash towels or blankets if they were exposed to spills.
Store the hot box materials together so they are ready for the next outage.
Good storage habits:
- Keep towels clean and dry.
- Store the thermometer with the box.
- Keep the box free of chemical smells.
- Do not store fuel, cleaners, or pesticides inside it.
- Check for mold or dampness before use.
Clean storage is important because this setup is used around food.
Final Thoughts
A DIY wool-blanket hot box is a simple no-power way to keep fully cooked food warm longer during blackouts, storms, and off-grid situations. It uses basic materials, requires no electricity, and can help stretch cooking fuel when every meal matters.
The build is easy: choose a sturdy box, make a snug blanket nest, cook the food fully, load the hot lidded pot, close the lid, and check the temperature before serving.
The most important rule is food safety. This is a passive food-warming box, not a refrigerator and not a raw-food cooker. Cook first, insulate fast, keep it closed, and verify the food is still hot before eating.
For emergency preparedness, this is one of the simplest low-cost kitchen projects worth learning before the next power outage.
Frequently Asked Questions
Can a wool-blanket hot box cook raw food?
No. This setup is best for holding fully cooked hot food. Do not rely on it to safely cook raw meat, poultry, seafood, eggs, or other high-risk foods.
How long will food stay hot?
It depends on the pot size, food volume, starting temperature, insulation, box type, and room temperature. Use a thermometer instead of guessing.
What temperature should hot food stay above?
Hot food should generally be held at 140°F / 60°C or above for safer serving. If it drops too low, reheat it thoroughly before eating.
Can I use a plastic cooler?
Yes, but be careful. Do not place a dangerously hot pot directly against plastic that could soften or melt. Use towels, a trivet, or a heat-safe barrier.
What foods work best?
Soups, stews, beans, rice, oats, porridge, chili, and other fully cooked moist foods work well because they hold heat better.
Can I use regular towels instead of wool blankets?
Yes. Thick towels can work, but wool blankets usually insulate better. Use clean, dry materials only.
Should I open the box to check often?
No. Opening the box releases heat. Check only when needed, and use a thermometer when possible.
Can I store leftovers in the hot box overnight?
No. A hot box is not for overnight storage. Cool leftovers safely and refrigerate them when possible.