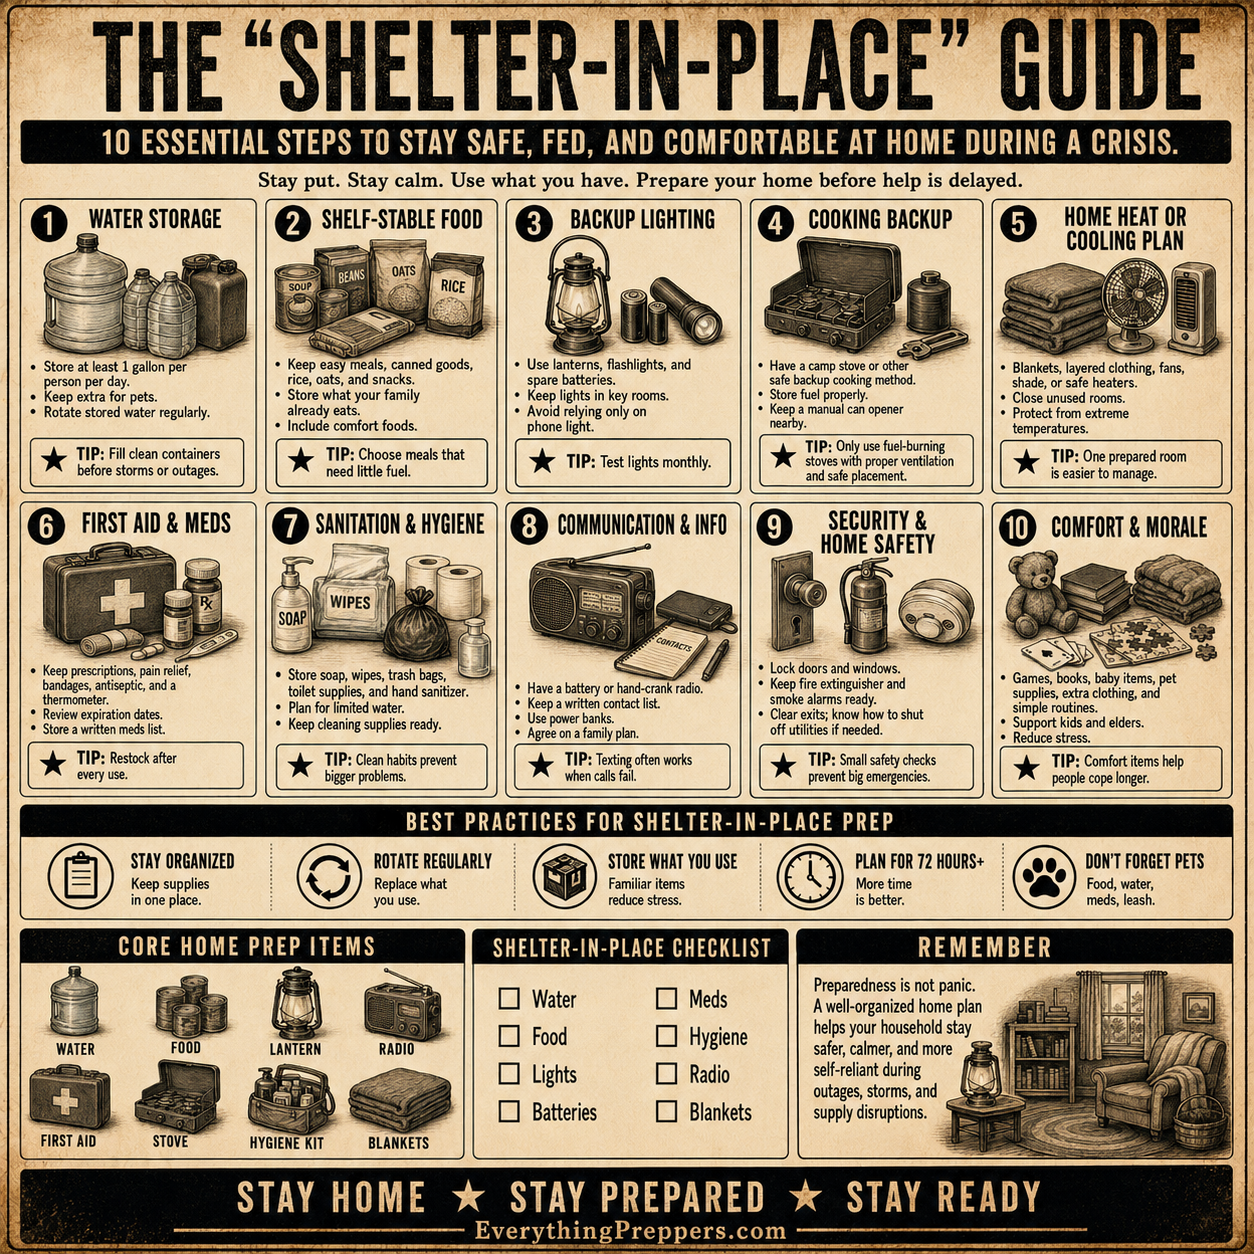
When the power goes out, the small things suddenly become important. A charged phone, a working light, a radio, a small fan, or a laptop can make a blackout much easier to manage. But not everyone wants a noisy fuel generator, and not every emergency requires whole-house backup power.
That is where a DIY 12V blackout battery backup cart becomes useful.
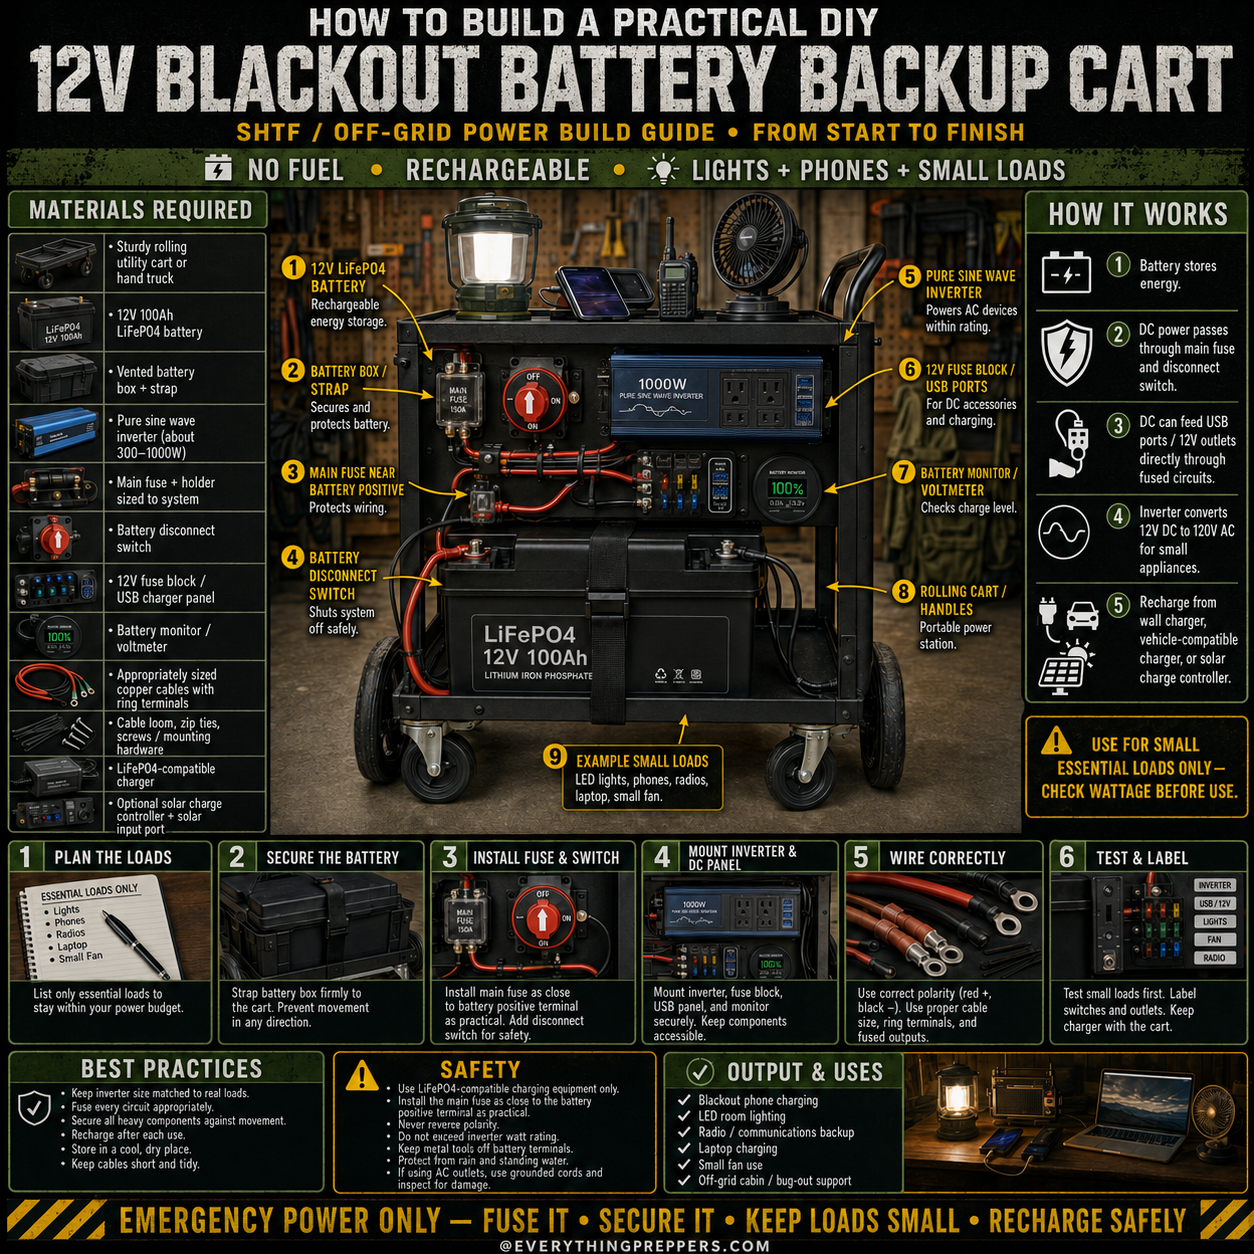
This portable backup power cart is designed for small essential loads only: phones, LED lights, radios, tablets, laptops, USB devices, and small fans. It is built around a rechargeable 12V battery, fuse protection, a disconnect switch, a DC fuse panel, USB ports, a battery monitor, and a pure sine wave inverter.
It is not meant to power an entire home, run heaters, operate large appliances, or replace a professionally installed backup system. Instead, it gives you a practical, movable emergency power station for basic blackout needs.

What Is a 12V Blackout Battery Backup Cart?
A 12V blackout battery backup cart is a portable emergency power setup mounted on a rolling utility cart or hand truck. The battery stores energy, and the wiring system sends that power to small devices through USB ports, 12V outlets, or an inverter.
The cart design makes it easier to move your backup power where it is needed most. During a blackout, you may want it in the living room for lights, near a desk for charging devices, or in a sheltered area for radio communication.
A basic battery backup cart can help with:
- Charging phones
- Running LED lights
- Powering small fans
- Charging tablets or laptops
- Running radios
- Supporting basic communication gear
- Off-grid cabin lighting
- Short-term blackout comfort
The main idea is simple: store power before an outage, then use it carefully for the most important small devices.
How This Backup Cart Works
The system works by moving stored battery power through protected circuits.
Here is the basic power flow:
- The battery stores energy.
A 12V battery, such as a LiFePO4 battery, acts as the main energy source. - The main fuse protects the wiring.
A fuse near the battery positive terminal helps protect the system if a short circuit happens. - The disconnect switch shuts the system off.
This lets you turn off the cart when it is not in use or when you need to work on it. - The fuse block distributes DC power.
USB ports, 12V outlets, lights, or small DC accessories can be connected through fused circuits. - The inverter powers small AC devices.
A pure sine wave inverter converts 12V DC power into AC power for compatible small electronics. - The battery monitor shows charge level.
A voltmeter or battery monitor helps you track how much power remains. - The battery is recharged after use.
A compatible charger, vehicle-compatible charger, or solar charge controller can recharge the battery depending on your setup.
Every part should be properly rated for the battery, wiring, and devices you plan to use.
Important Safety Warning
This project involves batteries, wiring, fuses, and electrical components. Mistakes can cause overheating, fire, damaged devices, or battery failure.
Before building or using a battery backup cart:
- Use proper wire size for the expected current.
- Install a main fuse close to the battery positive terminal.
- Never reverse positive and negative polarity.
- Use a charger compatible with your battery type.
- Do not exceed the inverter watt rating.
- Keep the system dry and protected.
- Do not use damaged wires, swollen batteries, or loose terminals.
- Ask a qualified electrician or experienced technician if you are unsure.
This guide is for general educational planning. Electrical projects should always be built safely and checked carefully before use.
Materials Needed
The exact parts depend on your power goals, but a practical small-load backup cart may include the following:
Main Materials
- Sturdy rolling utility cart or hand truck
- 12V 100Ah LiFePO4 battery
- Vented or protective battery box
- Battery strap or mounting bracket
- Pure sine wave inverter, commonly 300W to 1000W
- Main fuse and fuse holder sized for the system
- Battery disconnect switch
- 12V fuse block or USB charger panel
- Battery monitor or voltmeter
- Properly sized copper cables with ring terminals
- Cable loom, zip ties, screws, and mounting hardware
- LiFePO4-compatible charger
- Optional solar charge controller and solar input port
Useful Tools
- Wire cutter
- Wire crimper
- Drill or driver
- Screwdrivers
- Wrenches
- Multimeter
- Heat shrink tubing
- Labels
- Safety glasses
- Work gloves
Do not choose random parts just because they fit together physically. Battery systems need correctly rated components.
Step 1: Plan the Loads First
Before buying parts or connecting wires, decide what the cart is supposed to power. This step prevents overspending and helps avoid unsafe overloads.
Make a simple list of essential devices:
- LED light
- Phone charger
- Tablet charger
- Laptop charger
- Small fan
- Radio
- Battery charger
- USB accessories
Then check the wattage of each device. You can usually find this on the charger label, device label, or power adapter.
This cart is best for small essential loads. Avoid high-wattage devices such as:
- Space heaters
- Microwaves
- Electric kettles
- Hair dryers
- Toasters
- Air conditioners
- Large refrigerators
- High-surge power tools
A good blackout power plan is not about running everything. It is about keeping the most important things running longer.
Step 2: Secure the Battery
Mount the battery inside a protective battery box and strap it firmly to the cart. The battery should not slide, tip, or bounce when the cart moves.
Place the battery low on the cart if possible. This lowers the center of gravity and makes the cart more stable.
A 12V 100Ah battery can be heavy, especially when mounted with cables and accessories. A rolling cart makes it easier to move, but only if the battery is secured properly.
Check that:
- The battery cannot shift.
- The box is firmly attached.
- The cart wheels roll smoothly.
- The cart does not tip easily.
- Cables are not being pulled or pinched.
Good mounting protects both the battery and the wiring.
Step 3: Install the Main Fuse and Disconnect Switch
The main fuse is one of the most important safety parts of the whole system. It should be placed as close as practical to the battery positive terminal.
The fuse helps protect the wiring if a short circuit happens.
The disconnect switch allows you to shut off the battery output when the cart is stored, transported, or serviced.
Basic safety points:
- Put the main fuse near the battery positive terminal.
- Use a fuse sized correctly for the wire and system.
- Use a disconnect switch rated for DC battery current.
- Keep exposed terminals covered.
- Do not leave long unfused positive cable runs.
Never skip the fuse. Batteries can release a large amount of current very quickly during a short circuit.
Step 4: Mount the Inverter and DC Panel
Next, mount the inverter, USB ports, fuse block, and battery monitor where they are easy to reach.
The inverter should have enough airflow around it. Do not bury it under bags, cloth, tools, or boxes. Inverters can get warm when running and need ventilation.
Keep the control panel simple and easy to understand. During a blackout, you do not want to guess which switch powers which outlet.
A clean panel may include:
- Main power switch
- USB charging ports
- 12V outlet
- Battery monitor
- Inverter switch
- Fuse block access
- Labels for each circuit
Mount everything securely so vibration and movement do not loosen wires.
Step 5: Wire the System Correctly
Correct wiring is critical. Use properly sized copper cable, secure terminals, correct polarity, and the right fuse protection.
General wiring rules:
- Red usually means positive.
- Black usually means negative.
- Use properly crimped ring terminals.
- Keep cables short and tidy.
- Protect wires from sharp edges.
- Use cable loom or clamps where needed.
- Fuse circuits according to wire size and load.
- Check voltage and polarity with a multimeter.
- Never let metal tools touch both battery terminals.
Before plugging in devices, inspect all wiring and test the system with a small load first.
If you are not confident with DC wiring, have someone qualified inspect the build before using it.
Step 6: Test and Label Everything
Testing should happen before the emergency, not during the emergency.
Start with small devices:
- One phone charger
- One LED light
- One radio
- One small fan
Watch for warning signs:
- Hot wires
- Warm connectors
- Burning smell
- Flickering power
- Inverter alarms
- Loose terminals
- Unexpected shutdowns
Label every switch, outlet, fuse, and charger input. Clear labels make the cart safer for family members who may need to use it during a blackout.
Useful labels include:
- Main disconnect
- Inverter
- USB ports
- 12V outlet
- Lights
- Fan
- Radio
- Charger input
- Solar input
Keep the charger stored with the cart so it does not get lost.
How Long Will a 12V 100Ah Battery Last?
Runtime depends on battery capacity, device wattage, inverter losses, and how deeply the battery is discharged.
A 12V 100Ah battery stores about 1,200 watt-hours in theory. In real use, the available power may be lower because of inverter losses, battery management limits, wiring losses, and safety margins.
Example:
- A 10W LED light can run for a long time.
- A 20W phone charging setup uses little power.
- A 40W small fan uses more power but may still be reasonable.
- A 500W appliance can drain the battery much faster.
The rule is simple: small loads last longer.
For blackout use, focus on efficient devices. LED lights and USB charging are much better uses of stored power than heat-producing appliances.
Best Devices to Use With This Cart
This type of cart is best for low-watt essentials.
Good devices include:
- LED lanterns
- USB lights
- Phones
- Tablets
- Radios
- Small fans
- Rechargeable flashlights
- Laptop chargers
- Small communication devices
- AA/AAA battery chargers
Avoid high-watt devices such as:
- Heaters
- Electric kettles
- Microwaves
- Toasters
- Coffee makers
- Hair dryers
- Air conditioners
- Large power tools
If a device makes heat, it probably uses too much power for this type of backup cart.
Charging the Battery Backup Cart
Recharge the cart after every use. Do not wait until the next outage.
Common charging options include:
- A LiFePO4-compatible wall charger
- A vehicle-compatible DC charger
- A solar panel through a compatible solar charge controller
Do not connect solar panels directly to the battery unless your system is specifically designed for that. A solar charge controller is normally required.
Good charging habits:
- Recharge after each use.
- Check charge level monthly.
- Store the charger with the cart.
- Keep the battery in a cool, dry place.
- Follow the battery manufacturer’s charging instructions.
- Do not use damaged chargers or cables.
A backup cart is only useful if it is charged before the power goes out.
Best Practices
To keep your system safe and useful:
- Keep inverter size matched to real loads.
- Fuse every circuit properly.
- Secure heavy parts against movement.
- Recharge after each use.
- Store the cart in a cool, dry place.
- Keep cables short and tidy.
- Label switches and outlets.
- Keep water away from the cart.
- Test the system before storm season.
- Do not lend it out without explaining how it works.
Simple systems are usually more reliable during emergencies.
Common Mistakes to Avoid
Mistake 1: Building Without a Load Plan
If you do not know what you want to power, you may choose the wrong battery, inverter, cables, or fuses.
Mistake 2: Skipping Fuse Protection
A fuse is not optional. The main fuse protects the wiring from dangerous short circuits.
Mistake 3: Using Undersized Wire
Small wire can overheat when carrying too much current. Wire size must match the load and cable length.
Mistake 4: Running Large Appliances
This cart is for small essential loads. Large appliances can overload the inverter and drain the battery quickly.
Mistake 5: Using the Wrong Charger
A LiFePO4 battery needs a compatible charger. The wrong charger can reduce performance or damage the battery.
Mistake 6: Ignoring Water Protection
Electricity and water are a dangerous combination. Keep the cart dry and avoid wet cords or wet hands.
Safety Checklist
Before using the cart, check:
- Battery is strapped down.
- Main fuse is installed.
- Disconnect switch works.
- Wires are secure.
- Polarity is correct.
- Inverter is ventilated.
- Cables are not damaged.
- Battery monitor works.
- Charger is compatible.
- Loads are small and within rating.
Shut the system down immediately if you notice heat, smoke, sparks, melting, strange smells, or unusual sounds.
Maintenance Checklist
Check the cart regularly so it is ready when needed.
Monthly:
- Check battery level.
- Inspect cables.
- Test one light or phone charger.
- Check fuse condition.
- Make sure the charger is stored nearby.
- Inspect the wheels and cart frame.
- Make sure labels are readable.
After each use:
- Recharge the battery.
- Let the inverter cool.
- Check for loose connections.
- Clean dust from vents.
- Store it dry.
Preparedness gear should be tested before an emergency.
Output and Uses
A DIY 12V blackout battery backup cart can be useful for:
- Emergency phone charging
- LED room lighting
- Radio backup
- Small fan use
- Laptop charging
- Off-grid cabin support
- Bug-out staging
- Short-term blackout comfort
It is not a whole-house power system. Use it for small essential loads and recharge it safely.
Final Thoughts
A DIY 12V blackout battery backup cart is one of the most practical emergency power projects for home preparedness. It is quieter than a generator, rechargeable, portable, and useful for the devices people rely on most during a power outage.
The key is to keep the system simple and safe. Plan your loads, secure the battery, install proper fuse protection, use correct wiring, label everything, and recharge after every use.
For preppers, cabin owners, and anyone preparing for blackouts, this cart can become a dependable part of your emergency setup—as long as you respect its limits and use it only for small essential loads.
Frequently Asked Questions
Can this power my whole house?
No. This is a small-load emergency backup cart. It is meant for phones, lights, radios, laptops, and small fans—not whole-house power.
Can it run a refrigerator?
Only if the system is specifically sized for the refrigerator’s running wattage and startup surge. For most basic builds, it is better to use this cart for smaller essentials.
Can I use a regular car battery?
A regular car starting battery is not ideal for deep-cycle use. A deep-cycle battery or LiFePO4 battery is usually better for repeated backup power use.
Do I really need a fuse?
Yes. A fuse near the battery positive terminal is one of the most important safety parts of the build.
Can I charge it with solar?
Yes, but use a compatible solar charge controller. Do not connect solar panels directly to the battery unless the system is designed for it.
Is this safe indoors?
It can be used indoors if properly built, kept dry, ventilated, and not overloaded. Do not use damaged wiring, wet cords, or exposed terminals.
What should I not plug into it?
Avoid heaters, kettles, microwaves, toasters, air conditioners, hair dryers, and other high-wattage appliances.
How often should I check it?
Check the battery level monthly and recharge after every use. Test the system before storm season or planned outages.