A productive garden can create a problem almost overnight.
Tomatoes ripen at once. Apples begin dropping. Peppers soften before you can use them. Fresh produce that took months to grow may start deteriorating within days.
A solar food dehydrator offers a low-power way to preserve part of that harvest.
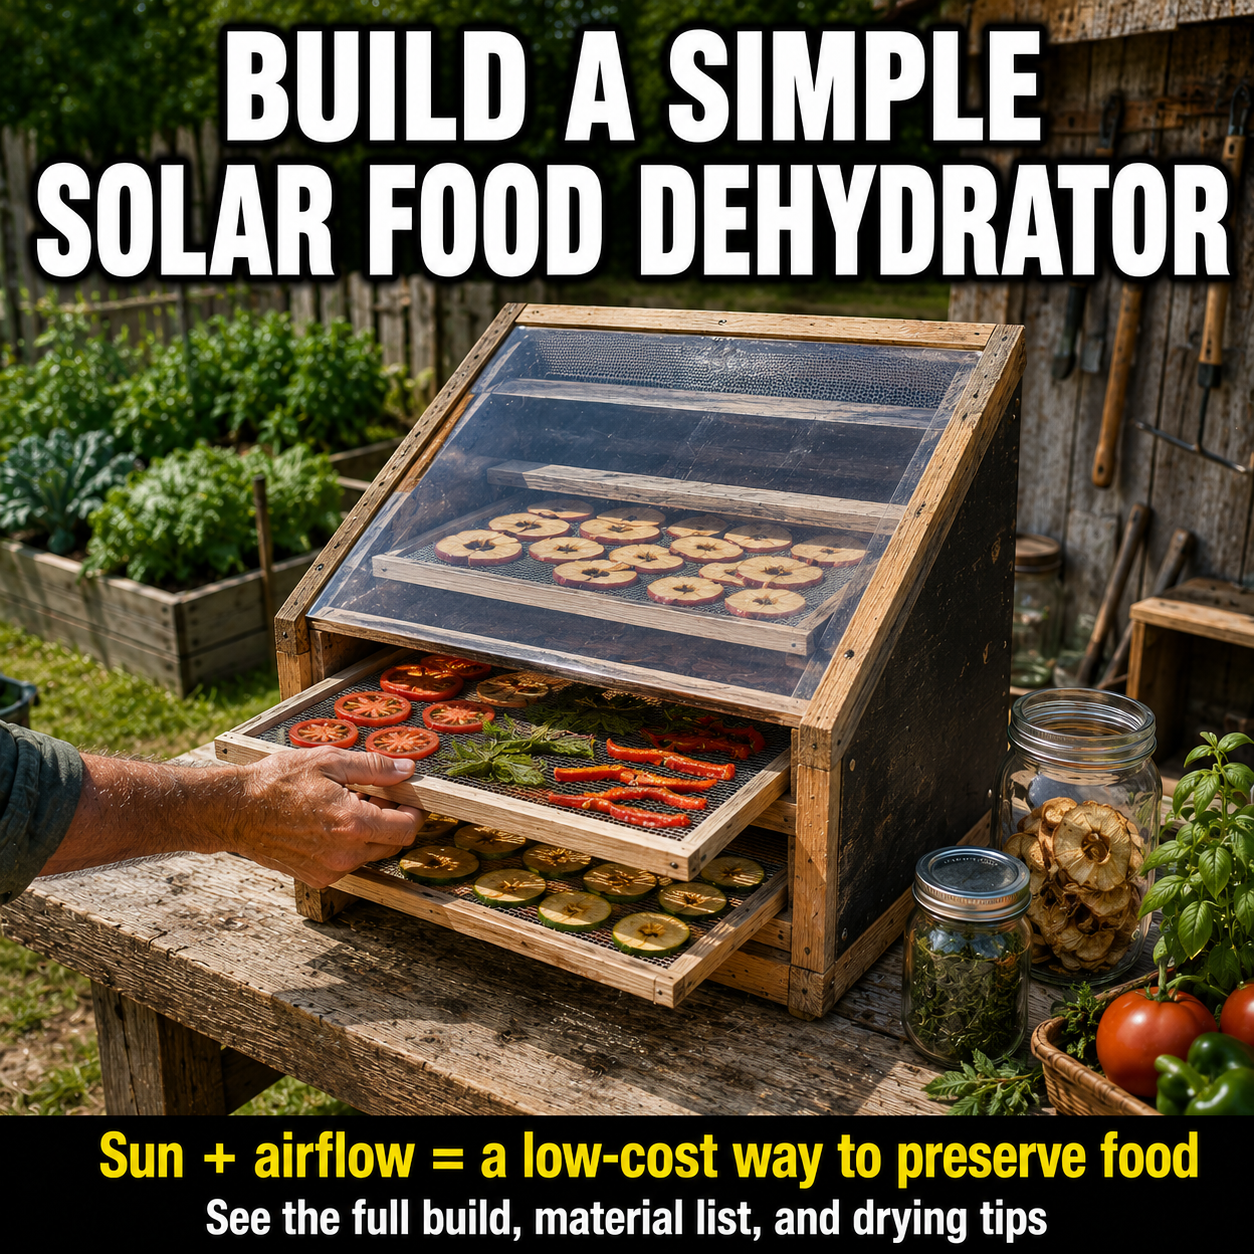
Instead of placing food directly in the open sun, the dehydrator captures solar heat inside a ventilated cabinet. Warm air moves across thinly sliced food, absorbs moisture, and exits through upper vents. Screened trays keep the pieces separated while an enclosed cabinet helps protect them from insects, birds, dust, and falling debris.
There is no heating element.
There is no electric fan.
But this project requires more care than simply placing food inside a warm wooden box.
The temperature must become warm enough to remove moisture promptly, air must continue moving through the cabinet, and the selected food must be suitable for the conditions your homemade unit can provide.
Built and monitored correctly, a solar dehydrator can become a useful seasonal tool for:
- Drying suitable fruits
- Reducing garden waste
- Making lightweight trail snacks
- Preserving part of a harvest without grid electricity
- Teaching practical food-preservation skills
- Supplementing an electric dehydrator
- Preparing ingredients for baking and cooking
It should not be treated as a universal appliance for every type of food.
Important Safety Note Before You Build
The National Center for Home Food Preservation considers high-sugar, high-acid fruits the safest foods for outdoor drying when the weather is hot, dry, and breezy. It does not recommend outdoor drying of vegetables or meat because their composition and uncontrolled outdoor conditions increase the risk of spoilage or microbial growth. (Home Food Preservation)
That distinction matters because the featured image shows apples, tomatoes, peppers, zucchini, and herbs together.
A homemade solar cabinet is better protected and often warmer than an uncovered outdoor rack, but it still lacks the precise thermostat and continuous fan found in an electric food dehydrator.
For the most conservative approach:
- Begin with suitable fruits.
- Follow a tested drying recipe for each food.
- Monitor the cabinet with a thermometer.
- Move unfinished food to a controlled dehydrator or oven when weather conditions deteriorate.
- Do not use this homemade solar unit for meat, poultry, fish, eggs, dairy products, or cooked meals.
- Do not make jerky in it.
USDA guidance for jerky requires meat to receive a validated heating step and then dry in equipment capable of maintaining the required temperature. An unpredictable solar cabinet cannot reliably provide that control. (Food Safety and Inspection Service)
How a Solar Dehydrator Works
Drying preserves food by removing moisture needed for microbial growth and many spoilage reactions. Successful drying depends on three things working together:
- Moderate heat
- Low humidity
- Continuous airflow
Food should be arranged so air can move above, below, and between the pieces. (Utah State University Extension)
A solar dehydrator creates this movement naturally.
Sunlight passes through a clear front or collector panel and warms a dark absorber surface inside the cabinet. The heated air becomes lighter and rises through the drying trays.
As it passes over the food, the air absorbs moisture.
The warmer, moisture-laden air then escapes through exhaust openings near the top. Fresh, drier air enters through screened vents near the bottom, warms, and repeats the cycle.
Utah State University’s solar-dehydrator design uses the same basic principle: a dark solar collector warms incoming air, the air moves through food-safe screened trays, and a vent or chimney carries moisture out of the drying chamber. (Utah State University Extension)
The food is not preserved merely because the cabinet feels hot.
It is preserved when enough moisture has been removed throughout every piece.
Direct, Indirect, and Hybrid Solar Dehydrators
There are three common arrangements.
Direct solar dehydrator
The food sits beneath a transparent cover and receives direct sunlight.
This is the simplest design, but intense sunlight can cause:
- Uneven heating
- Color loss
- Scorching
- Surface hardening
- Greater vitamin loss
- Excessive temperatures near the clear cover
Indirect solar dehydrator
Sunlight warms a separate dark collector. The heated air then moves into a shaded drying chamber.
This offers more protection from direct ultraviolet light and usually provides more even airflow.
Hybrid design
A compact cabinet may combine a clear sloped front, a shaded lower air intake, a dark absorber, and partially shaded trays.
The project below uses this simpler hybrid configuration. It is easier to build than a large separate collector while still providing enclosed, screened airflow.
For higher-quality results, you can later extend the cabinet with a dedicated solar-air collector.
What You Can Dry
Best foods for a first test
Start with a small batch of one suitable fruit:
- Apples
- Pears
- Peaches
- Apricots
- Plums
- Cherries
- Grapes
- Pineapple
- Bananas
Do not mix several foods during the first test. Different foods release moisture at different rates and may require different preparation, drying temperatures, and completion times.
Fruit selected for drying should be fresh, sound, and free of decay.
Tomatoes and vegetables
Tomatoes, peppers, zucchini, carrots, onions, and similar vegetables are often dehydrated in thermostatically controlled appliances. Many require blanching or another tested pretreatment before drying.
Because the National Center for Home Food Preservation does not recommend outdoor vegetable drying, the conservative choice is to dry vegetables in an electric dehydrator or controlled oven. A solar cabinet may be used as a supplemental heat source only when its performance has been measured and the process follows tested instructions for the specific vegetable. (Home Food Preservation)
When the solar unit cannot maintain appropriate conditions, transfer the trays indoors and complete the process immediately.
Herbs
Herbs require relatively low temperatures. Direct sun is not recommended because it can reduce color and flavor. Many herbs dry best in warm, shaded, well-ventilated conditions or in a controlled dehydrator around 95°F to 115°F. (Home Food Preservation)
A full-sun solar cabinet may become far too hot for herbs. Use an indirect collector, shade the drying chamber, or dry herbs separately.
Foods to keep out
Do not place these foods in a homemade passive solar dehydrator:
- Beef, pork, poultry, or game
- Fish or seafood
- Eggs
- Milk or cheese
- Cooked rice or beans
- Prepared meals
- Leftovers
- Foods containing meat drippings
- Unknown or moldy produce
Drying does not automatically destroy every pathogen already present in food.
Materials
The following quantities create a compact cabinet with approximately four removable trays.
Cabinet
- One sheet of exterior-grade plywood
- Scrap 1×2 or 2×2 lumber
- Exterior-grade screws
- Waterproof wood glue
- Two hinges
- Two latches
- One handle
- Weather stripping
- Exterior wood sealer or paint
- Four short legs or wooden blocks
Use sound, dry wood without chemical contamination, mold, oil, or rot.
Clear solar panel
Choose one:
- Tempered glass
- Reclaimed storm-window glass in good condition
- UV-resistant clear polycarbonate rated for outdoor heat
Avoid cracked glass or thin brittle plastic that may warp under heat.
Heat absorber
- Thin sheet metal
- Food-safe, high-temperature black coating for the non-food-contact absorber
- Screws or brackets
- Spacers creating an air channel beneath it
The food should never touch the painted absorber.
Drying trays
- Scrap 1×2 lumber for tray frames
- Stainless-steel mesh
- Food-grade plastic dehydrator mesh
- Food-safe fiberglass screening specifically intended for food contact
- Small screws or stainless-steel staples
The National Center for Home Food Preservation recommends stainless steel, food-safe plastic, or suitable coated fiberglass screens. It warns against galvanized hardware cloth, copper screening, and aluminum screening because metals may oxidize, corrode, discolor food, or leave unwanted residues. (Home Food Preservation)
Ordinary window screen should not automatically be assumed safe for direct food contact.
Ventilation
- Insect screen
- Two adjustable vent covers
- Optional short exhaust chimney
- Optional small solar-powered fan
Monitoring equipment
- Oven or dehydrator thermometer
- Optional probe thermometer
- Optional hygrometer
- Timer
- Notebook for recording test results
Tools
- Tape measure
- Carpenter’s square
- Pencil
- Circular saw or hand saw
- Drill
- Screwdriver
- Clamps
- Stapler suitable for the tray material
- Utility knife
- Sandpaper
- Safety glasses
- Work gloves
Suggested Dimensions
A practical countertop or garden-table model can measure approximately:
- Width: 24 inches
- Depth: 24 inches
- Rear height: 30 inches
- Front height: 20 inches
- Tray size: approximately 20 by 20 inches
- Space between trays: 3 to 4 inches
- Number of trays: three or four
The sloped roof or front panel should face the strongest available sunlight.
These dimensions are only a starting point. Adapt the cabinet to the clear panel and food-safe tray material you already have.
Keep the cabinet small enough that:
- You can move it under shelter.
- Every tray remains accessible.
- Air can travel through the entire chamber.
- The food can be checked without dismantling the unit.
- You can clean all interior surfaces.
Step 1: Build the Cabinet Frame
Cut four vertical corner posts.
Build rectangular frames for:
- The base
- The front
- The rear
- The two sides
The rear should be taller than the front, creating a slope for the clear panel.
Connect the frame with exterior screws and waterproof glue.
Check the cabinet diagonally before tightening the joints. Equal diagonal measurements indicate that the frame is square.
Add horizontal supports inside the side walls for the removable trays. Keep the supports level from side to side.
The cabinet should not twist when pushed gently from either direction.
Step 2: Add the Wooden Walls
Cover the back and side walls with exterior plywood.
Leave the front open for either:
- A hinged access door, or
- A removable clear panel
Seal the exterior joints against rain, but do not block the planned air intake or exhaust openings.
Sand all interior edges.
Paint or seal only the exterior unless the interior coating is specifically suitable for the expected heat and incidental food-area use. Keep food on removable food-safe trays rather than directly against wood.
Step 3: Build the Solar Absorber
Cut a thin metal panel slightly smaller than the cabinet floor.
Coat the side facing the sun with a heat-resistant matte-black finish. Allow the finish to cure fully before installing it.
Mount the panel on small spacers so incoming air can travel around or beneath it.
The goal is to create an air-warming channel:
- Cooler air enters at the bottom.
- Sunlight warms the black surface.
- The warmed air rises through the trays.
- Moist air exits near the top.
Do not allow painted metal to touch the food.
A removable absorber is easier to clean and replace.
Step 4: Create the Lower Air Intake
Cut an intake opening across the lower front or bottom of the cabinet.
Cover it with fine insect screen.
The intake should allow substantial airflow while keeping out:
- Flies
- Ants
- Wasps
- Leaves
- Dust
- Small animals
Install a sliding cover or hinged flap so you can adjust the opening.
Do not seal the intake completely while food is drying. Trapped humid air can slow the process even when the cabinet temperature is high.
Step 5: Add the Upper Exhaust
Cut an exhaust opening near the highest point of the cabinet.
Warm air naturally rises, so the exhaust should remain above the top tray.
Cover the opening with insect screen and add an adjustable cover.
For stronger draft, install a short vertical chimney over the exhaust. A dark chimney can warm in sunlight and improve upward air movement.
The exhaust must remain open enough for humid air to escape.
A cabinet with a large collector but inadequate exhaust may steam the food instead of drying it.
Step 6: Install the Clear Panel
Frame the clear panel with wood so it can be opened or removed.
Attach it with hinges along the tall rear edge or one side. Install:
- A handle
- Two latches
- Weather stripping
- A safety support preventing accidental closure
The panel should fit closely enough to direct air through the intended vents, but the dehydrator should not be airtight.
Wear gloves and eye protection when working with glass.
Position the clear panel so rain runs away from the cabinet instead of entering through the upper seam.
Step 7: Build the Drying Trays
Construct identical rectangular frames from 1×2 lumber.
Stretch approved food-contact mesh across each frame and secure it firmly.
The mesh should:
- Remain flat under the food’s weight
- Resist corrosion
- Allow air to pass freely
- Have openings small enough to support sliced food
- Be removable for washing
Add small handles to the tray fronts.
Slide every tray into the empty cabinet and confirm that it can be removed without tilting or spilling food.
Leave several inches between trays. Crowded trays reduce airflow and create uneven drying.
Step 8: Add a Thermometer
Mount a thermometer where it can be read without repeatedly opening the cabinet.
The sensing area should sit near the food rather than directly against:
- The black absorber
- The clear cover
- The cabinet wall
- The exhaust opening
Those areas may be much hotter or cooler than the air around the food.
For better testing, use two thermometers:
- One near the lowest tray
- One near the highest tray
A significant difference indicates uneven airflow.
Commercial food dehydrators are designed to provide regulated heat, ventilation, and relatively uniform temperatures. A homemade solar device must be measured because sunlight and ambient conditions change throughout the day. (Utah State University Extension)
Step 9: Test the Empty Cabinet
Do not begin with food.
Place the empty dehydrator in full sun and record:
- Outdoor temperature
- Lower-tray temperature
- Upper-tray temperature
- Time of day
- Cloud cover
- Wind conditions
- Relative humidity, when available
Check it every 30 minutes for several hours.
Watch for:
- Excessive temperatures
- Poor airflow
- Condensation
- Plastic warping
- Strong paint or adhesive odors
- Hot spots near the glass
- Water entering through joints
- Insects passing through the screens
When the interior smells like paint, glue, sealant, plastic, or heated wood treatment, do not place food inside.
Allow the materials to cure and ventilate completely.
What Temperature Should the Cabinet Reach?
There is no single setting for every food.
Many tested fruit-drying instructions use approximately 130°F to 140°F, while general dehydrator guidance often describes equipment operating near 140°F. Exact preparation and temperature should come from a tested recipe for the food being dried. (Utah State University Extension)
A solar cabinet may exceed those temperatures during intense afternoon sun.
Excessive heat can dry the outside too quickly while trapping moisture inside. This is sometimes called case hardening.
Control excess heat by:
- Opening the intake further
- Opening the exhaust further
- Partially shading the collector
- Increasing the distance between the absorber and trays
- Adding a solar-powered exhaust fan
- Rotating the cabinet slightly away from direct sun
When the temperature is too low, improve:
- Sun exposure
- Collector angle
- Cabinet sealing
- Black absorber area
- Insulation
- Chimney draft
Do not compensate for weak sunlight by closing all vents. Removing humid air is essential.
Preparing Food for Drying
Start clean
Wash your hands with soap and water before handling produce.
Wash whole fruits and vegetables under clean running water. Do not wash produce with soap, household detergent, or unapproved chemical cleaners. Cut away bruised or damaged areas and discard anything rotten. (U.S. Food and Drug Administration)
Clean and sanitize:
- Knives
- Cutting boards
- Bowls
- Trays
- Work surfaces
Keep produce away from raw meat, poultry, seafood, pets, compost, and garden soil after washing.
Slice evenly
Pieces of similar thickness dry at similar rates.
For many fruits, slices approximately one-quarter inch thick provide a useful starting point. However, follow the tested preparation instructions for the specific food.
Uneven slices create a mixture of:
- Pieces that are finished
- Pieces that are still moist
- Pieces that have become overly hard
Pretreat when recommended
Light-colored fruits such as apples, pears, peaches, and apricots may darken after cutting. A tested ascorbic-acid or fruit-juice dip can slow browning and improve quality. Specific pretreatment quantities vary by fruit, so use a research-based recipe rather than guessing. (Utah State University Extension)
Most vegetables require blanching before controlled dehydration. Blanching helps inactivate enzymes, reduce spoilage organisms, preserve color, and allow moisture to escape more readily. Times differ by vegetable. (Utah State University Extension)
Loading the Trays
Arrange the pieces in one layer.
Do not pile or overlap them.
Leave a small space between pieces so air can reach the edges.
Load similar foods together. Avoid combining:
- Strong onions with mild fruit
- Herbs with high-moisture tomatoes
- Thick pieces with very thin slices
- Foods requiring different temperatures
Insert the trays and close the cabinet promptly.
Record:
- Food
- Weight before drying
- Slice thickness
- Start time
- Cabinet temperatures
- Weather
These notes help you improve later batches.
Operating the Solar Dehydrator
Check the unit throughout the day.
A passive solar dehydrator is not a “load it and forget it” appliance.
Every 30 to 60 minutes
Check:
- Cabinet temperature
- Airflow
- Vent openings
- Cloud conditions
- Condensation
- Insects
- Food condition
Rotate the trays when one level appears to be drying faster than another.
Turn larger pieces when necessary.
Do not repeatedly open the cabinet without reason, because each opening releases heat and interrupts airflow. However, a brief inspection is safer than allowing the temperature to become excessive or the food to remain damp.
What to Do at Night
Do not leave partly dried food exposed to cool, humid night air.
Outdoor drying guidance recommends covering or moving fruit under shelter at night because condensation can add moisture back to the food and delay drying. (Home Food Preservation)
Before sunset:
- Remove the trays.
- Cover them against insects and dust.
- Bring them into a clean, dry indoor location.
- Refrigerate the food when the drying process has been interrupted substantially.
- Resume promptly the following day or finish in a controlled dehydrator or oven.
Do not leave warm, partly dried produce sealed inside a humid cabinet overnight.
A project that requires several unpredictable outdoor days may be less reliable than beginning with solar heat and finishing the batch indoors.
What to Do When Clouds Arrive
Move the trays indoors when:
- Rain begins
- Humidity rises sharply
- The cabinet stops warming
- Condensation forms
- Food remains warm and damp for an extended period
- The process cannot be completed before night
Do not wait for the food to develop an odor or visible mold.
An electric dehydrator or properly operated oven can finish the batch under controlled conditions.
How to Tell When Fruit Is Dry
Do not judge fruit while it is still hot.
Remove one piece and allow it to cool to room temperature.
Properly dried fruit is generally:
- Leathery
- Flexible
- Free of visible moisture
- Free of wet pockets when cut
- Not sticky from uncooked interior moisture
When several cooled pieces are squeezed together, they should separate again after pressure is released. Naturally high-sugar fruits may remain slightly sticky. (Utah State University Extension)
When moisture appears after cutting or pressing a cooled piece, return the batch to the dryer.
Do not rely only on drying time. Weather, slice size, fruit variety, tray position, and airflow can change the required time dramatically.
How to Tell When Vegetables Are Dry
Vegetables intended for shelf storage are generally dried much more thoroughly than fruit.
The National Center for Home Food Preservation describes properly dried vegetables as brittle or crisp, with approximately 10 percent moisture remaining. Some pieces may shatter when broken. (Home Food Preservation)
Again, vegetables should be processed with tested preparation and controlled drying guidance rather than depending only on an outdoor solar cabinet.
Conditioning Dried Fruit
Different pieces may contain different amounts of remaining moisture even when they appear finished.
Conditioning helps equalize that moisture.
After the fruit has cooled:
- Pack it loosely into clean glass or plastic containers.
- Fill each container approximately two-thirds full.
- Close the container.
- Keep it at room temperature for 7 to 10 days.
- Shake the container daily.
- Check for condensation.
When condensation appears, return the fruit to the dehydrator for additional drying.
Conditioning reduces the risk that one unusually moist piece will encourage mold after the batch has been packaged. (Home Food Preservation)
Do not condition vegetables in the same manner. Properly dried vegetables should already be brittle and uniformly dry.
Packaging and Storage
Allow dried food to cool completely before packaging.
Warm food placed in a sealed container can produce condensation, creating enough moisture for mold growth. (Home Food Preservation)
Use clean, dry, insect-resistant containers such as:
- Home-canning jars
- Freezer containers with tight lids
- Heavy freezer bags
- Vacuum-sealed bags
Store the packages in a:
- Cool
- Dry
- Dark
- Pest-free location
Smaller packages are preferable because repeatedly opening one large container exposes the entire supply to air and moisture.
Inspect stored food regularly.
When moisture appears inside a container:
- Remove the food.
- Check carefully for mold or spoilage.
- Redry food that remains sound.
- Cool it completely.
- Repackage it in a dry container.
Discard moldy dried food. Do not eat around the affected area. (Home Food Preservation)
Label every package with:
- Food name
- Pretreatment
- Drying date
- Batch number
- Recommended use
Cleaning the Dehydrator
Clean the unit after every batch.
Remove and wash
- Trays
- Food-contact screens
- Crumb catchers
- Removable drip surfaces
Use hot soapy water when appropriate for the tray material, rinse thoroughly, and dry completely.
Wipe the cabinet
Remove:
- Fruit juice
- Seeds
- Skin fragments
- Dust
- Insect debris
- Condensation
Do not soak wooden walls.
Inspect
Check for:
- Mold
- Cracked sealant
- Rust
- Loose screening
- Warped trays
- Insect nests
- Peeling paint
- Splintered wood
- Damaged glass or polycarbonate
Store the dehydrator dry and ventilated.
Do not close and cover it while interior surfaces remain damp.
Common Building and Operating Mistakes
Building a sealed hot box
Heat without air exchange traps moisture.
The cabinet needs both a lower intake and an upper exhaust.
Using unsafe screen material
Galvanized hardware cloth and unidentified window screens may be unsuitable for food contact.
Use a known food-safe tray material. (Home Food Preservation)
Placing food directly on wood
Wood can be difficult to clean and may absorb juice, odors, and moisture.
Use removable washable trays.
Drying thick pieces
The surface may feel dry while moisture remains inside.
Slice food evenly and follow tested instructions.
Loading every tray completely
Overloading blocks airflow.
Begin with a smaller batch and leave space around each piece.
Ignoring temperature
A clear sunny box can become much hotter than expected.
Install and use a thermometer.
Closing the vents to create more heat
This may increase temperature while preventing moisture from escaping.
Heat and airflow must work together.
Mixing foods
Onions, herbs, fruit, and vegetables may require different temperatures and produce different drying times.
Dry one category at a time.
Leaving food outside overnight
Cool night air can return moisture to partially dried food. (Home Food Preservation)
Assuming dry-looking food is shelf-stable
Cool and test representative pieces. Condition fruit and watch for condensation before long-term storage.
Drying meat in an uncontrolled cabinet
A passive solar dryer cannot reliably provide the validated heating and temperature control required for safe jerky production. (Food Safety and Inspection Service)
Optional Improvements
Add an indirect solar collector
Build a shallow insulated box connected to the lower intake.
Cover it with glass or polycarbonate and install a black metal absorber inside. The food cabinet can then remain shaded while receiving warm air from the collector.
This improves protection from direct sunlight.
Add a solar-powered fan
A small photovoltaic panel can power a low-voltage fan whenever sunlight is available.
Position the fan to assist exhaust rather than blowing dust directly onto the food.
The system is no longer completely passive, but it still operates without batteries or grid power.
Add a taller chimney
A vertical dark chimney above the exhaust can improve natural draft.
Add adjustable shade
Mount shade cloth on a simple frame above part of the clear panel.
Move it as needed to control excessive midday temperatures.
Add removable insulation
Insulated side and back panels can reduce heat loss during cool, breezy weather.
Do not insulate over vents.
Add a washable metal interior liner
A removable stainless-steel or suitable food-area liner makes spills easier to clean.
Add a temperature alarm
A probe thermometer with high- and low-temperature alerts can help identify unsuitable conditions before an entire batch is lost.
Is a Solar Food Dehydrator Worth Building?
Yes—when it is treated as a monitored food-preservation tool rather than a magical sun-powered box.
Its advantages are real:
- No grid electricity during operation
- Low ongoing cost
- Larger capacity than many small countertop units
- Protection from many outdoor contaminants
- Useful during a strong harvest
- Valuable hands-on preparedness experience
Its limitations are equally important:
- Weather is unpredictable.
- Humidity can stop effective drying.
- Temperatures may fluctuate widely.
- Some foods are unsuitable.
- Drying may extend beyond daylight hours.
- A homemade cabinet has no certified thermostat.
- Safe storage still requires correct final dryness.
The best approach is to build it before harvest season and test it with a small quantity of inexpensive fruit.
Measure the temperature.
Record drying time.
Inspect the airflow.
Condition the finished batch.
Watch the container for moisture.
Only after that first controlled test should you depend on the unit for a larger harvest.
Final Safety Note
A homemade solar dehydrator does not make every dried food safe.
For the most conservative use, begin with suitable high-acid fruits during hot, dry, breezy weather. Follow research-based preparation and dryness instructions for each food.
Do not use this passive solar cabinet to make jerky or dry meat, poultry, fish, eggs, dairy products, cooked meals, or leftovers.
Vegetables should be processed according to tested guidance in equipment that provides appropriate temperature and airflow control. When solar conditions become inadequate, transfer the food to a controlled dehydrator or oven and complete the process promptly.
Discard any dried food that develops mold, an unusual odor, sliminess, moisture buildup, or signs of insect contamination.