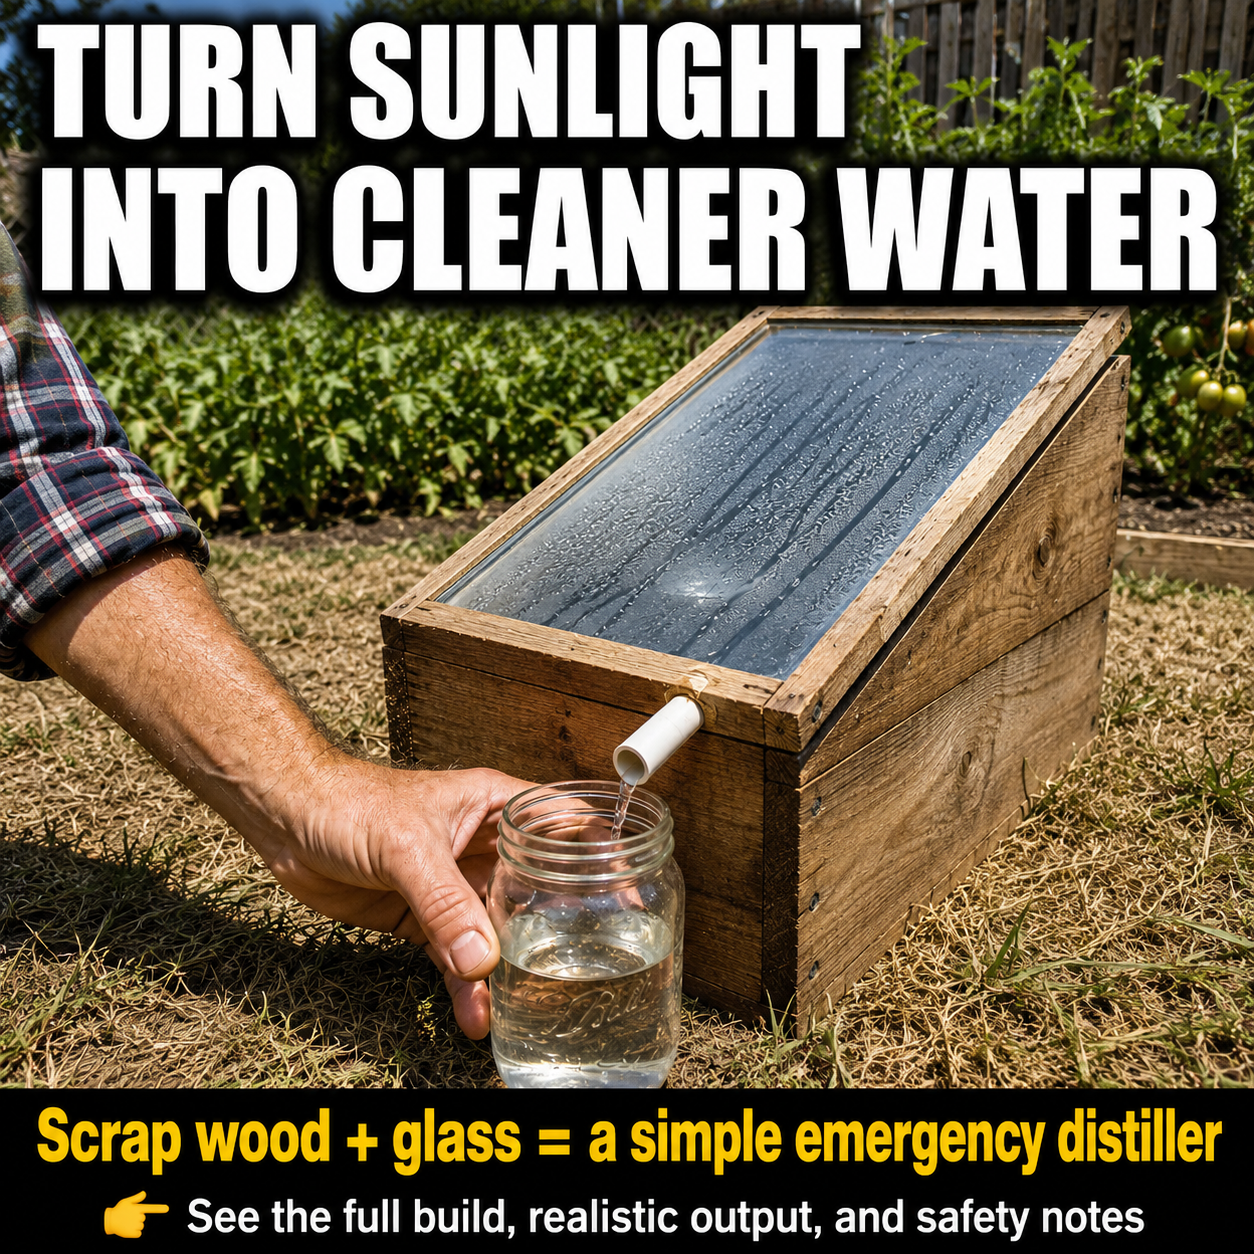
A wooden box, a clear glass panel, and strong sunlight can become a simple emergency water distiller.
This project is called a solar still. It uses heat from the sun to evaporate water, collect the vapor on a sloped glass cover, and guide the condensed droplets into a clean container. It is a low-power, low-cost way to learn emergency water distillation using basic materials.
But before we go further, here is the honest truth: a small backyard solar still will not magically create gallons of water from thin air. It must be supplied with water, and it usually produces only a limited amount per sunny day.
That does not make it useless.
It makes it a practical backup tool for people who understand its limits. A scrap-wood solar still can help with small-scale distillation, desalination practice, off-grid water experiments, and emergency preparedness training. It should not replace stored drinking water, bottled water, proper filtration, or official emergency water guidance.
What Is a Solar Still?
A solar still is a simple device that uses sunlight to separate water vapor from the original water source.
The basic process works like this:
- Water is placed in a shallow dark basin.
- Sunlight passes through a clear cover.
- The dark basin absorbs heat.
- Water slowly evaporates.
- Vapor rises and touches the cooler sloped glass.
- Droplets form on the glass.
- The droplets run into a clean collection channel.
- Distilled water flows through a tube into a clean container.
This process imitates part of the natural water cycle: evaporation, condensation, and collection.
A solar still can leave behind many contaminants that do not evaporate with the water, including salts, minerals, sediment, and many biological contaminants. However, it is not a magic purifier for every possible water source.
Some chemicals can evaporate with water. That means a homemade solar still should never be used with water that may contain gasoline, fuel, solvents, pesticides, industrial runoff, or unknown chemical contamination.
What This Solar Still Is Best For
A homemade solar still is best used as a supplemental emergency water project, not as your main household water plan.
It may be useful for:
- Learning basic water distillation
- Desalinating small amounts of saltwater
- Processing limited non-chemical contaminated water
- Producing small backup water amounts in sunny weather
- Practicing off-grid water skills
- Understanding evaporation and condensation
- Testing emergency preparedness ideas before a crisis
It is not ideal when:
- You need large amounts of water quickly
- The weather is cloudy or cold
- The water may contain fuel or solvents
- You do not have clean collection containers
- Safe bottled water is available
- Someone has an urgent medical need for reliable drinking water
A solar still is useful, but it should be one layer in a larger water plan.
Important Water Safety Warning
Distillation can remove many contaminants, but a homemade solar still is not a certified drinking-water appliance.
Water safety depends on:
- The original water source
- Construction materials
- Cleanliness of the basin and tubing
- Whether volatile chemicals are present
- Whether untreated water splashes into the collection channel
- Whether the collection container is clean
- How the water is stored after collection
Never assume clear water is safe just because it looks clean. If reliable drinking water is available, use that first.
Do not use this still for water suspected of containing:
- Gasoline
- Diesel fuel
- Paint thinner
- Solvents
- Industrial discharge
- Pesticide concentrate
- Chemical spill runoff
- Oily residue
- Mining waste
- Toxic algae
- Unknown contamination
During an official emergency, follow local health department or emergency management guidance for safe drinking water.
Materials You Will Need
The exact size can be adjusted depending on your scrap wood and glass panel, but this build works best as a shallow, sloped wooden box with a removable basin and clear cover.
Wooden Enclosure
- Exterior-grade plywood
- Scrap 1×2 or 2×2 lumber for framing
- Exterior wood screws
- Waterproof wood glue
- Exterior sealant or weather-resistant paint
- Hinges for the glass frame
- Weather stripping
Clear Cover
- Tempered glass or reclaimed glass window panel
- Wood strips for framing the glass
- Heat-resistant silicone sealant
Tempered glass is preferred because it is stronger and safer than fragile thin glass. Do not use cracked, badly scratched, coated, or unknown contaminated glass.
Water Basin
- Shallow stainless-steel basin or food-grade dark basin
- Removable tray or pan
- Food-safe dark surface if needed
A removable basin is easier to clean than painting the inside of the entire wooden box.
Collection System
- Narrow stainless-steel or food-safe plastic channel
- Food-grade silicone tubing
- Small bulkhead fitting or outlet fitting
- Clean glass jar or food-grade collection container
Insulation and Sealing
- Rigid insulation board, optional
- Weather stripping
- Heat-resistant silicone
- Foil-faced insulation, optional
Avoid pressure-treated wood, roofing tar, unknown adhesives, ordinary interior paint, or any material that may release fumes inside the heated chamber.
Basic Tools
- Tape measure
- Pencil
- Saw
- Drill
- Screwdriver
- Clamps
- Utility knife
- Level
- Caulking gun
- Safety glasses
- Work gloves
Suggested Dimensions
A manageable backyard model can use a basin around:
- 24 inches wide
- 36 inches long
- 3 to 5 inches deep
Build the rear wall taller than the front wall so the glass slopes downward toward the collection channel.
A practical layout:
- Rear wall: about 18 inches high
- Front wall: about 8 inches high
- Basin depth during use: about 1/2 inch to 1 inch of water
The exact angle is less important than making sure condensed droplets run down the glass into the collection channel instead of falling back into the dirty-water basin.
Step 1: Build the Wooden Box
Cut the plywood into five main pieces:
- Bottom panel
- Front wall
- Tall rear wall
- Left triangular side
- Right triangular side
Attach the front and rear walls to the bottom panel with waterproof glue and exterior screws. Then install the triangular side walls.
Add reinforcing strips along the inside corners if needed, but keep untreated wood away from direct contact with source water whenever possible.
The box must be sturdy enough to support the glass cover without flexing.
Before moving forward, set the box on a flat surface and make sure it does not rock.
Step 2: Seal and Insulate the Enclosure
Seal the exterior joints with weather-resistant sealant. This helps reduce air leaks and protects the wood from moisture.
Add insulation beneath the basin and along the side walls if desired. Insulation helps reduce heat loss so more solar energy warms the water.
Any insulation facing the interior should be covered with a stable, heat-resistant barrier so loose material cannot fall into the basin.
Do not permanently seal the glass in place. You need access for cleaning, adjustment, and inspection.
Step 3: Install the Dark Basin
Place the shallow basin near the bottom of the enclosure.
The basin should be:
- Level
- Removable
- Leak-free
- Corrosion-resistant
- Easy to clean
- Dark enough to absorb heat
- Lower than the collection channel
Keep the water shallow during use. A shallow water layer heats faster than a deep basin. Start with about 1/2 inch to 1 inch of source water while testing.
Do not overfill the basin. Source water must never splash or spill into the clean-water collection channel.
Step 4: Build the Condensation Channel
Install a narrow channel along the lowest interior edge of the sloped glass. This channel catches droplets that run down the glass.
The channel should tilt slightly toward the outlet fitting. Even a small slope helps prevent water from pooling.
Connect the outlet to food-grade tubing and route the tube through the front wall.
Seal carefully around the outlet so humid air does not escape and insects cannot enter.
This part is extremely important: the collection channel must stay physically separate from the source-water basin. Even one splash of untreated water can recontaminate the collected distillate.
Step 5: Frame the Glass
Build a wooden frame around the glass panel. Attach the frame to the rear of the box with hinges so it can open for cleaning.
Add a handle and secure latches along the front. Apply compressible weather stripping around the top edge of the box so the glass closes firmly.
When closed, the glass should create a reasonably sealed chamber while still remaining removable for maintenance.
Use heat-resistant silicone where needed, and allow all adhesives and sealants to cure fully before operating the still.
Step 6: Test the Collection Path
Before using questionable water, test the collection system with clean tap water.
Pour a small amount of clean water onto the inside surface of the glass and watch whether it:
- Runs down the glass
- Enters the collection channel
- Moves toward the outlet
- Flows through the tubing
- Reaches the collection jar without leaking
Fix any low spots where water gets trapped. Then rinse the basin, channel, tubing, and collection container.
Testing with clean water first helps you find mistakes before you rely on the still.
Step 7: Position the Solar Still
Place the finished solar still in a location that receives direct sunlight for most of the day.
Avoid shade from:
- Trees
- Fences
- Buildings
- Vehicles
- Rooflines
- Garden structures
The glass should face the strongest available sunlight. The still should sit on stable ground or a sturdy stand.
Secure it against wind, pets, children, and accidental impact. Do not place it where falling branches, lawn equipment, or reflected glare could create hazards.
Step 8: Add the Source Water
Pour source water into the basin carefully. Do not wet the collection channel.
Close and latch the glass cover.
As the interior warms, moisture should begin appearing on the underside of the glass. Small droplets will gradually combine, run down the slope, enter the collection channel, and flow through the tubing into the collection jar.
Production often begins slowly because the basin, water, air, and enclosure must warm up first.
Check the outlet tubing occasionally to make sure it is not blocked.
How Much Water Can It Produce?
This is where many viral claims become misleading.
A compact solar still usually produces water slowly. A small 24-by-36-inch basin may produce only a limited amount on a good sunny day. Output depends on sunlight, basin area, water depth, air leaks, insulation, temperature, humidity, glass cleanliness, and collection angle.
A realistic expectation for a compact homemade still is often measured in cups or small bottles per day, not multiple gallons.
Production improves with:
- Strong direct sunlight
- Larger basin area
- Dark heat-absorbing basin
- Shallow water depth
- Good insulation
- Clean glass
- Tight construction
- Effective condensation drainage
- Minimal shade
- Proper glass slope
Production decreases with:
- Clouds
- Short winter days
- Deep basin water
- Dirty glass
- Air leaks
- Poor insulation
- Frequent opening
- Wrong channel angle
- Condensate falling back into the basin
- Shade during peak sun
This is a backup tool, not a whole-house water system.
Preventing Recontamination
Producing distilled water is only half the process. The collected water can become contaminated again if the tube, jar, lid, or hands are dirty.
Use a collection container that is:
- Food-grade
- Cleaned thoroughly
- Covered
- Reserved for treated water
- Protected from insects and dust
Do not allow the end of the tube to sit under the collected water in the jar. Wash your hands before handling clean-water parts.
If the collected water touches dirty surfaces, it is no longer clean.
Cleaning and Maintenance
Drain the untreated basin after each operating cycle. Do not keep adding new water to concentrated residue.
As water evaporates, salts, minerals, sediment, and other nonvolatile substances remain behind. If you keep topping off the basin without cleaning it, the residue becomes more concentrated.
After each use:
- Empty the basin.
- Remove sediment.
- Wash the basin with clean water.
- Clean the condensation channel.
- Flush the outlet tube.
- Wash the collection container.
- Inspect the glass and seals.
- Allow components to dry.
Also inspect the wooden box for cracks, mold, swelling, loose screws, failed sealant, insect damage, or warping.
Replace damaged tubing or contaminated collection parts instead of trying to save them.
Common Building Mistakes
Using Unsafe Materials
Do not use pressure-treated wood, unknown recycled plastic, ordinary paint, roofing adhesive, tar, or questionable sealants inside the heated chamber.
Making the Basin Too Deep
A deep basin takes longer to heat and may reduce daily output.
Letting Dirty Water Reach the Channel
The collection channel must remain above the maximum source-water level.
Installing Nearly Flat Glass
Condensed water needs slope so it can run into the channel.
Leaving Air Leaks
Air leaks allow warm, humid air to escape before it condenses.
Expecting Household-Scale Output
A compact solar still produces limited water. It should not replace stored emergency water.
Using Chemically Contaminated Water
Distillation is not a universal solution for unknown chemical contamination.
Ignoring Storage Hygiene
Clean distillate can be contaminated by a dirty jar, tube, lid, or hand.
Is This Project Worth Building?
Yes, if you understand what it is for.
A scrap-wood solar still is valuable as:
- A preparedness experiment
- A small emergency backup tool
- A desalination practice project
- A water-cycle demonstration
- A foundation for larger solar-distillation systems
- A way to learn what your own setup can actually produce
Its greatest value may not be the amount of water it produces. Its greatest value may be teaching you how evaporation, condensation, heat capture, clean materials, and safe storage work together.
Build it before an emergency. Measure the output. Test it in different weather. Learn where it leaks. Improve the design while safe water is still available.
Do not depend on viral production claims. Depend on results you have tested yourself.
Final Safety Note
This project is for general preparedness education. A homemade solar still is not guaranteed to make every water source safe.
Never process water contaminated by fuel, solvents, pesticides, industrial chemicals, toxic algae, or unknown spills. Follow local public-health instructions during a water emergency, and use bottled or officially approved water whenever available.
Final Thoughts
A scrap-wood solar still is a smart project for anyone interested in emergency water skills, off-grid systems, and practical preparedness. It uses simple materials and sunlight to demonstrate one of the oldest water-treatment principles: evaporation and condensation.
The build is straightforward: make a sloped wooden box, install a shallow dark basin, add a clean collection channel, seal the glass cover, test the flow path, place it in strong sun, and collect the condensed water safely.
Just remember the limits. It produces slowly, depends on weather, and should not be used with chemically contaminated water. Treat it as one backup tool in a broader water plan—not your only source.
Preparedness is strongest when your tools are tested before you need them.
Frequently Asked Questions
Can a solar still make water from thin air?
Not in any useful amount. A standard solar still needs water placed in the basin. It evaporates and condenses that water; it is not an atmospheric water generator.
How much water can a homemade solar still produce?
Output varies widely. A compact backyard still may produce only a small amount per sunny day. Sunlight, basin size, water depth, insulation, leaks, and glass angle all matter.
Can it desalinate saltwater?
Yes, solar distillation can separate water vapor from salt, but output is slow. Clean the basin regularly because salt remains behind.
Is distilled water from a homemade still safe to drink?
It depends on the source water, materials, cleanliness, and storage. A homemade still is not a certified purifier. Avoid chemically contaminated water and follow local emergency guidance.
Can I use dirty pond water?
Only with caution. Distillation can leave many biological contaminants behind, but chemical contamination, algae toxins, splashing, and dirty collection parts can still create risk.
Can I use plastic instead of glass?
Glass usually stays clearer and resists heat better. Some plastics may warp, scratch, or release unwanted chemicals when heated.
Why does the basin need to be shallow?
Shallow water heats faster. Deep water takes more solar energy to warm and may reduce daily output.
Do I need to clean it after every use?
Yes. Empty the untreated basin, remove residue, clean the channel and tubing, and keep the collection container sanitary.